CLOUD BREAD *GLUTEN FREE & KETO FRIENDLY*

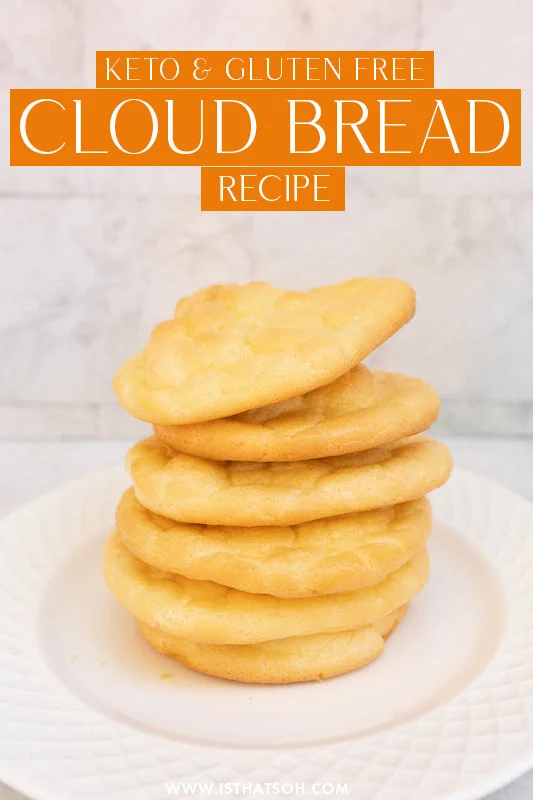
I know what you are thinking… Cloud bread? What is cloud bread? Well, it is a super fluffy, soft, delicious bread made from three ingredients! I first came across a cloud bread recipe while on TikTok and the fluffiness and name instantly caught my eye. Not only is it super easy and quick to make but keto-friendly, gluten-free, and so versatile - you can use it as a base for a pizza, or for your eggs at breakfast, etc. Best of all, it’s so delicious and I know you are going to love it just as much as I do! If you are wondering how to make cloud break and want an easy cloud bread recipe that is keto-friendly, check mine out below!

Enjoy!

CLOUD BREAD INGREDIENTS:

Makes 6-8 Pieces

3 Eggs - room temperature
3 TBSP of Cream Cheese - room temperature
1/4 TSP of Cream of Tartar


CHECK OUT THESE OTHER EASY KETO RECIPES


HOW TO MAKE CLOUD BREAD - DIRECTIONS:

Preheat oven to 300 and line a baking sheet with parchment paper.

In two medium-size bowl, separate the eggs, putting the yolk in one bowl and the whites in another.

Using a hand mixer, beat the egg whites on a low-medium speed until bubbles start to form before adding in the cream of tartar. When ready, turn the speed up to high on the hand mixer and continuing to whip egg whites until stiff peaks start to form.

Next, in the bowl with the yolks, add in the cream cheese and beat until blended and smooth.

Next, fold the bowl with your egg whites into the bowl with the yolks and cream cheese. Try not to over mix because you will deflate your cloud bread.

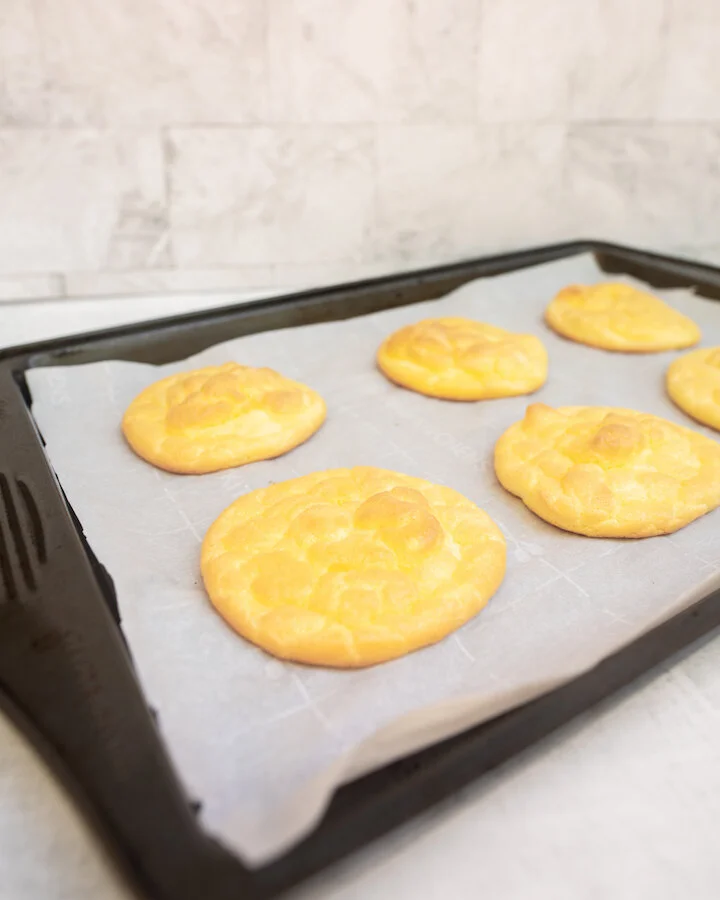
When ready, scoop a dollop of the batter using a large spoon onto your baking sheet and bake for 20-30 until medium golden brown.


FOLLOW ME ON INSTAGRAM @ISTHATSOH

Gallery Block
This is an example. To display your Instagram posts, double-click here to add an account or select an existing connected account. Learn more

I hope you enjoyed this TikTok cloud bread recipe as much as I do. If you have any comments please leave them below and I'll be happy to answer them as soon as I can! Happy cooking!!!


PIN THIS POST

CAULIFLOWER HASH BROWN EGG BITES

Always on the look out for a keto friendly recipe, these cauliflower hash brown egg bites are the perfect addition to your weekly breakfast line up. If you are looking for something to batch make that is not only low carb but also gluten free, you have to try this recipe. Not only are they delicious but you can add a variety of toppings to them like smoke salmon and chives or ham and tomato. Plus, they are packed full of protein so you can feel good about starting your day off on the right foot. Enjoy!

INGREDIENTS:

Makes 9 Cups

500 Grams of Frozen Riced Cauliflower - defrosted
1 Large Egg - whisked
1/2 CUP of Cheddar Cheese
1/2 Cup of Parmesan
1 TSP of Salt
1/2 TSP of Garlic Powder
Pepper to Taste
9 Eggs

Additional Toppings - Optional
Chili Pepper Flakes
Green Onion
Chives

DIRECTIONS:

Preheat oven to 350 and butter your muffin tray really well! If you don’t it will be hard to remove the cauliflower cups later.

In a large bowl, microwave your cauliflower for 8 minutes. Remove and let rest of 5 minutes before putting it a cheesecloth or tea towel to squeeze out as much liquid as possible. There is a lot of excess water in cauliflower so you will need to squeeze it really hard!

Next, in a large bowl, add in your whisked egg, cauliflower, cheddar cheese, parmesan, salt, and garlic powder and mix well using your hands.

Take your cauliflower mixture and press it into your muffin tray to form your ‘cups’.

When ready, place muffin tray in the oven and bake for 15-20 until the cups are golden and edges are brown.

Remove from oven, add in one egg to each cup, sprinkle salt and pepper to taste on top before placing back into the oven for another 10-15 minutes or until whites are set.

When done, remove from oven and allow egg bites to sit for 5 minutes before taking a knife and sliding it around the edge of each muffin mold to help remove the egg bites from the tray.

Add your desired garnishes and serve.

Enjoy!


I hope you enjoyed this recipe as much as I do. If you have any comments please leave them below and I'll be happy to answer them as soon as I can! Happy cooking!!!


PIN THIS POST

CHOCOLATE ZUCCHINI BREAD

If you are trying to sneak more veggies into your diet, I highly recommend giving this zucchini bread a go. If you are looking to be a little healthier feel free to omit the chocolate, it still tastes great without it. Not only is this recipe nutritious but the bread is also so moist but it freezes well. My boyfriend and I love to enjoy a slice with some earl grey tea as the combo is simply divine.

Enjoy!

INGREDIENTS:

Makes 1 Loaf of Chocolate Zucchini Bread

Unsalted Butter - for greasing the loaf pan
4 OZ Bittersweet Chocolate - Chopped
1 CUP of All-Purpose Flour
1/2 CUP of Whole Wheat Flour
1/3 CUP Instant Oats
1 TSP of Baking Soda
1/2 CUP of Unsalted Butter
1/2 CUP of Sugar
2 Eggs
2 TBSP of Plain Yogurt
1 TSP of Vanilla
1/2 a TSP of Lemon Zest
2 CUPS of Zucchini - Shredded

You will also need:
Loaf Pan
Parchment Paper

DIRECTIONS:

Preheat oven to 350 degrees

Greece loaf pan and line with a piece of parchment paper.

Melt your chocolate on medium-low heat in a small saucepan on the stove.

In a bowl, combine flour (both - all-purpose and whole wheat), oats, and baking soda. Give it a whisk until well incorporated.

In a separate large bowl, combine sugar and butter and using a hand mixer, cream together until light and fluffy.

Next add eggs, yogurt, vanilla, lemon rind, and melted chocolate to your sugar and butter bowl, and beat until well incorporated.

Next, stir in your shredded zucchini before adding the flour mixture in a cup at a time and beating until nicely mixed. Make sure to scrape the sides and get all the flour built up there.

Lastly, spread your batter in the loaf pan and bake for 45 minutes or until a toothpick comes out clean.

Allow the zucchini loaf to cool in the pan for 20 minutes before removing it and letting it continue to cool on a cooling rack.

Enjoy!


I hope you enjoyed this recipe as much as I do. If you have any comments please leave them below and I'll be happy to answer them as soon as I can! Happy baking!!!


PIN THIS POST

ELOTE - MEXICAN STREET CORN

Elote or Mexican street corn is one of my favorite appetizers!! Whenever I go out for tacos I always have to order the Mexican street corn otherwise the dining experience isn't complete! The thing you might not realize is that it is so simple to make and you can do it so easily right at home. I made mine on the bbq this past week which I think was even better than boiling it because when you boil it you dilute the sugars in the kernels whereas if you bbq it, they get sealed in and the corn tastes extra sweet! Give it a go, you’ll be surprised just how delicious and easy it is to make.

INGREDIENTS:

Sweet Corn - Two per person is my usual estimate
Butchers Twine
2 TBSP of Vegetable Oil
Cream Fresh
Chipotle Chilli Seasoning Spice
Feta Cheese, Cotija Cheese or Queso Fresco
Lime Wedges - optional

DIRECTIONS:

Peel back the husk of corn and tie back with a piece of butchers twine

Coat corn in a light layer of oil and place on the bbq, turning frequently so that it becomes only slightly charred

When the corn is ready, drizzle with creme fresh, sprinkle with chipotle seasoning and garnish with cheese.

Serve warm with a slice of lime.

Enjoy!


I hope you enjoyed this recipe as much as I do. If you have any comments please leave them below and I'll be happy to answer them as soon as I can! Happy cooking!!!


PIN THIS POST

KOREAN PICKLED RADISH RECIPE

I am sure by now you can tell that I have recently developed a slight obsession with Korean food. Now having been introduced to Yangnyeom chicken by my boyfriend’s brother’s Korean girlfriend and already having a previous love for Bibimbap, I now wanted to start sharing recipes for some little side dishes that you often see being served with Korean food like this one, a simple Korean pickled radish dish. Unlike regular radish, Korean radish is massive in size and white on the outside as well as the inside. Usually served pickled along with other small side dishes, I find Korean pickled radish to be refreshing, almost like a palette cleanser that goes well with spicy dishes. Pickled korean radish can also be stored easily in the fridge for up to two weeks and made in batches which makes it easy to pull out during mealtime. We recently made Korean pickled radish to go with our Yangnyeom chicken dinner the other week and it was the best compliment for the dish! I think you will feel the same way also! Hope you like it!


INGREDIENTS:

- Pickled Korean Radish -

1 lbs of Korean Radish, peeled and cubbed
1/3 CUP of Sugar
1/3 CUP & 1 TBSP of White Vinegar
3/4 CUP of Water
1 TSP of Kosher Salt


CHECK OUT THESE OTHER ASIAN INSPIRED RECIPES!


DIRECTIONS:

Combine sugar, vinegar, salt, and water in a large glass pickling jar and give it a stir so that it can mix well.

Next, add in your cubed radish, seal with a lid, and place in the fridge.

Allow to ‘pickle’ for a minimum of 2 hours before serving.

Korean pickled radish can be stored in the fridge for up to two weeks.

P.S. This recipe is usually served and pairs really well with Korean Fried Chicken (pictured below).


FOLLOW ME ON INSTAGRAM @ISTHATSOH

Gallery Block
This is an example. To display your Instagram posts, double-click here to add an account or select an existing connected account. Learn more

I hope you enjoyed this pickled Korean radish recipe as much as I do. If you have any comments please leave them below and I'll be happy to answer them as soon as I can! Happy cooking!!!


PIN THIS POST