PENNE ALLA VODKA - AN AUTHENTIC VODKA SAUCE RECIPE

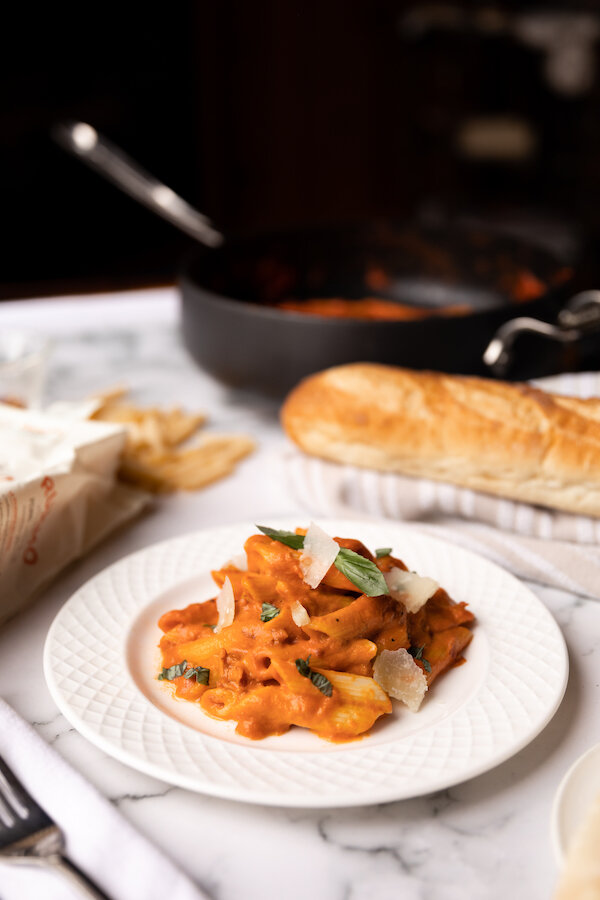
This authentic vodka sauce recipe is one of my all-time favorite pasta dishes and one of my most frequently asked for. People just love it, especially in the winter when the warmth and spiciness of this dish balance out the weather outside. Jam-packed full of carbs and comfort this dish definitely gives you the energy your body needs to stay warm all year round. All that aside though, it is a classic Italian vodka sauce recipe you can easily tweak to your desired spice level! First time cooking with vodka? Don’t worry, all alcohol in the vodka does evaporate during the cooking process while the vodka helps detach all the juicy pork flavor from the bottom of the skillet to ensure the most flavorful sauce you can possibly get! Enjoy!

INGREDIENTS:

SERVES 4-5
10 Min Prep, 50 min Cooking Time

1 Pack of Penne Pasta (Usually feeds 4-5)
1-1.5 650ml Bottles of Tomato Sauce (basic Pomodoro or tomato & basil)
1 TBSP of Butter (Salted
1 Cup of Vodka
200-300grams Of Pancetta or Black Forest Ham (chopped finely - almost minced)
1 TSP of Chili Flakes (optional)
1 Medium box of 35% Whipping cream
Parmesan Cheese (1 Cup Shaved and 1 Cup for garnish)
Salt and Pepper to Taste
Baguette (optional)


HERE ARE SOME OTHER PASTA RECIPES YOU MAY ALSO ENJOY!


DIRECTIONS:

Melt the butter down in a deep skillet on medium heat. Once the butter is melted and hot add in the chunks of pancetta or minced ham, tossing it in the butter and allowing it to cook until it becomes crispy.

Once the pancetta or ham is crispy add in your cup of vodka. It will create some more heat and steam but don't worry all the alcohol will burn out. This helps all the flavor from the ham that stuck to the bottom of the skillet to be transferred back into the flavors of the sauce later. Scrape the bottom of the skillet with a wooden spoon to help them along. Let this cook down until there is only a little bit of moisture left. Take your time.

Next, add in the tomato sauce (whether homemade or bought from the store you want the most basic Pomodoro kind). This will add in a lot of liquid to your sauce so make sure you boil this down as well so that a lot of the water evaporates and you are left with a nice thick sauce. About 20-30 minutes.

If you want your sauce to be a little bit spicy add in your chili peppers now and let them cook into your sauce. Sprinkle and stir. You can also add in some Salt and Pepper now to your taste.

Next, add in your cream. First, about a 1/2 cup stirring the whole time than a 1/4 cup until you get the perfect red/orange color. You can taste it as you go to see if you want more cream. To help thicken the sauce up shave about a cup of parmesan down and add it into the sauce, stir it in. Let the water cook out of this while you start cooking the penne pasta in a pot. Some people also like to use a hand blender and blend the sauce at this point so that the small bits of pancetta/ham become undetectable and the sauce is extra smooth in texture.

Boil water for the pasta adding about 1-1.5 TBSP of salt to the water once it boils. Add in pasta and let it cook till it is al dente.

Now you should be ready to serve the sauce with the pasta. You can either mix it together or spoon some sauce on top of a plate of pasta. Garnish with more parmesan cheese and a slice of baguette.


FOLLOW ME ON INSTAGRAM @ISTHATSOH


I hope you enjoy this authentic penne alla vodka sauce recipe as much as I do! Please let me know your thoughts and comments below I’d love to hear from you! Happy cooking :)


PIN THIS POST

CHOCOLATE COVERED CHRISTMAS WAFER RODS

This chocolate covered Christmas wafer rod recipe is so easy to do and makes for a fun DIY you can get your nieces and nephews involved in. Plus, they are super festive and another great way to dress up the dessert table or package and added to your Christmas gifts as a personalized decoration!

Enjoy!

INGREDIENTS:


1 Can of Pirouline Wafer Rods
1 Bag of Pure White Chocolate Chips
1 Bag of Milk Chocolate Chips

- Toppings -
Sprinkles
Candy Cane - crushed
Cookie Icing

- Tools -

Wax Paper
2 Small Sauce Pans for Melting Chocolate
Piping Bag for Icing


CHECK OUT THESE OTHER FESTIVE RECIPES


DIRECTIONS:

Prepare a banking sheet by lining it with wax paper.

In a bowl, place one bag of chocolate chips and slowly melt using a double boiling method, stirring every once and a while until completely melted.

Dip wafers into chocolate or use a spoon to pour chocolate over 2/3rds of the wafer and gently shake off excess before placing on the wax paper to cool.

Immediately after, coat in sprinkles or crushed candy cane so they adhere to the chocolate-covered wafers.

If you are going to dress a few rods with cookie icing, first allow them to cool completely before adding icing and moving them to a new clean baking sheet with a new sheet of wax paper to dry.

Make sure all rods are dry before removing from the wax paper before packaging or displaying, or store in an airtight container at room temperature.


FOLLOW ME ON INSTAGRAM @ISTHATSOH


I hope you enjoyed this recipe as much as I do. If you have any comments please leave them below and I'll be happy to answer them as soon as I can! Happy cooking!!!


PIN THIS POST

CHOCOLATE ZUCCHINI BREAD

If you are trying to sneak more veggies into your diet, I highly recommend giving this zucchini bread a go. If you are looking to be a little healthier feel free to omit the chocolate, it still tastes great without it. Not only is this recipe nutritious but the bread is also so moist but it freezes well. My boyfriend and I love to enjoy a slice with some earl grey tea as the combo is simply divine.

Enjoy!

INGREDIENTS:

Makes 1 Loaf of Chocolate Zucchini Bread

Unsalted Butter - for greasing the loaf pan
4 OZ Bittersweet Chocolate - Chopped
1 CUP of All-Purpose Flour
1/2 CUP of Whole Wheat Flour
1/3 CUP Instant Oats
1 TSP of Baking Soda
1/2 CUP of Unsalted Butter
1/2 CUP of Sugar
2 Eggs
2 TBSP of Plain Yogurt
1 TSP of Vanilla
1/2 a TSP of Lemon Zest
2 CUPS of Zucchini - Shredded

You will also need:
Loaf Pan
Parchment Paper

DIRECTIONS:

Preheat oven to 350 degrees

Greece loaf pan and line with a piece of parchment paper.

Melt your chocolate on medium-low heat in a small saucepan on the stove.

In a bowl, combine flour (both - all-purpose and whole wheat), oats, and baking soda. Give it a whisk until well incorporated.

In a separate large bowl, combine sugar and butter and using a hand mixer, cream together until light and fluffy.

Next add eggs, yogurt, vanilla, lemon rind, and melted chocolate to your sugar and butter bowl, and beat until well incorporated.

Next, stir in your shredded zucchini before adding the flour mixture in a cup at a time and beating until nicely mixed. Make sure to scrape the sides and get all the flour built up there.

Lastly, spread your batter in the loaf pan and bake for 45 minutes or until a toothpick comes out clean.

Allow the zucchini loaf to cool in the pan for 20 minutes before removing it and letting it continue to cool on a cooling rack.

Enjoy!


I hope you enjoyed this recipe as much as I do. If you have any comments please leave them below and I'll be happy to answer them as soon as I can! Happy baking!!!


PIN THIS POST

CAULIFLOWER EGG FRIED RICE (LOW CARB & KETO)

Always on the lookout for a low carb option to make with my next meal, this cauliflower egg fried rice is my new favorite recipe. It’s so easy to make, is great for batch meal planning, and only takes a few minutes to prepare. If you are looking for a tasty low carb, keto, gluten-free recipe that is packed full of flavor and taste just like the traditional egg fried rice, you got to try this recipe!

Enjoy!

INGREDIENTS:

- Makes 4 Servings -

2 TBSP of Vegetable Oil
3 Scallions - Chopped
4 Garlic Cloves - Minced
1'“ of Fresh Ginger - Minced
1 CUP of Frozen Peas
1 500 gram Pack of Frozen Cauliflower Rice
4 TBSP Low Sodium Soya Sauce
2 TBSP Sesame Oil
3 Eggs - lightly beaten
Salt and Pepper to Taste

DIRECTIONS:

Heat up vegetable oil in a large skillet on high. When hot, throw in your chopped scallions and minced garlic and ginger. Allow to cook for 3-4 minutes before adding in your frozen peas.

When peas begin to turn bright green (about 4-5 minutes) add in your frozen cauliflower rice and mi thoroughly until well incorporated and there are no big chunks. Allow water to evaporate by continuing to cook for 5-7 minutes.

Next, add in your soya sauce and sesame oil, Mix until all the rice is coated before pushing the rice to one side fo the skillet.

On the empty side oft he skillet, add in your egg. Salt and pepper to taste. Fry it up, scrambling as it goes. Once cooked mix in with the rice and remove from heat.

Enjoy!


If you like this recipe or have any comments/questions, feel free to leave them in the comment section below!


PIN THIS POST

HEALTHY GRAB AND GO BREAKFAST EGG MUFFINS 2 WAYS - LOW CARB & VEGETARIAN OPTION

As someone who thrives on being a busy body, I often forget to eat or worse, go after items high in carbs and sugar as a way to sustain my energy and curb my cravings. Knowing this, I decided to make some delicious, healthy, grab and go egg bites that I can batch make and store in the fridge for easy access throughout the week. This has totally helped me choose better snacking foods and its super easy to just warm up quickly in the microwave before I head out the door. I love them in the morning or after a workout and they are packed full of protein and veggies so you can have two or three completely guilt free!

Hope you like them!

INGREDIENTS:

- Makes 12 Servings -

Butter to Greece Baking Sheet
!2 Large Eggs
1 Small Sweet Onion - chopped roughly
Salt and Pepper To Taste

- For 6 Muffins Italian Style -
1/4 Cup of Freshly Grated Mozerella
5-6 Cherry Tomatoes, Sliced
3-4 Strips of Prosciutto

- For 6 Muffins Greek Vegetarian Style -
1/4 Cup of Grated Halloumi
1/4 Cup of Crumbled Feta Cheese
A handful of Freshly Washed Spinach

DIRECTIONS:

Preheat oven to 350.

Greece baking tray wel.

Mix eggs, onion, salt and pepper in a large bowl and whip together.

Pour mixture into baking tray till each muffin cup is 1/2 way full.

Add in ingredients for both the Italian and Greek style.

Bake for 25-30 minutes until the tops brown slightly.

Remove and let sit for 10 minutes before trying to remove them from the tray.

Enjoy!

P.s You can store these eggs muffins in the fridge for 3-4 days in a ziplock bag or sealed container and warm up in the microwave for an easy grab and go snack!!


If you like this recipe or have any comments/questions, feel free to leave them in the comment section below!


PIN THIS POST