HOMEMADE FORTUNE COOKIES

Thinking of making a customizable treat for someone in your life? Perhaps Valentine’s Day is coming up, maybe you want to cheer a friend up or you need the perfect gift for your anniversary. Look no further than this easy to personalize fortune cookies recipe! Not only can you leave super cute handwritten notes for someone inside or notes of encouragement but the cookies themselves are pretty addictive! When creating my fortune cookies I noticed that it is important to work quick which is why I recommend making your notes or messages ahead of time and having them already prepared. Additionally, when creating customized fortune cookies, you want to make sure you don’t make the batter too thick so that they dont turn into mini pancakes. Instead, spoon out as much as you need and spread it out in a circular motion so you can almost see the parchment paper underneath. Lastly, I would also recommend creating only making two fortune cookies at a time as you need to work fast and it can get harder the more you make at one time. Enjoy!

* Please Note - Some links in this post may be affiliate links *

INGREDIENTS:

Makes about 20 Fortune Cookies


4 Egg Whites
1 Cup of Flour
1 Cup of Sugar
4 TBSP of Water
2TSP of Almond Extract

You will also need:
Hand Mixer
Whisk
Medium Size Bowl
Baking Tray
Parchment Paper
Muffin Tray


CHECK OUT THESE OTHER GREAT RECIPE GIFT IDEAS!


DIRECTIONS:

Write out your ‘fortunes’ on strips of paper 4.5-5 inches in length.

Preheat oven to 400 degrees.

In a medium size bowl, beat egg whites with a hand mixer until stiff peaks form .

Add in your flour, sugar and almond extract, and mix with a whisk until it turns into a paste.

Add in your water and continue to combine with a whisk.

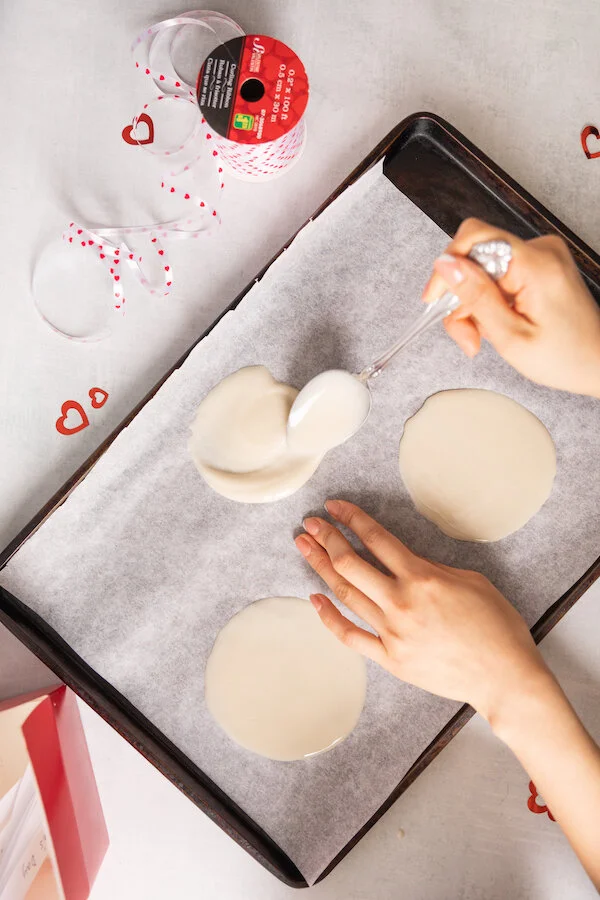
Line a baking tray with parchment paper and make circles with the mixture about 4.5 inches in diameter. You don’t want to do more than three at a time (I found my sweet spot to be 2) and don’t make them too thick or else they will come out like pancakes. So make sure they are thin!

Bake for 4 minutes or until edges brown slightly.

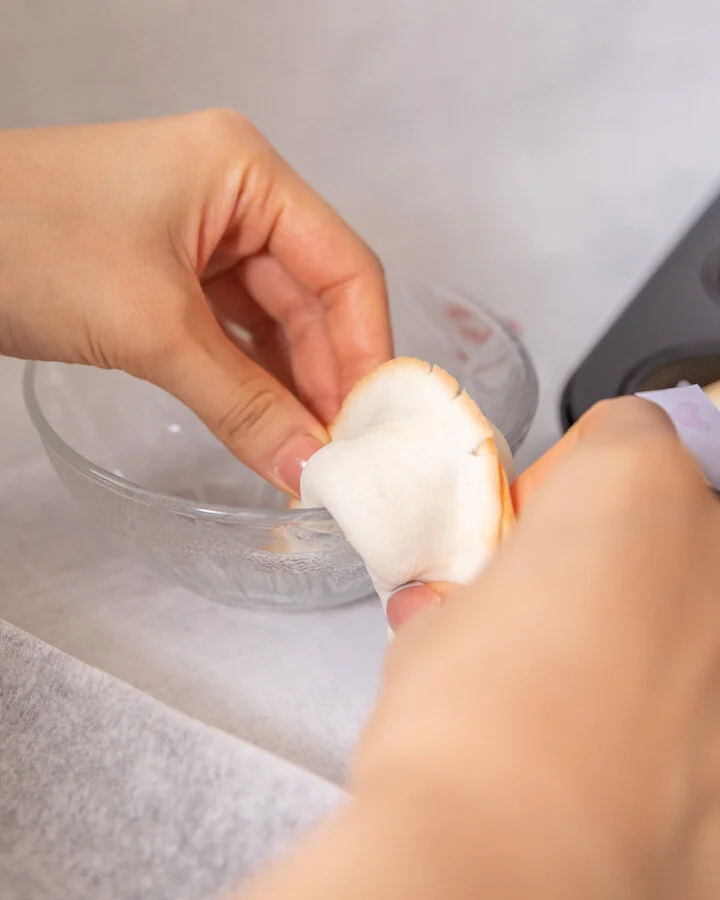
Remove from oven allowing to cool for 5 seconds before quickly but carefully pealing the pancake off the parchment and folding it in half with one of the notes inside. Pinch the sides together before folding it in half again using a cup or a lip of a bowl (see below photo for demo).

Place in muffin tray to cool and harden.

Flip parchment paper over and repeat. NOTE: You don’t want to use a piece of parchment paper more than twice otherwise the cookies start to stick to the paper.


FOLLOW ME ON INSTAGRAM @ISTHATSOH


I hope you enjoyed this homemade fortune cookies recipe as much as I do. If you have any comments please leave them below and I'll be happy to answer them as soon as I can! Happy baking!!!


PIN THIS POST

CHOCOLATE RICE KRISPIE TREATS FOR VALENTINE'S DAY

If you are looking for a fun Valentine’s Day recipe that is not only adorable but easy and fun to make, I highly recommend trying this chocolate rice krispie treats recipe!

When it comes to the best rice krispie treats recipe this one takes the cake because they are so incredibly soft and chewy! Of course, the steps for this recipe are the same for regular rice krispie squares but I thought using a heart cookie cutter would be a great fit for Valentine’s Day. This recipe for chocolate rice krispies will have you reminiscing about childhood bake sales and exchanging Valentine’s day cards with friends. Speaking of exchanging, they are also super fun to decorate and make a great gift so my advice is to double the recipe and giving a few away! Enjoy!

* Please Note - Some links in this post may be affiliate links *

INGREDIENTS:

Makes Apx 12 Hearts

1/2 CUP of Unsalted Butter
5 Cups of Marshmallows - separated into two portions - 1 of 4 Cups and 1 of 1 Cup.
6 Cups of Rice Krispies Cereal
1.5 TSP of Vanilla Extract
2.5 CUPS of White Chocolate Wafers
Pink Food Colouring

You Will Also Need:
Heart-Shaped Cookie Cutter
Baking Tray
Wax Paper


CHECK OUT THESE OTHER FUN VALENTINE’S DAY RECIPES


DIRECTIONS:

In a large sauce pan melt the butter on medium heat.

Once melted add in 4 cups of marshmallows and reduce heat to low. Continue stirring until completely melted.

Next, remove melted marshmallow and butter mixture from heat and add to large bowl with the Rice Krispie cereal, remaining marshmallows and vanilla extract. Mix until well incorporated.

Using wax paper, line a baking tray and press the rice crispy into the baking tray creating an even thickness all round. Place the baking tray in the fridge for 20 min to cool before removing and cutting out heart shapes using a heart shaped cookie cutter. Place the hearts on a wax paper lined baking sheet. NOTE: You can take the remainder of the mixture that you were not able to use and press it into the heart shaped cookie cutter to create 1 or 2 more heart shapes so you don’t have to waste any of the precious mixture.

Using the ‘double boil’ method, melt the white chocolate wafers. Set 1/2 aside and add a ladybug size amount of pink food colouring to it. Stir well to turn the chocolate pink.

Dip each heart into either the white or pink chocolate until half the heart is submerged before placing it back on the baking sheet to dry. You can also use a fork or piping bag to create decorative patterns on top using alternating chocolate colours.

Store hearts in cool place until you are you are ready to enjoy.

chocolate rice crispy treats
)

FOLLOW ME ON INSTAGRAM @ISTHATSOH


I hope you enjoyed this chocolate rice krispie treats recipe as much as I do. If you have any comments or suggestions about how to make rice krispy treats please leave them below and I'll be happy to answer them as soon as I can! Happy baking!!!


PIN THIS POST

chocolate rice crispy treats

PIRI PIRI CHICKEN WITH ROASTED VEGGIES - A PORTUGESE CHICKEN RECIPE

If you’re looking for something healthy and easy to make for dinner tonight that will transport you to the beautiful country of Portugal, may I suggest trying this easy Piri Piri chicken with roasted veggies? Best marinated a day in advance, this Portuguese chicken recipe doesn’t take long to make and always comes out super juicy. I love how the vegetable roast alongside the Piri Piri chicken in the excess fat to perfection until their exterior is crunchy and their insides are soft. Since Piri Piri sauce can be a little spicy and very juicy make sure to pair the chicken and veggies with a simple side like a helping of rice for a well-rounded authentic Portuguese chicken dinner.

Want to try making your own Piri Piri Mix at home? Check out Chef Mireille’s Piri Piri Spice Blend Recipe!

* Please Note - Some links in this post may be affiliate links *

INGREDIENTS:

Serves 2 people

- Piri Piri Chicken Glaze -
4 TBSP of Olive Oil
3 Garlic Cloves - pressed
2 TBSP of Piri Piri Spice Mix - For premade I like the clubhouse Piri Piri spice mix or the Farm Boy Mix however you can also check out Chef Mireille’s Piri Piri Spice Blend Recipe and make it at home!
2 TBSP of Lemon Juice
1 TSP of Lime Zest
Salt and Pepper
Whole Chicken - butterflied (mine was about 3.5 lbs) or you can use chicken thighs or quarters

- Roasted Veggies -
2-3 Yukon Potatoes - washed and cut in large pieces. I like to put my cut potato pieces in water while I prep all my ingredients so they don’t oxidize and turn colour. Drain water before use.
2 TBSP of Olive Oil
2 TSP of Piri Piri Spice Mix
Salt and Pepper
1 Large Carrot - chopped roughly
2-3 Shallots - chopped roughly
3 Lemon Slices or Wedges

- Garnish -
Parsley

- Fun Tools -
Meat thermometer


LOOKING FOR A MAIN DISH? CHECK OUT THESE OTHER RECIPES!


DIRECTIONS:

The first thing to do is marinate the chicken, preferably for a minimum of 4 hours or better yet overnight. In order to do so you must create the glaze.

Heat up the olive oil for your chicken glaze in a sauce pan and add in pressed garlic. Once they become fragrant (about 2 minutes) add in your Piri Piri spice mix, lemon juice, lemon zest, salt and pepper. Stir and set aside to cool.

Wash and dry your chicken before coating it with the glaze. Make sure to coat both sides of the chicken well before covering with plastic wrap and storing in the fridge. Alternatively, you can also do this in a zip lock bag if you can find one big enough.

When you are ready to start cooking, preheat oven to 375F on convection roast (if you don’t have the setting, roast or bake is fine) and remove your chicken from the fridge. Place chicken and all the glaze in the middle of a sheet or roasting pan.

Next, toss your potatoes in olive oil, Piri Piri mix, and salt and pepper until evenly coated. Place potatoes in the sheet pan surrounding the chicken along with roughly chopped carrots and shallots. Garnish with lemon slices before roasting in the oven for 45-55 minutes on the middle rack or until tender.

If you have a meat thermometer the minimum for chicken is 165. You can use it to check if the chicken is done or you can check manually by cutting into it to see if it’s pink inside. If the chicken is done and the potatoes are not, feel free to take the chicken out of the sheet pan and cover it with aluminum foil to keep warm before placing the veggies back in the oven until they become tender.

When potatoes are ready, add chicken back in and serve!

Enjoy!


FOLLOW ME ON INSTAGRAM @ISTHATSOH


I hope you enjoyed this Piri Piri Chicken Portugues chicken recipe as much as I do. If you have any comments please leave them below and I'll be happy to answer them as soon as I can! Happy cooking!!!


PIN THIS POST

MOROCCAN BROCCOLI SALAD - GLUTEN FREE, KETO & VEGAN

Packed full of antioxidants, this delicious Moroccan raw broccoli salad is both beautiful to look at and packed full of nutrients. If you, like me, are looking for ways to eat healthier without compromising on taste, this gluten free, vegan, keto broccoli salad is perfect. Since it can be prepared a day in advance and keeps well in the fridge, it also is great for meal planning or a grab-and-go snack. Not to mention it takes only a few minutes to make!

Enjoy!

INGREDIENTS:

Serves 4

- Dressing -
6 TBSP of Grape Seed Oil
1 TSP of Ras-El-Hanout Spice
1 Garlic Clove (pressed or chopped finely)
2 TBSP of Fresh Lemon Juice
2 TBSP of Balsamic Vinegar
1 TBSP of Honey (can be substituted with Agave if you are vegan)
Salt and Pepper to taste

- Salad -
6 CUPS of Broccoli Florets
1 Shallot (chopped Finely)
1 Jalapeno (chopped finely)
1/3 CUP of Dates (pits removed and chopped finely) - reduce the amount or leave out if you want more of a keto broccoli salad)
1/4 Cup of Roasted Pistachios (chopped finely)
Salt and Pepper to taste

- Optional Garnish-
1/4 CUP of Pomegranate Seeds
5-6 Slices of Pickled Beets (use sugar-free pickled beets if you want more of a keto broccoli salad)


LOOKING FOR SOME HEALTHY RECIPES? CHECK THESE OUT TOO!


DIRECTIONS:

Remove sauce pan from heat and add in lemon juice, balsamic vinegar, and honey (or agave). Salt and pepper to taste and set aside to cool.

Next, add your broccoli, shallots, dates, jalapenos and pistachios to a large salad bowl. Dress with your ras-el-hanout dressing, toss and garnish with pomegranates and slices of picked beats. Salt and pepper once again to taste.

Cover and chill if prepared in advance otherwise enjoy!


FOLLOW ME ON INSTAGRAM @ISTHATSOH


I hope you enjoyed this gluten free, vegan, keto broccoli salad recipe as much as I do. If you have any comments please leave them below and I'll be happy to answer them as soon as I can! Happy cooking!!!


PIN THIS POST

ROASTED POTATO TOWERS WITH THYME AND GOAT CHEESE!

When planning for a dinner party it’s important to make sure that whatever you are serving matches or has a progression. This recipe for roasted potato towers, although not complicated in terms of flavor profile, make a really appetizing side dish and pairs well with meats, pasta, and even some seafood dishes like scallops!

INGREDIENTS:

Makes 6 Servings

4-5 Yukon Potatoes - thinly sliced (about 1/8 inch thick)
7 TBSP Butter - melted
1 TBSP of Fresh Thyme - removed from stems
Coarse Salt and Cracked Pepper (to taste)
Goat Cheese

- Cooking Items-
Muffin Tin
Baking Tray
Aluminum Paper


CHECK OUT THESE OTHER DELICIOUS SIDE DISHES!


DIRECTIONS:

Preheat the over to 350 degrees.

Place the cut up potato slices into a large the bowl. Add the butter, thyme, salt, and pepper and mix together so the potatoes are well coated.

Take a muffin tray and butter the tray. In a circular motion start to stack the potatoes into tower form. TIP: Use the smaller pieces at the bottom of the muffin tray and the larger slices at the top.

Cover the tray with aluminum foil and bake in the oven for 30 minutes.

After 30 minutes take the cupcake tray out of the oven and turn the heat up to 450.

Next, we are going to flip the potato towers, aluminum foil and all, over onto a baking tray and remove the muffin tray. When you have successfully completed this step and fixed your towers so they stand up straight again (don’t worry it happens to all of us) place the tray back into the oven for an additional 15 minutes until they cook and become more crispy.

When they are nice and crispy take them out of the oven and add a dollop of goat cheese to the top (or if you want them to be really pretty pipe goat cheese onto them with an icing piper!), followed by a small piece of thyme for garnish.

Serve while hot!

Enjoy!


I hope you enjoyed this recipe as much as I do. If you have any comments please leave them below and I'll be happy to answer them as soon as I can! Happy cooking!!!


FOLLOW ME ON INSTAGRAM @ISTHATSOH


PIN THIS POST

Potato Towers.jpg