CHOCOLATE ZUCCHINI BREAD

If you are trying to sneak more veggies into your diet, I highly recommend giving this zucchini bread a go. If you are looking to be a little healthier feel free to omit the chocolate, it still tastes great without it. Not only is this recipe nutritious but the bread is also so moist but it freezes well. My boyfriend and I love to enjoy a slice with some earl grey tea as the combo is simply divine.

Enjoy!

INGREDIENTS:

Makes 1 Loaf of Chocolate Zucchini Bread

Unsalted Butter - for greasing the loaf pan
4 OZ Bittersweet Chocolate - Chopped
1 CUP of All-Purpose Flour
1/2 CUP of Whole Wheat Flour
1/3 CUP Instant Oats
1 TSP of Baking Soda
1/2 CUP of Unsalted Butter
1/2 CUP of Sugar
2 Eggs
2 TBSP of Plain Yogurt
1 TSP of Vanilla
1/2 a TSP of Lemon Zest
2 CUPS of Zucchini - Shredded

You will also need:
Loaf Pan
Parchment Paper

DIRECTIONS:

Preheat oven to 350 degrees

Greece loaf pan and line with a piece of parchment paper.

Melt your chocolate on medium-low heat in a small saucepan on the stove.

In a bowl, combine flour (both - all-purpose and whole wheat), oats, and baking soda. Give it a whisk until well incorporated.

In a separate large bowl, combine sugar and butter and using a hand mixer, cream together until light and fluffy.

Next add eggs, yogurt, vanilla, lemon rind, and melted chocolate to your sugar and butter bowl, and beat until well incorporated.

Next, stir in your shredded zucchini before adding the flour mixture in a cup at a time and beating until nicely mixed. Make sure to scrape the sides and get all the flour built up there.

Lastly, spread your batter in the loaf pan and bake for 45 minutes or until a toothpick comes out clean.

Allow the zucchini loaf to cool in the pan for 20 minutes before removing it and letting it continue to cool on a cooling rack.

Enjoy!


I hope you enjoyed this recipe as much as I do. If you have any comments please leave them below and I'll be happy to answer them as soon as I can! Happy baking!!!


PIN THIS POST

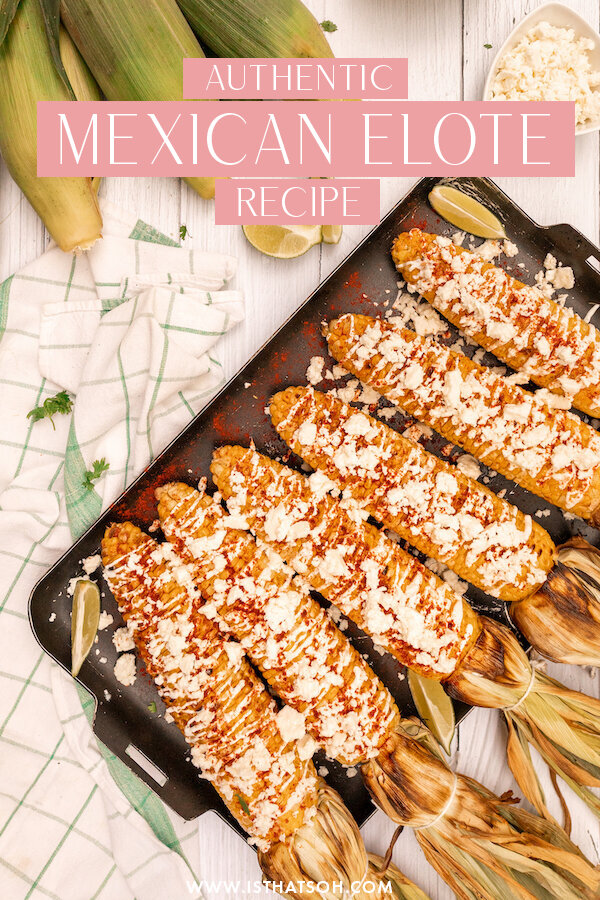
ELOTE - MEXICAN STREET CORN

Elote or Mexican street corn is one of my favorite appetizers!! Whenever I go out for tacos I always have to order the Mexican street corn otherwise the dining experience isn't complete! The thing you might not realize is that it is so simple to make and you can do it so easily right at home. I made mine on the bbq this past week which I think was even better than boiling it because when you boil it you dilute the sugars in the kernels whereas if you bbq it, they get sealed in and the corn tastes extra sweet! Give it a go, you’ll be surprised just how delicious and easy it is to make.

INGREDIENTS:

Sweet Corn - Two per person is my usual estimate
Butchers Twine
2 TBSP of Vegetable Oil
Cream Fresh
Chipotle Chilli Seasoning Spice
Feta Cheese, Cotija Cheese or Queso Fresco
Lime Wedges - optional

DIRECTIONS:

Peel back the husk of corn and tie back with a piece of butchers twine

Coat corn in a light layer of oil and place on the bbq, turning frequently so that it becomes only slightly charred

When the corn is ready, drizzle with creme fresh, sprinkle with chipotle seasoning and garnish with cheese.

Serve warm with a slice of lime.

Enjoy!


I hope you enjoyed this recipe as much as I do. If you have any comments please leave them below and I'll be happy to answer them as soon as I can! Happy cooking!!!


PIN THIS POST

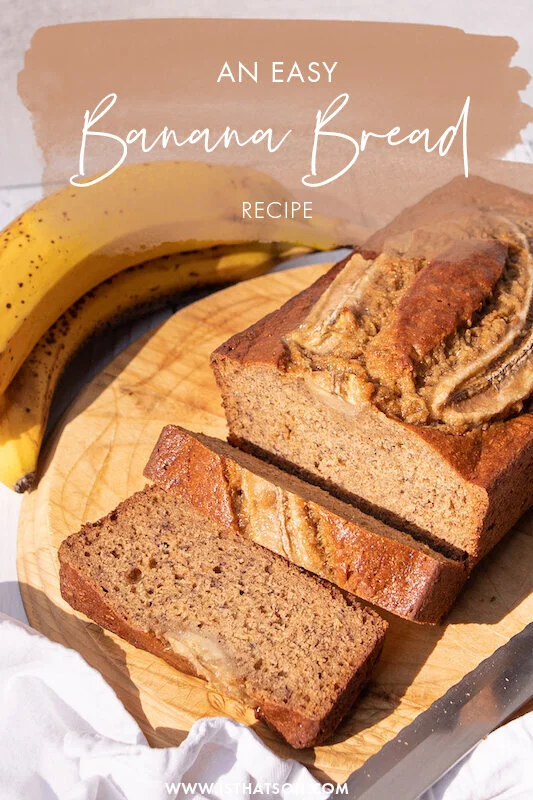
MY FAIL PROOF BANANA BREAD!

If you ever have overripe bananas, don’t throw them away! One of my favorite ways to use them is to make this glorious easy moist banana bread recipe. Even if I am on a diet that doesn't mean everyone else I know is and who wouldn't mind receiving a nice loaf of banana bread as a gift ;) Get creative... you can even add some walnuts or chocolate chips to this easy recipe if you want.

Enjoy!

INGREDIENTS:

1/3 Cup of Unsalted Butter (melted)
3/4 Cup of Brown Sugar
3 Bananas - (2 mashed and one for garnish)
1 TSP of Vanilla Extract
2 Egg (whisked)
2 Cups of All-Purpose Flour
1/4 TSP of Salt
1 TSP Baking Soda
1 TSP of Cinnamon


CHECK OUT THESE OTHER BREAD RECIPES!


DIRECTIONS:

Preheat over to 350 degrees.

Get a baking tray or loaf baking tray and butter all sides.

In a large bowl add in your butter and sugar. Blend with a hand blender until they come together.

Next, add in your banana and vanilla extract. Continue to blend.

Lastly, add in your egg and blend only until incorporated (don’t over blend).

In a second bowl add in your flour, salt, baking soda and cinnamon - whisk together until evenly mixed.

Slowly start to add in your dry ingredients to your wet ingredient bowl and mix on low with your hand blender. You may have to use a spatula to scrape the dry ingredient that build up on the side.

Once blended, scoop out your banana bread batter and place in your baking tray.

Garnish the banana bread batter with the 3rd banana before placing the tray in the oven to bake for about 1 hour (check at 50 minutes). Take a toothpick and stick it in the middle of the bread if when you pull it out nothing is on the toothpick it is ready.

Set aside to cool before cutting and serving.


FOLLOW ME ON INSTAGRAM @ISTHATSOH


I hope you enjoyed this classic banana bread recipe as much as I do. If you have any comments please leave them below and I'll be happy to answer them as soon as I can! Happy baking!!!


PIN THIS POST

CAULIFLOWER EGG FRIED RICE (LOW CARB & KETO)

Always on the lookout for a low carb option to make with my next meal, this cauliflower egg fried rice is my new favorite recipe. It’s so easy to make, is great for batch meal planning, and only takes a few minutes to prepare. If you are looking for a tasty low carb, keto, gluten-free recipe that is packed full of flavor and taste just like the traditional egg fried rice, you got to try this recipe!

Enjoy!

INGREDIENTS:

- Makes 4 Servings -

2 TBSP of Vegetable Oil
3 Scallions - Chopped
4 Garlic Cloves - Minced
1'“ of Fresh Ginger - Minced
1 CUP of Frozen Peas
1 500 gram Pack of Frozen Cauliflower Rice
4 TBSP Low Sodium Soya Sauce
2 TBSP Sesame Oil
3 Eggs - lightly beaten
Salt and Pepper to Taste

DIRECTIONS:

Heat up vegetable oil in a large skillet on high. When hot, throw in your chopped scallions and minced garlic and ginger. Allow to cook for 3-4 minutes before adding in your frozen peas.

When peas begin to turn bright green (about 4-5 minutes) add in your frozen cauliflower rice and mi thoroughly until well incorporated and there are no big chunks. Allow water to evaporate by continuing to cook for 5-7 minutes.

Next, add in your soya sauce and sesame oil, Mix until all the rice is coated before pushing the rice to one side fo the skillet.

On the empty side oft he skillet, add in your egg. Salt and pepper to taste. Fry it up, scrambling as it goes. Once cooked mix in with the rice and remove from heat.

Enjoy!


If you like this recipe or have any comments/questions, feel free to leave them in the comment section below!


PIN THIS POST

SUMMER OF PROSCIUTTO - 2 APPETIZERS THAT REQUIRE ZERO COOKING

*Disclosure: I have participated in a paid partnership with Mastro/San Daniele.
Opinions in this post are my own.

Summer has always been my favourite season in Canada and this year I am determined to make the most of it! For me, that means less time in the house and more time outdoors, enjoying the cottage, hanging out at the beach and of course, watching the sunset. Whenever I’m looking for a quick and easy meal to whip up to take along with me, I always prefer the non-cook option (actually, my boyfriend Adam and I like to joke about how I’m an even better ‘assembler’ than I am a cook)! This means that I’m always on the lookout for delicious food items that are not only versatile but also bursting with flavours that enhance any dish I throw together. One such item is San Daniele Prosciutto! Made according to old world tradition and cured for 12 months, this pre-packaged prosciutto helps turn a simple salad, crostini or charcuterie board into an amazing appetizer or even meal, not to mention it travels well and can easily be assembled on the go! So next time you’re at the grocery store, make sure to grab a pack of San Daniele prosciutto from the bulk deli counter at your grocery store and enjoy its bursts of classic flavour, unique fragrance, and naturally rosy colour with your next meal.

This week I used my pack of San Daniele prosciutto to whip up these brie and prosciutto crostini to enjoy on the beach while watching the sunset, along with this Joso’s inspired summer salad (my favourite restaurant in Toronto) that is light yet very filling!

INGREDIENTS:

- Serves 4 People -

- Crostini -

1 Pack of Paris Toast
1 Round of Brie Cheese
1 Jar of Jam (I recommend an apricot or raspberry)
1 Pack of San Daniele Prosciutto

- Large Salad -

1 Large White Potato - Boiled and Chopped
2 Cups of Fresh Arugula
2 Cups of Romain - Chopped
1 Vine Tomato - Chopped
1/2 Can of Chickpeas - Rinsed and Drained
2 Green Onions - sliced lengthwise
1/2 Cup of Feta Cheese
1 Persian Cucumber - Chopped
1 Pack of San Daniele Prosciutto
Salt and Pepper

- Salad Dressing -

1 Part Red Wine Vinegar
4 Part Canola Oil or Vegetable Oil
Salt and Pepper (lots of salt!)

DIRECTIONS:

- Crostini’s -

Top a few Paris toast with brie cheese.

Next, add a dollop of jam on top.

Garnish with San Daniele Prosciutto and serve.

Enjoy!

- Large Salad -

Bring a pot of water to a boil and place you pealed potato inside. Cook for 20 minutes or until it is soft. You can check if it has become soft by sticking a fork in it. If you can easily slide a fork inside it then it is ready. When ready, drain the hot water out of the pot and blanch the potato with cold water for 2 minutes to prevent it from cooking further.

Place Arugula, Romain, chopped tomato, chickpeas, chopped green onion, chopped cucumber, crumbled feta, and cooled, chopped boiled potato in a large bowl. Top with San Daniele Prosciutto, some fresh cracked pepper, and a pinch of salt.

Dress with salad dressing, toss and serve.

Enjoy!


If you like this recipe or have any comments/questions, feel free to leave them in the comment section below!


PIN THIS POST