FRIED EGGPLANT AND CHICKPEA MASALA - VEGAN, VEGETARIAN, SOY AND GLUTEN FREE

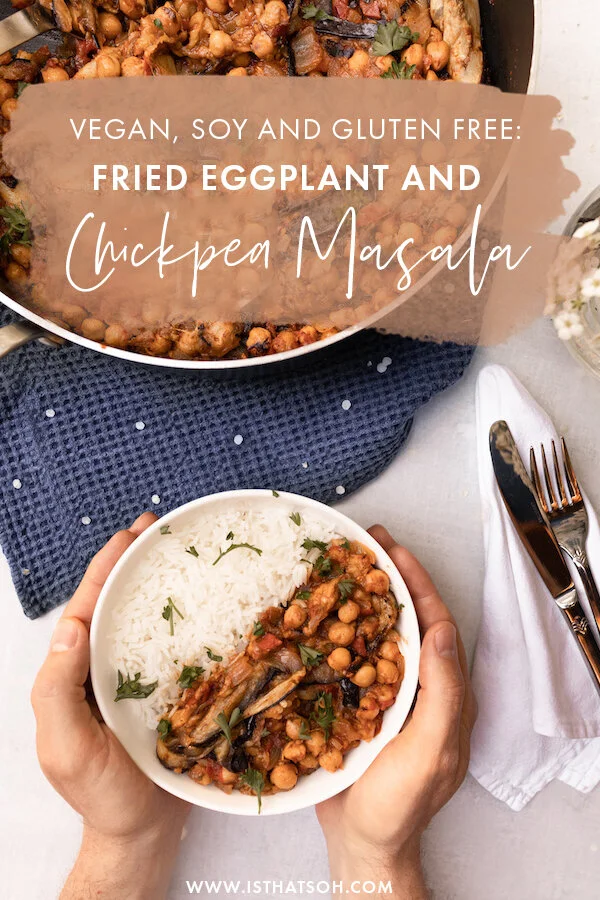
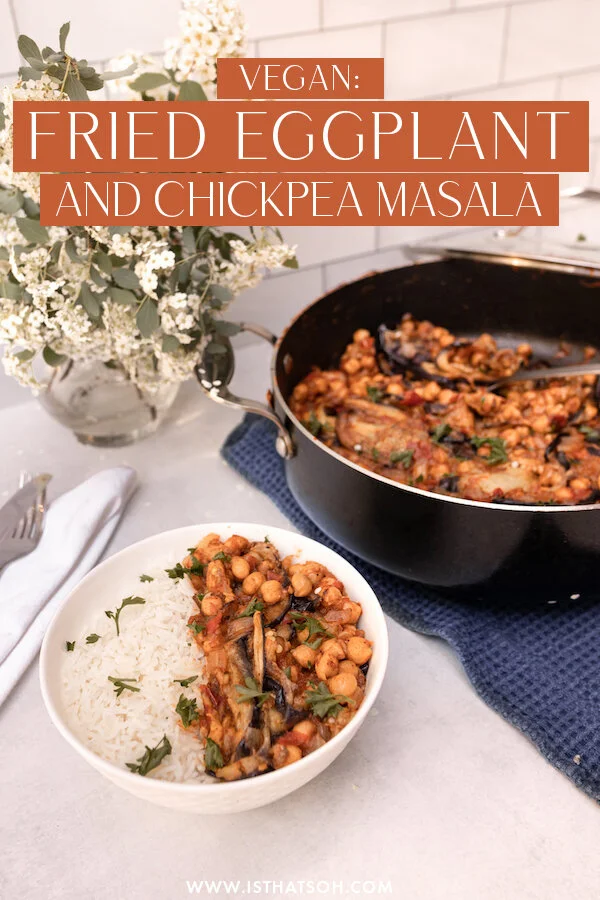
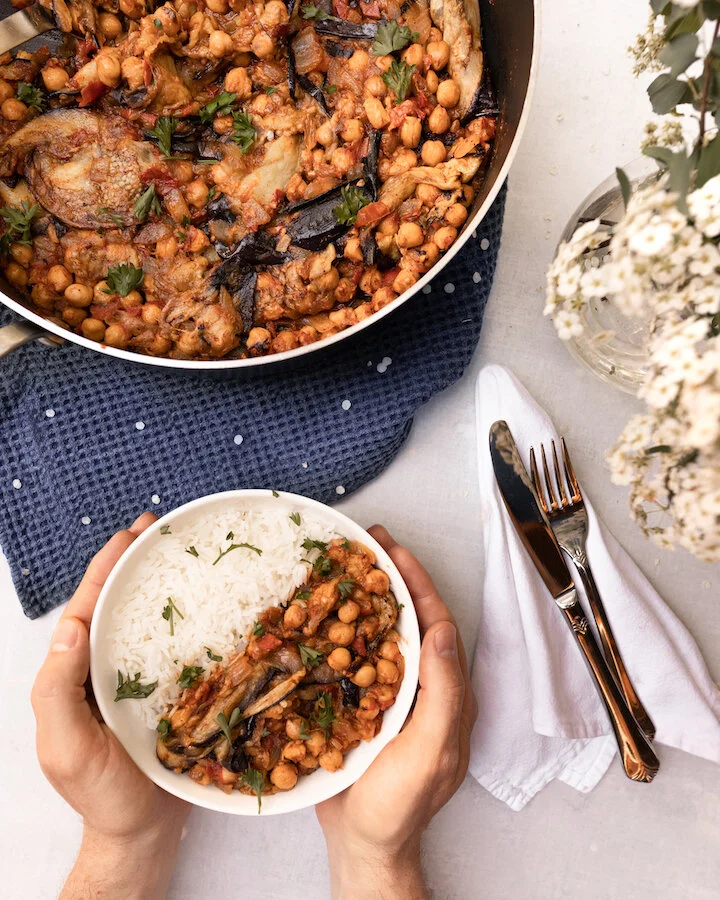
I have made this plant-based, Indian-inspired eggplant masala ( similar to brinjal masala) dish twice now and both times there have been no leftovers. Friends and family just can’t get enough of this curried eggplant recipe. Although frying the eggplant at the beginning does tack on quite a bit of time, once you get the hang of it this isn't that complicated of a dish. Best of all, it’s totally worth the effort in learning a new Indian eggplant recipe and is so healthy for you. If you are looking for an easy vegetarian, plant-based recipe to try, I highly recommend giving this curry eggplant dish a shot!

Enjoy!

INGREDIENTS:

- Serves 4 People with No Leftovers!

2lbs Eggplant (Italian)
Olive oil
Sea Salt
1 large White Onion (halved and diced)
2 Garlic Cloves (minced)
1.5 teaspoons garam masala
1/2 teaspoon paprika
1/4 teaspoon black pepper
1/4 teaspoon cayenne
2 Cups Tomato (diced)
1 15oz can of Chickpeas (drained and washed)

- Optional Base -

Basmati Rice


CHECK OUT THESE OTHER VEGETARIAN RECIPES!


DIRECTIONS:

Cut the eggplant into 1/4 inch pucks and salt on both sides.

Lightly cover a frying pan in olive oil and fry the eggplant pucks (medium heat) until they are soft and until both sides are browned. The eggplant will suck up the oil like no other and it will be tempting to add more olive oil but as the eggplant softens it will also release a bit of the oil back into the pan so don't overdo it. This step will take the longest time so you can prepare everything else as you do this. Once the eggplant is fried remove it from the frying pan and place it on a baking sheet.

Next, add some oil to the pan and fry up the onions.

When they become soft and golden (about 10 minutes) add the garlic and cook for another 4-5 minutes.

Next, add in your spices and mix it all up for a minute or two. CAN YOU SMELL THE GOODNESS??

Finally add the tomato, the chickpeas, and about 2 tablespoons of water. Turn the heat up a little to medium-hot, partly cover, and let simmer for 15 minutes.

If you are going to make basmati rice, start making it now so that both will be ready at the same time.

After 15 minutes I usually add a pinch more of garam masala, paprika, and cayenne (if you like it spicy) and mix it in.

After another five minutes, I add in the eggplant that we previously fried up and let that continue to cook for an additional 10 minutes. The eggplant should breakdown and really thicken up the dish.

Remove from heat and serve on a bed of basmati rice!

Enjoy!


FOLLOW ME ON INSTAGRAM @ISTHATSOH

Gallery Block
This is an example. To display your Instagram posts, double-click here to add an account or select an existing connected account. Learn more

If you like this curry eggplant masala recipe or have any comments/questions, feel free to leave them in the comment section below!


PIN THIS POST

CLASSIC FRENCH MUSSELS MARINIERE (WHITE WINE SAUCE)

One of the best parts about being self isolate with my family is that we all like to eat!

Every Friday we get together a little bit earlier and celebrate the end of the week with some nice seafood. Each week my mom has been busting out a new recipes, each better than the last. One recipe that topped the list was her classic french mussels in a white wine sauce, an easy crowd pleaser! If you have ever wondered how to cook mussels at home or are just looking for some new recipes for mussels to try, this one is easy and so delicious!

Enjoy!

INGREDIENTS:

Serves 2 People

-Seafood-
2.5 lbs of fresh mussels – rinse, scrub and de-beard. (I usually buy extra because I know that some are going to be bad)

How to buy, store, and prep fresh mussels:

When buying fresh mussels, make sure to smell them - they SHOULD NOT have a strong odor! You also want the shells to be shut. Since mussels are alive if you bang the shells or apply pressure and close them yourself, if they are indeed alive, they should shut or remain shut. If they open once again right away it means that they are weak/not fresh, so don’t buy those. Make sure to store your mussels in the fridge, they need air to breathe so don’t use a sealed container, instead place a damp cloth over them like a napkin or paper towel to provide further moisture. Before you are ready to use them make sure to rinse the shells, remove the beards or hairy bits, and scrub away any debris off the shells.

-White Wine Sauce-
2 TBSP of Unsalted Butter
1 Shallots - chopped finely
1 TBSP of Fresh Flat Parsley, chopped finely
1 cloves of garlic - minced
1 Stock of Celery, chopped finely
1 Bay Leaf
A few twigs of Fresh Thyme
1 Cup of Dry White Wine
Salt and Pepper to Taste
1 TBSP Double Creme

-Toppings-
Fresh Flat Parsley

-Extras-
French Baguette


LOVE SEAFOOD? CHECK OUT THESE OTHER SEAFOOD RECIPES!


HOW TO COOK MUSSELS:

how to cook mussels

Place a large pot on the stove and add in your butter. Allow butter to melt on medium heat. Once ready, add shallots and cook until translucent.

Add chopped parsley, celery, garlic, bay laves and thyme to the pot and mix. Allow the heat to bring out the aroma of the herbs (maybe 2-3 minutes).

Add the fresh mussels to the mixture and stir to coat the mussels with the herbs. Add the wine and raise temperature to high. When the wine starts to bubble, stir the mussels once again so that they become coated with wine.

After you have covered the mussels in white wine, lower the heat to medium/high and cover for 5-6 minutes but no more.

After 5-6 minutes, uncover and remove mussels from the pot but keep the juice in the pot. Taste sauce and adjust with salt and pepper if needed. Add the double cream to the sauce (it should make the sauce whiter) before stirring it in until well incorporated. Add the steamed mussels back into pot, stir and serving right away while hot.

Bon Appétit!!!


FOLLOW ME ON INSTAGRAM @ISTHATSOH!


If you like this recipe for mussels, learning how to cook mussels or have any comments/questions about this mussels in white wine cream sauce recipe, feel free to leave them in the comment section below!


PIN THIS POST

how to cook mussels in white wine sauce

FALL-OFF-THE-BONE SLOW COOKED ASIAN SHORT RIBS

Ever since I have been in self-isolation due to COVID-19 I have been cooking up a storm. Yesterday, Adam and I decided to try to make some Asian style beef short ribs in the Le Creuset his parents got us for Christmas and they turned out even better than imagined! Adam said I can definitely make this again! The best part, everything goes into one pot and you just have to let it sit on low. It’s so easy!

INGREDIENTS:

 Serves 2 People

-Short Ribs-
3 LBS of Beef Short Ribs - bone-in, cut crosswise into 2” pieces
1/2 a CUP of reduced-sodium soya sauce
1/2 a CUP beef broth
1/4 CUP of brown sugar
3 Garlic cloves (minced)
1 TBSP Ginger (freshly grated)
1 TSP of Sesame Oil
1 TSP of Crushed Red Chili Pepper flakes (optional)
2 TBSP of Corn Starch
1/4 CUP of Water
Sesame Seeds for garnish
Fresh parsley (chopped finely) for garnish

-Sides-
Sticky Rice

DIRECTIONS:

short rib.jpg

In a large bowl, combine soya sauce, beef broth, brown sugar, minced garlic, freshly grated ginger, sesame oil, and chili flakes (optional) in a large bowl. Wisk until well incorporated.

Place short ribs (bone down) in Le Creuset and add in the soya sauce mixture. With Le Creuset’s you will need to give each piece of meat a little space, in other words, don’t pack them in too tight. Make sure meat is well coated with sauce - there should be a pool but not necessarily completely submerged.

short rib-2.jpg

Cover and bring to a boil on medium before lower temperature to low and allowing to cook on low heat for 5-6 hours.

30 minutes before the meat reaches the end of its cooking time, in a separate small bowl mix cornstarch with 1/4 cup of water and whisk until fully incorporated. Add the cornstarch mixture to the Le Creuset and stir well. Allow meat to cook for the remaining 30 minutes or until the sauce has thickened.

After, start to preparing/cook your sticky rice!

Once meat is finished cooking, garnish with sesame seeds and freshly chopped parsley and serve immediately over sticky rice.

Enjoy!


If you like this recipe or have any comments/questions, feel free to leave them in the comment section below!


PIN THIS POST

FALL-OFF-THE-BONE SLOW COOKED ASIAN SHORT RIBS.jpg

HOMEMADE PEROGIES FROM SCRATCH!

“Food is our common ground, a universal experience.” –James Beard

Life hasn’t been all sunshine and rainbows lately. I know this global pandemic raging over the world has taken away everyone’s ability to move freely and enjoy the comforts we once took for granted, dining out included. For me personally, I feel like I am in a constant state of limbo unsure of what the future may hold or when self-isolation and social distancing will end. Turning to comfort foods that both keeps my mind busy and nourish my soul has been a great escape from this new reality.

Perogies for me are one of those comfort foods that take time and patience to prepare but always manages to soothe the mind and soul. They are also great if you want to batch make something to keep in your fridge so you can enjoy them over the course of a week or want something relatively inexpensive to give to someone in need. During this time we must all be a little bit kinder to ourselves and to others, and giving someone a home-cooked meal is a great way to show you still care even when you can’t be there physically. Whatever your purpose for making them, I hope they bring you the same happiness and enjoyment as they have brought me. Stay well!

INGREDIENTS:

Serving: 6 People @ 5 Perogies Each,

- Cheese and Potato Perogies: Filling-
1 1/2 LBS of Russet Potatoes (typically around 2-3 potatoes should suffice) - peeled and chopped into 1-inch squares
2 TSP of Olive Oil
1/2 a CUP of Onion (diced)
1 Clove of Garlic (minced)
1/2 CUPS of Cream Cheese
1/2 TSP of Salt
Pepper to taste

- Dough For Perogies -
2 1/2 CUPS of All-Purpose Flour
1/2 TSP of salt
1/4 CUP of Sour Cream
1 Egg
2/3 CUP of water

-What To Serve With Perogies - Optional Toppings -
Bacon
Chives
Sourcream
Caramelized Onion


CRAVING COMFORT FOOD? CHECK OUT THESE OTHER RECIPES!


HOW TO MAKE PEROGIES:

First, we need to make the filling.

Put your cut up potatoes in a pot with lukewarm water, add salt and bring to a boil.

In a pan, drizzle a little bit of olive oil and allow it to heat up on medium. Once hot, add in your chopped onions and allow them to cook until they become translucent. This may take 3-5 minutes and you may want to reduce the heat to ensure they don’t burn.

Add in your garlic to the onions when they are close to being done (garlic cooks faster than onion).

Once the potatoes are ready, strain the water out and place the cooked potato back in the pot before starting to mashing them into a smooth texture. To help you make them creamier, add in your cream cheese.

When onions and garlic are ready, add them to the potato pot as well, mix until well incorporated, salt and pepper to taste, and set aside to cool down to room temperature.

Dough For Perogies

Next, we need to make the dough.

Add flour and salt into a large bowl and mix until well combined.

Make a well in the middle and add in your eggs, water, and sour cream. Using a fork or spoon start to mix it together starting from the inner circle and working your way toward the outer edges. You may need to eventually switch to using your hands.

Once the dough starts to form, use a countertop to knead it till it isn’t powdery and has a smooth texture. Place dough back in the bowl, cover with a cloth and let sit for 10 minutes.

After 10 minutes, flour a working station and roll out 1/3 of the dough till it is 1/8’ in thickness. Cut out circles using a circle cookie cutter with a 4’ diameter. You can also use a lip of a cup as a stencil and a pizza cutter if you don’t have a circle cookie cutter! Feel free to get creative! If you don’t have a 4’ wide diameter cup you can always roll out the dough a little thicker, use a 3’ wide diameter cup and then roll them out a little thinner after to spread out the dough wider. It doesn’t have to be perfect.

Set dough pancakes aside on a floured surface and cover with a cloth. Once you have a few cut out, fill the middle with about a tablespoon of the mashed potato filling and fold the dough over, pinching the sides to create a seal. If the seal doesn’t hold use a little water along the edge to help. Secure the seal by pressing the prongs of a fork along the dumpling edge and making indents into the dough.

How To Cook Perogies & How Long To Boil Perogies

Once you have a few complete, boil a pot of water. Once boiled, add salt and drop in 3-4 dumplings. You will need to stir the water at first so they don’t stick together. Eventually, after 3-5 minutes the Perogies, will float to the surface of the water, when that happens, allow them to cook for an additional 30-45 seconds before taking them out of the water and setting them aside on an oiled tray or casserole dish. As you add more cooked perogies to the oiled tray or casserole dish, make sure they are covered in olive oil to avoid them sticking to one another. You can store them like this for a few days in the fridge if you don’t want to eat them right away.

I like my perogies fried so typically I will heat up some butter in a pan on medium and once hot, place a few of these finished, pre boiled perogies in the plan flipping them as they become nicely browned. When ready, remove them from the pan, add a dollop of sour cream, chives, and bacon bits and serve!

Pierogies in Air Fryer

You can also air fry pierogies in an air fryer if you have one! It usually only takes 4-5 minutes to get them crispy and golden brown but I have found that each air fryer I have tried them with is a little different so just keep an eye on them. Typically 4-5 minutes though is good!

Enjoy!


FOLLOW ME ON INSTAGRAM @ISTHATSOH


If you like this recipe for perogies with bacon or have any comments/questions about how to make homemade perogies or suggestions as to what to serve with perogies, feel free to leave them in the comment section below!


PIN THIS POST

HOMEMADE PEROGIES FROM SCRATCH.jpg Perogies - how to make perogies, homemade perogies

RECIPE REVIEW: STRAWBERRY GOAT CHEESE BRUSCHETTA RECIPE

I found this recipe online while trying to find inspiration and had to try it out. I am a huge fan of goat cheese and the mix of sweet and salty flavors, so right off the bat it caught my attention. I did make an adjustment to the original recipe which called for thyme instead of mint, and I am so happy I did. The freshness of the mint perfectly complimented the strawberries and it tasted just heavenly. If you have a sweet tooth or like sweet fruits with cheese, you got to try this strawberry bruschetta recipe! Feel free to also get creative and change up the cheese! I am sure it would also taste amazing with feta cheese and a little balsamic glaze or cream cheese if that’s all you have!

INGREDIENTS:

Serving: 3-4 People

1/2 CUP of balsamic vinegar
Bread cut into slices - I used baguette but the original recipe calls for Italian
1 TBSP of olive oil
1 LB of Fresh Strawberries (cut into small morsels)
2 TSP of Fresh Mint (chopped) - original recipe calls for thyme
1 CUP of Goat Cheese - Keep at room temperature for easy spreading
Salt and Pepper to Taste


LOOKING FOR AN INTERESTING APPETIZER? CHECK OUT THESE OTHER RECIPES!


HOW TO MAKE STRAWBERRY BRUSCHETTA:

The first thing you want to do is reduce the balsamic vinegar into a glaze so in order to do this you need to heat it in a small pot or pan over medium to low heat. Let it simmer there for 8 to 10 minutes, it should reduce by about half and thicken nicely to a glaze. Once it is done, remove from heat and allow it to cool back to room temperature.

Next, you have to toast the bread. You can either do this in bulk using a foil-lined baking sheet, drizzling them with olive oil, and placing them in the oven at 400 for 5-10 minutes. The timing here can vary depending on how thick you cut the slices and how golden/crunchy you want them so keep an eye on them so they don’t burn.

While the bread is in the oven, combine cut-up strawberries with fresh mint in a bowl and add in the room temperature vinegar glaze. Salt and pepper the mixture to your taste.

Once the bread is ready you can go ahead and spread goat cheese across each piece before spooning the strawberry bruschetta mixture over each piece. Garnish with more mint and serve!

Enjoy!

To check out the original recipe, click HERE!

If you are looking for an authentic traditional Italian bruschetta recipe with tomatoes, click HERE!


FOLLOW ME ON INSTAGRAM @ISTHATSOH

Gallery Block
This is an example. To display your Instagram posts, double-click here to add an account or select an existing connected account. Learn more

If you like this strawberry bruschetta recipe or have any comments/questions, feel free to leave them in the comment section below!


PIN THIS POST