CAULIFLOWER EGG FRIED RICE (LOW CARB & KETO)

Always on the lookout for a low carb option to make with my next meal, this cauliflower egg fried rice is my new favorite recipe. It’s so easy to make, is great for batch meal planning, and only takes a few minutes to prepare. If you are looking for a tasty low carb, keto, gluten-free recipe that is packed full of flavor and taste just like the traditional egg fried rice, you got to try this recipe!

Enjoy!

INGREDIENTS:

- Makes 4 Servings -

2 TBSP of Vegetable Oil
3 Scallions - Chopped
4 Garlic Cloves - Minced
1'“ of Fresh Ginger - Minced
1 CUP of Frozen Peas
1 500 gram Pack of Frozen Cauliflower Rice
4 TBSP Low Sodium Soya Sauce
2 TBSP Sesame Oil
3 Eggs - lightly beaten
Salt and Pepper to Taste

DIRECTIONS:

Heat up vegetable oil in a large skillet on high. When hot, throw in your chopped scallions and minced garlic and ginger. Allow to cook for 3-4 minutes before adding in your frozen peas.

When peas begin to turn bright green (about 4-5 minutes) add in your frozen cauliflower rice and mi thoroughly until well incorporated and there are no big chunks. Allow water to evaporate by continuing to cook for 5-7 minutes.

Next, add in your soya sauce and sesame oil, Mix until all the rice is coated before pushing the rice to one side fo the skillet.

On the empty side oft he skillet, add in your egg. Salt and pepper to taste. Fry it up, scrambling as it goes. Once cooked mix in with the rice and remove from heat.

Enjoy!


If you like this recipe or have any comments/questions, feel free to leave them in the comment section below!


PIN THIS POST

SUMMER OF PROSCIUTTO - 2 APPETIZERS THAT REQUIRE ZERO COOKING

*Disclosure: I have participated in a paid partnership with Mastro/San Daniele.
Opinions in this post are my own.

Summer has always been my favourite season in Canada and this year I am determined to make the most of it! For me, that means less time in the house and more time outdoors, enjoying the cottage, hanging out at the beach and of course, watching the sunset. Whenever I’m looking for a quick and easy meal to whip up to take along with me, I always prefer the non-cook option (actually, my boyfriend Adam and I like to joke about how I’m an even better ‘assembler’ than I am a cook)! This means that I’m always on the lookout for delicious food items that are not only versatile but also bursting with flavours that enhance any dish I throw together. One such item is San Daniele Prosciutto! Made according to old world tradition and cured for 12 months, this pre-packaged prosciutto helps turn a simple salad, crostini or charcuterie board into an amazing appetizer or even meal, not to mention it travels well and can easily be assembled on the go! So next time you’re at the grocery store, make sure to grab a pack of San Daniele prosciutto from the bulk deli counter at your grocery store and enjoy its bursts of classic flavour, unique fragrance, and naturally rosy colour with your next meal.

This week I used my pack of San Daniele prosciutto to whip up these brie and prosciutto crostini to enjoy on the beach while watching the sunset, along with this Joso’s inspired summer salad (my favourite restaurant in Toronto) that is light yet very filling!

INGREDIENTS:

- Serves 4 People -

- Crostini -

1 Pack of Paris Toast
1 Round of Brie Cheese
1 Jar of Jam (I recommend an apricot or raspberry)
1 Pack of San Daniele Prosciutto

- Large Salad -

1 Large White Potato - Boiled and Chopped
2 Cups of Fresh Arugula
2 Cups of Romain - Chopped
1 Vine Tomato - Chopped
1/2 Can of Chickpeas - Rinsed and Drained
2 Green Onions - sliced lengthwise
1/2 Cup of Feta Cheese
1 Persian Cucumber - Chopped
1 Pack of San Daniele Prosciutto
Salt and Pepper

- Salad Dressing -

1 Part Red Wine Vinegar
4 Part Canola Oil or Vegetable Oil
Salt and Pepper (lots of salt!)

DIRECTIONS:

- Crostini’s -

Top a few Paris toast with brie cheese.

Next, add a dollop of jam on top.

Garnish with San Daniele Prosciutto and serve.

Enjoy!

- Large Salad -

Bring a pot of water to a boil and place you pealed potato inside. Cook for 20 minutes or until it is soft. You can check if it has become soft by sticking a fork in it. If you can easily slide a fork inside it then it is ready. When ready, drain the hot water out of the pot and blanch the potato with cold water for 2 minutes to prevent it from cooking further.

Place Arugula, Romain, chopped tomato, chickpeas, chopped green onion, chopped cucumber, crumbled feta, and cooled, chopped boiled potato in a large bowl. Top with San Daniele Prosciutto, some fresh cracked pepper, and a pinch of salt.

Dress with salad dressing, toss and serve.

Enjoy!


If you like this recipe or have any comments/questions, feel free to leave them in the comment section below!


PIN THIS POST

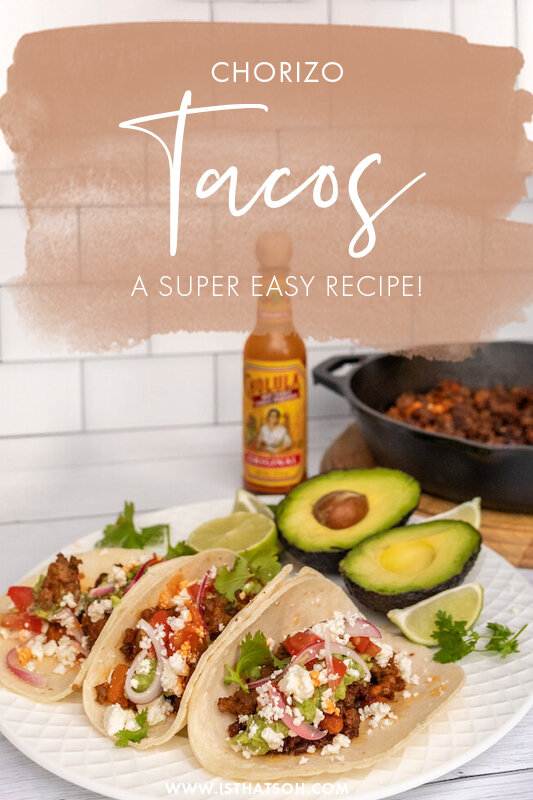
CHORIZO TACOS WITH POTATO!!! A SUPER EASY AND DELICIOUS RECIPE!

Is there a better way to celebrate the end of the work week than with margaritas and tacos? I think not! For the last 4 weeks in a row, Adam’s family and I have been partying it up every Friday with this chorizo potato taco recipe. First introduced to us by my sister, this recipe has become a Weiers family favorite and I am not mad about it. If you are looking for an easy Carne taco recipe to whip up for your next taco Tuesday or get together, baby you found it! It’s so easy, juicy, and packed full of flavor your friends will be begging you for the recipe.

Enjoy!

INGREDIENTS:

- Serves 4 People -

- Chorizo Filling -

8 Pork Sausage (If you can’t find chorizo sausage you can use mild or Italian with the Chorizo spices)
1 Spanish Onion - diced
1 medium Sweet Potato - peeled and diced

- Chorizo Spice Mix -

1 TBSP of Ancho Chilli Powder
1 TBSP of Paprika
1/2 TSP of Kosher Salt
1/2 TSP of Garlic Powder
I/2 TSP of Onion Powder
1/2 TSP of Cumin
1/2 TSP of Ground Black Pepper
1/4 TSP of Oregano
1/4 TSP of Thyme
1/4 TSP of Coriander
1/4 TSP of Ground Clove
Pinch of Cinnamon
1 Bay Leaf

- Optional Ingredients and Garnishes -

Tortillas
Hot Sauce
Guacamole
Tomatoes - diced
Jalapeno
Cilantro
Cojita
Red Onion - pickled

DIRECTIONS:

In a large bowl, remove raw pork sausage from casing. If the sausage is not already spiced with chorizo, make and add in the chorizo spice mix. Mix thoroughly and set aside to marinate for 30 minutes.

When ready, in a large skillet add in a handful of sausage, allow to cook on medium heat until the fat starts to render out before adding in your onions. Cook onions until translucent, around 2-3- minutes before adding in the remaining sausage, breaking it apart as it cooks for 5-7 minutes.

When further fat is released from the sausage, add in sweet potato and allow to cook further for 30 or so minutes until the potato is tender and meat is fully cooked. Stir every few minutes to avoid burning and to ensure both the meat and potatoes are being cooked evenly.

Remove from heat and build your taco using tortillas and optional garnishes.

Enjoy!


If you like this recipe or have any comments/questions, feel free to leave them in the comment section below!


PIN THIS POST

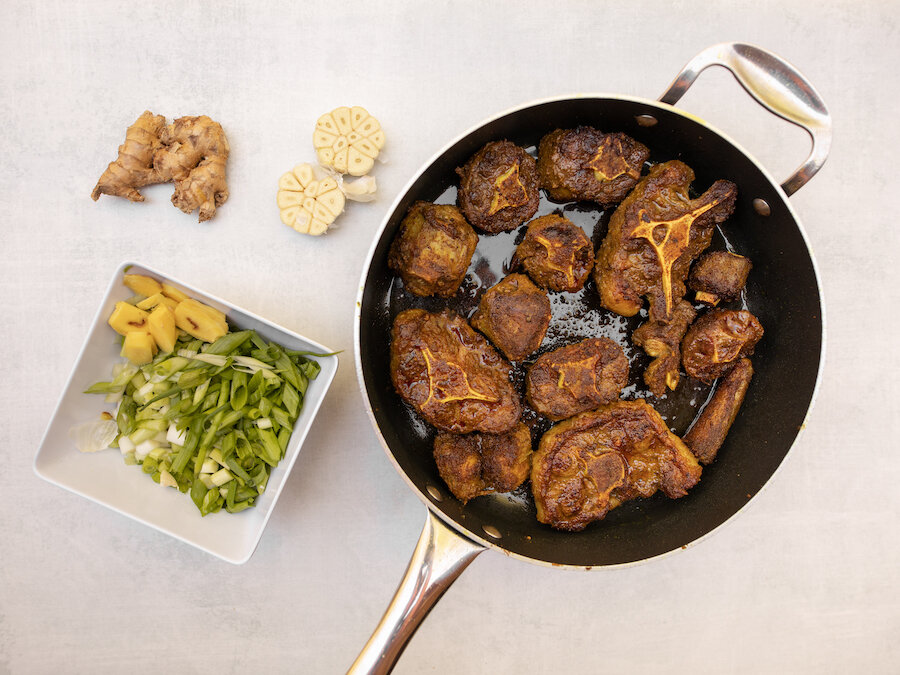
BRAISED OXTAIL WITH COCONUT CAULIFLOWER RICE

A personal favorite of mine, Oxtail is a very tender, juicy, gelatin-rich meat. Usually found slow-cooked as a stew or braised, my version is packed full of amazing savory flavors and braised for 7 hours until it falls off the bone. Although, I didn’t cook the oxtail in the typical Jamaican style, I did pair mine with coconut cauliflower rice to give it a hint of sweetness while keeping it low in carbs. The results were amazing and had my family fighting over leftovers. If you like braised juicy meat, I highly recommend giving this recipe a try!

Enjoy!

INGREDIENTS:

- Serves 6 People -

- Braised Oxtail -

6LBS of Oxtail
Kosher Salt
3.5 TBSP of Curry
4 TBSP of Vegetable Oil
10 CUPS of Chicken Broth
8 Scallions - diced
2 Garlic Heads - cut in half
Pinch of Chilli Pepper Flakes
Pinch of Thyme
6” Piece of Giner - sliced in 1/8 slivers
4 TBSP of Soy
2 TBSP of Brown Sugar

- Coconut Cauliflower Rice -

1 TBSP of Butter
2 Cloves of Garlic - minced
2’ Piece of Ginger -Chopped
3 Scallions - diced
1/2 CUP of Unsweetened Coconut Milk
1/2 TSP of Brown Sugar
1000 Grams of Cauliflower Rice - I used from frozen

DIRECTIONS:

Heat oven to 250 degrees

In a large bowl, season oxtail generously with salt followed by the curry powder.

In a large deep skillet, or using a dutch oven heat up vegetable oil on the stove on medium-high and sear both sides of oxtail until browned. If you don’t have an oven-safe skillet or a large enough dutch oven to fit all the meat and liquid, first sear the oxtail in the skillet and then moved them to a roasting pan.

Once you have seared all the oxtail remove from skillet/dutch oven and add in chicken broth, scallions, garlic, chili pepper flakes, thyme, soy, ginger, and brown sugar. Allow this to come to a simmer and scrape the bits of oxtail that stuck to the bottom of the skillet to become loose before adding the mixture into your roasting pan, or placing the oxtail back in the dutch oven. The oxtail should be submerged in liquid.

Next, place the roasting pan or dutch oven with the oxtail in the oven to slow cook. Position lid partially off and allow to cook for 7 hours flipping pieces around halfway through. If at the halfway point the liquid has gone down a lot you can add in 1/2 cup of water.

30 minutes prior to Oxtail being ready its time to make the coconut cauliflower rice. Grab a large skillet, add in your butter and allow to heat up on medium. When hot add in your garlic, ginger, and scallions - saute for 3-4 minutes.

Next, add in your unsweetened coconut milk and brown sugar. Mix until well incorporated.

Finally, add in your cauliflower rice and allow it to steam and mix with sauce until fully coated.

Serve oxtail on rice when ready and garnish with more scallions.

Enjoy!


If you like this recipe or have any comments/questions, feel free to leave them in the comment section below!


PIN THIS POST

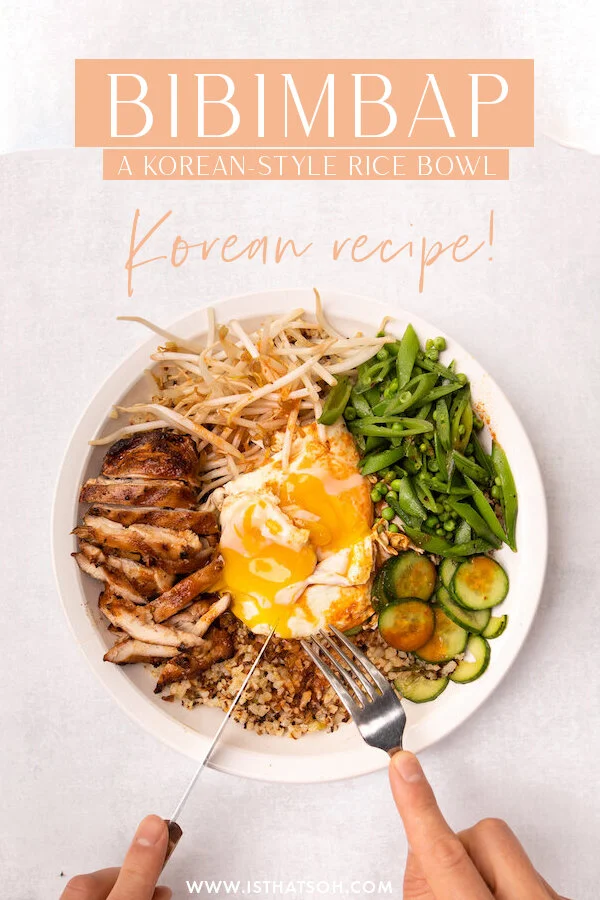
CRISPY KOREAN BIBIMBAP CAULIFLOWER RICE BOWL WITH BBQ CHICKEN & SPRING VEGGIES

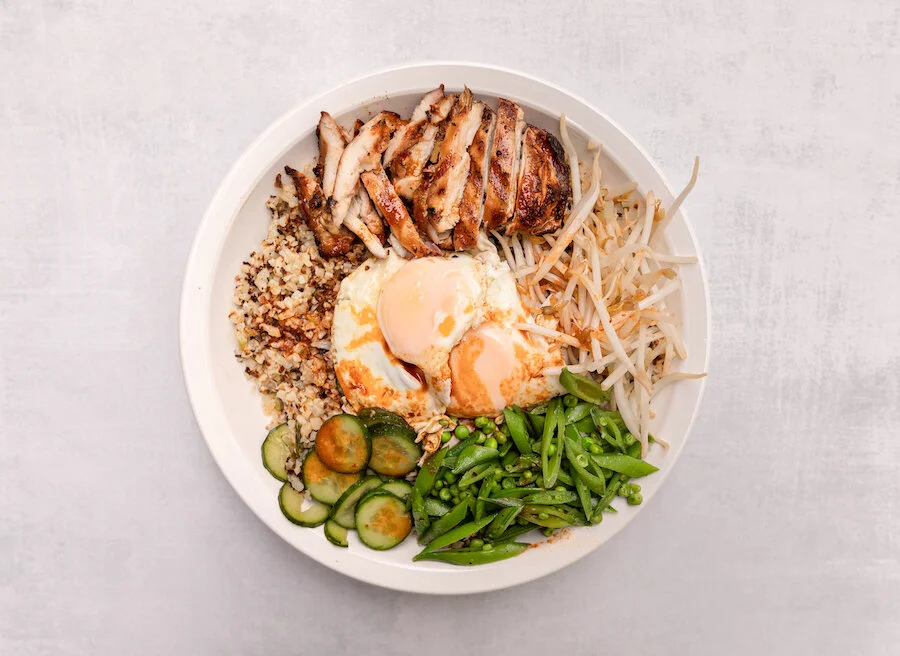
Traditionally cooked in a stone bowl, Bibimbap is a Korean rice dish that literally translates to ‘mixed rice with meat and assorted vegetables. Ever since I first discovered Korean rice bows I’ve been a huge fan and the hot Bibimbap sauce dressing really pulls the pickled veggies in perfectly with the crispy rice and fresh veggies. In the effort to make this recipe more low carb, I substituted the traditional use of sticky rice for cauliflower rice and although it didn’t crisp up quite the same way as normal sticky rice, it was still a beautiful substitute that maintained the integrity of the dish and still held the flavors together. To add a little extra protein Adam also cooked up these wonderful juicy chicken thighs on the BBQ which made for the perfect addition to this otherwise largely veggie based dish. If you are looking for something new, spicy, and wonderful to try, I highly recommend this Bibimbap recipe!

BIBIMBAP INGREDIENTS:

- Serves 4 People -

- BBQ Chicken Thighs and Marinade -
16 Chicken Thighs Boneless and Skinless (3-4 Per Person)
1 CUP of Low Sodium Soya Sauce
1 TBSP of Grated Ginger
4-6 Sprigs of Green Onion
4-6 cloves of Garlic - chopped or grated
Cracked Black Pepper
1-2 TSP of Cayenne Pepper - as per your spice level

- Crispy Cauliflower Rice Bowl -
Frozen Cauliflower Rice (you will want about 200grams per Person)
1.5 CUPS of Snow Peas - Chopped
6 Sprigs of Green Onion
3-4- slices of Ginger
3 Persian Cucumbers
1 TSP of Kosher Salt
3 TBSP of Rice Vinegar
4 TBSP of Vegetable Oil - split into 2 parts
2 TSP of Sesame Seed Oil
1 CUP of Frozen Peas
1 TBSP of Butter
4 Eggs
Bean Sprouts

- Korean Style Hot Bibimbap Sauce Recipe -
2 TBSP of Siracha
2.5 TBSP of Low Sodium Soya Sauce
2 TSP of Honey
4 TSP of Sesame Seed Oil
2 TSP of Rice Vinegar


CHECK OUT THESE OTHER ASIAN INSPIRED RECIPES


DIRECTIONS:

Throw the chicken along with all the marinade ingredients into a bowl and make sure the thighs are coated nicely. Allow chicken to marinate for min 30 minutes while chopping your veggies or overnight in the fridge.

Chop Persian cucumber in thin slices and place in a bowl. Add Kosher salt and massage into the cucumber. Dress with rice vinegar (make sure they are well coated and soaking in a little bath, and set aside allowing them to pickle while we move on to the other veggies.

Chop the snow peas on a diagonal in 1/4 inch pieces.

Chop the top (furthest from the stem) of the green onion on the diagonal until you have 1/4 CUP (set aside for garnish) and cut the remaining amount width-wise in thin slices as per normal.

In a large skillet, add in 3 TBSP of vegetable oil and 2 TSP of sesame oil and allow to heat up on medium. Once ready, add in your green onions (remember to save some for garnish) and ginger stirring constantly, and allow to fry for 3-4 minutes.

Once green onion and ginger are ready, add cauliflower rice into the skillet and mix until well incorporated before pressing the cauliflower down into the bottom of the skillet evenly and allowing it to cook on medium for the next 15 minutes.

During this time you can BBQ the chicken on medium-high heat, 10 minutes each side or until cooked through.

While the chicken and cauliflower are cooking make your Korean hot sauce by combining all the ingredients in a bowl and mixing thoroughly.

When cauliflower gets close to the 15-minute mark, give it a toss to allow crispy brown bits to mix and pat down again to form an even layer, allow to cook for an additional 5 -10 minutes until it is crispy. *Cauliflower rice will never get fully crispy because it holds a lot of water but it will get a little crispy

During these last few minutes fry up 4 eggs in a skillet using butter to coat the pan.

In a separate skillet, add 2 TBSP of vegetable oil and allow to heat up on medium heat. Add in the snow peas and frozen peas and allow them to fry ever so slightly before adding in 1/4 Cup of water, covering, and allowing to steam for 3-4 minutes.

When ready to plate, start with your cauliflower rice, add one friend egg to the middle, arrange bbq Chicken, bean sprouts, pickled Persian cucumber, and snow pea/pea mixture around the edge. Drizzle Korean hot sauce on top, garnish with extra green onion and serve!

Enjoy!


FOLLOW ME ON INSTAGRAM @ISTHATSOH


If you like this Korean bibimbap recipe or have any comments/questions about how to make bibimbap, feel free to leave them in the comment section below!


PIN THIS POST