BURNT BASQUE CHEESECAKE

We may not be able to travel right now but that doesn’t mean we can’t eat the delicious foods we discovered while away. I recently was reminded of Adam and I’s trip to Spain and the small little surfing town of San Sebastian that we visited while there. In the evening, we would wander around the small town looking for a bar to grab some pinchos (small traditional snacks typically eaten in bars in northern Spain) and on one of those evenings, we were also introduced to a popular dessert in the region, the Burnt Basque Cheesecake. Unsure of how to make it myself, I recently scoured the internet in search of a recipe that was not only super simple but tasted just as I had remembered. Not only was I super happy with how my cheesecake turned out but I would highly recommend giving this dessert recipe a good if you are looking for something to whisp you away to memories of Spain with a single bite!

Enjoy!

INGREDIENTS:

Unsalted Butter
2 LBS of Cream Cheese - Room Temperature
1.5 CUPS of Sugar
6 Large Eggs
2 CUPS of Heavy Cream
1 TSP of Kosher Salt
1 TSP of Vanilla
1/3 CUP of Flour

10” Spring Form Pan
Parchment Paper
Sifter

DIRECTIONS:

Preheat oven to 400 degrees and make sure your middle rack is not obstructed.

Using unsalted butter, butter your springform pan and line with two pieces (overlappings slightly in the middle) of parchment paper. You need them to help hold up the cheesecake once it rises so it’s okay if it comes over the top of the pan (just make sure it’s not too tall where it will touch the oven elements.

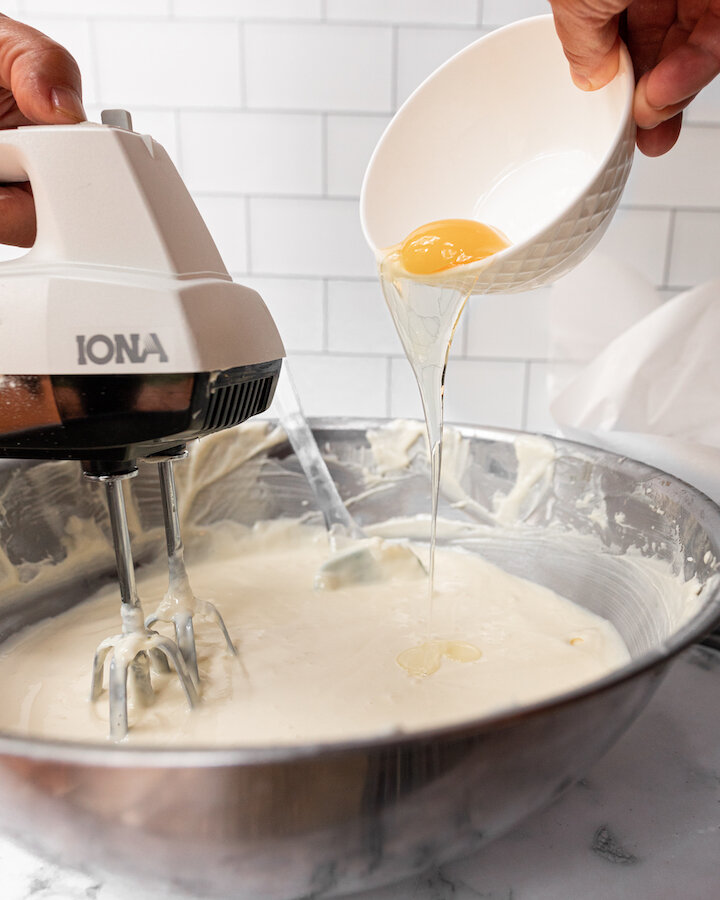
Beat cream cheese and sugar with a hand mixer on medium-low until sugar dissolves and the texture is smooth. Remember to scrape the sides!

Next, increase your speed slightly before adding one egg in at a time in 15-seconds intervals.

Next, reduce your speed slightly and add in your cream, salt, and vanilla. Mix until well incorporated, approximately 20-30 seconds.

Next, sift in your flour and beat on low until well incorporated. Make sure to scrape down the sides of the bowl to get the extra build-up on there. The batter should be a smooth consistency.

When ready, pour batter into your springform pan and bake on the medium rack for 60-65 minutes until it’s a deep golden brown.

When ready, set cheesecake aside to cool in the springform pan. The cheesecake will fall dramatically so don’t worry if it came over the sides a lot. Once cooled you can remove springform pan and carefully peel away the parchment paper.

At this point, feel free to cut the cake into wedges and serve however I like the consistency more the following day when it becomes more reminiscent of thicker creamy cheesecake as oppose to a flan texture.


I hope you enjoyed this recipe as much as I do. If you have any comments please leave them below and I'll be happy to answer them as soon as I can! Happy cooking!!!


PIN THIS POST

BOOZY MANGO ORANGE RUM POPS!

Made these boozy rum popsicles the other day while up at the cottage and I’m so glad I did because lately, we have been experiencing a big heatwave! The combination of mango, orange, and coconut go great together, and there no need to add more sugar because they are definitely sweet enough. If you are looking for a tasty vegan treat to have on those sweltering hot summer days, I highly recommend making this recipe!

INGREDIENTS:

- Makes 8 Popsicles -

- Popsical Filling -
1 Large Ripe Mangos - remove skin and pit
3/4 CUP Coconut Water
1/4 CUP of Orange Juice
2 Oz of Rum

- Molds -

NorPro Frozen Ice Pop Maker - I ordered this one off Amazon and highly recommend it!

DIRECTIONS:

In a blender add in your fresh mango and coconut water. Belnd until liquified.

Next, add in your orange juice and rum, pulse for 2 sec to mix.

Pour mixture into popsical moulds and palce in freezer for a minimum of 12 hours before you serve!

Enjoy!


If you like this recipe or have any comments/questions, feel free to leave them in the comment section below!


PIN THIS POST

MOLTEN CHOCOLATE CAKE!!!!

This molten chocolate cake is one of those desserts where you just can't say no to. My boyfriend's mom gave me this recipe after I tried one of her molten cakes straight out of the oven. So rich and decadent but small enough where you don't feel too guilty about indulging. The whole point of molten cakes is to underbaked them so that the chocolate center oozes out of it when cut into. If you have a chocolate lover in your family, this is sure to put a smile on their face. Enjoy!

INGREDIENTS:

Makes 6 small cakes

5 oz of bittersweet (not unsweetened) or semisweet chocolate (break into smaller blocks)
10 TBSP Unsalted Butter (melted)
3 Large Eggs
3 Large Egg Yokes
1.5 Cups of Icing Sugar
1/2 Cup of All Purpose Flour
Vanilla Ice Cream (optional)
 

DIRECTIONS:

Set the over to bake 450 Degrees and let it preheat.

Get 6 x 3/4 cup souffle dishes or custard cups and butter them.

While the oven is heating melt the chocolate and the butter down in a small heavy sauce pot on low heat, stirring all the time. Let it cool slightly.

In a bowl whisk the egg and egg yokes together. Then start to add in the icing sugar bit by bit, followed by the melted chocolate and finally by the flour. Whisk the whole time!!

When everything is whisked together and smooth pour the mixture into the buttered souffle dishes in equal portions.

Bake for 11-12 minutes. You want the cake sides and top to be set but the center to be runny. If you had prepared the batter ahead of time and refrigerated it during dinner you may need 2 or so more minutes (14min total max)

Run knife around the cakes to help release them. Place a plate upside down on top of the souffle dish and flip the dish so the cake is upside-down on the plate. Garnish with ice cream and it is ready to be served.

I really hope you liked this cake! If you have any questions or comments please leave them below I would love to hear from you about your baking experience. Bon Appetite :)


I hope you enjoyed this recipe as much as I do. If you have any comments please leave them below and I'll be happy to answer them as soon as I can! Bon Appetite!!!


 PIN THIS POST

ITALIAN CROSTATA RECIPE - MEMORIES FROM ITALY

Having recently received a package of Bonne Maman jams (best surprise ever!) I decided that I would put them to good use and make some delicious Italian breakfast tarts known as Crostatas. If you ever find that you have lots of jam in your fridge and you are looking for ways to use them up this is a great idea. The recipe is really easy and forgiving, and can be a fun activity to do with kids. Although Italians typically serve this tart with breakfast it can easily transition to an after dinner dessert with the help of a scoop of ice cream. Buon appetito!!

INGREDIENTS:

2 Cups of flour
1/2 Cup of granulated sugar
1/2 Teaspoon of baking powder
1 Egg + 1 Egg yoke (throw out whites for just one egg)
1/2 Cup of butter (softened!)
3/4 Cup of jam of your choice

DIRECTIONS:

Using a large bowl add in your flour, sugar, and baking powder - whisk until fully incorporated together.

Make a well and add in your eggs and butter, and start to incorporate it all together. I like to start with my whisk and then move to using my hands as it gets more clumpy.

Kneed the clumps together until they form a dough (this may take some time but the butter will eventually spread and help form the dough).

Once dough is formed wrap in plastic wrap and place in fridge for 30 minutes.

Preheat oven to 350 degrees

Take dough out of fridge after 30 minutes and roll out using a rolling pin to about 1/8 of an inch thickness.

Spread the dough out over your pie dish and get rid of any excess dough. You can kneed the excess dough together again and roll it out again to create strips of dough which are equal in thickness to decorate the top of the crostata with a lattice later if you want.

Add in your jam and spread out evenly. You want just enough jam where you don't see the crust below.

Add your decorative stripes of dough to the top now. I like to form a lattice but some people cut out shapes instead. You can turn down the edges of the pie to hold the lattice strips in place.

Place in oven for 30 - 35 minutes or until top is golden.

Once ready remove and let cool for 10 minutes before serving. Enjoy!


If you like this recipe or have any comments/questions, feel free to leave them in the comment section below!


PIN THIS POST


WALNUT & DATE ENERGY BITES!

Okay lets face it, sometimes throughout the day you crave a snack and what you end up choosing can really make or break your diet. One way to avoid making such an easy mistake is to be prepared! These energy bites are both vegan and paleo and taste AMAZING! When hunger strikes or you need a boost of energy grab one of these babies and feel guilt-free! They last for about 7 days when stored in the fridge and are so easy to make that you have no excuse lol ;) Happy eating my friends!

VIDEO POSTED BELOW

INGREDIENT:

1 Cup of Walnuts
1/2 a Cup of Unsweetened Coconut
16-18 Pitted Dates
1 TSP of Cinnamon
1/3 Cup of Almond Butter
1 TSP of Vanilla Extract
3 TBSP of Hemp Hearts
2/3 Cup of Oats

DIRECTIONS:

Place walnuts and unsweetened coconut in a food processor and pulse until the walnuts have been broken down into small chunks.

Add in dates, cinnamon, almond butter and vanilla extract and continue to pulse until the dates have been broken down into small chunks.

Transfer contents to a bowl, add in your hemp hearts and oats, and mix all ingredients together with your hands.

Once nicely mixed start to roll the ingredients into balls and place on a lined baking sheet lined with parchment paper.

Allow balls to sit for 30 minutes to dry and harden.

*You can store them up to a week in the fridge in a sealed container!

ENJOY!!!!

I hope you enjoyed this recipe as much as I do. If you have any comments please leave them below and I'll be happy to answer them as soon as I can! Bon Appetite!!!