CADBURY MINI-EGG COOKIES

Cadbury Mini Eggs in Easter Egg cookies - Cadbury cookies _ mini-egg cookies_ cadbury choc chip cookies - Cadbury mini-egg cookies

Cadbury mini-egg cookies, the perfect Easter treat!

Cadbury Mini Egg Cookies with Browned Butter - Easter Baking!

With Easter around the corner and spring in the air, I’m feeling full of gratitude for all that I have. One way I like to show my appreciation, spread good vibes and give back to others is by baking, and this elevated Cadbury choc chip cookies recipe with Mini eggs for Easter is a guaranteed way to put a smile on peoples faces. The best part, they aren’t hard to make! They do take a little extra time though if you are going to brown you butter (which I highly recommend you do as it gives it this extra rich flavour profile you’ll want in all your cookies moving forward - tips on how to do it below) and cool down the cookie dough before baking to ensure nice, thick, chewy Cadbury mini-egg cookies! You’ll be happy you in the end, trust me!

Hot Tip: When making cookies, if you place the uncooked cookie dough in the fridge for an hour to overnight before baking, the cookies spread less while cooking which helps them stay soft and chewy vs. crunchy. I always like to give them a couple hours in the fridge before baking but this step is totally up to you.

* Please Note - Some links in this post may be affiliate links *

INGREDIENTS FOR MY CADBURY MINI EGG COOKIES

Makes Apx 16 -20 Cadbury cookies

1 CUP of room temperature Browned Butter (instructions on how to brown butter to follow)
1/2 CUP of Granulated Sugar
3/4 CUP of Light brown sugar
2 TSP of Vanilla Extract
2 Large Eggs (room temperature)
3.25 CUPS of All Purpose Flour
T TSP of Baking Soda
1 TSP of Salt
100 Grams-ish of Dark Chocolate Chips
400 Grams of Cadbury Mini Eggs - split into two portions, one for inside the cookie dough (2/3 finely chopped) and the other for garnishing the cookies (1/3 roughly chopped into big chunks)!’

Hot Tip: I used a ziplock bag and the bottom of a olive oil bottle to smash up my Cadbury Mini Eggs! Works great and really contains the pieces/mess!

Cadbury Mini Eggs in Easter Egg cookies - Cadbury cookies _ mini-egg cookies_ cadbury choc chip cookies - break up mini egg in ziplock bag

I like to use a Ziplock bag and the bottom of a bottle to smash up my Cadbury Min Eggs for the cookie dough!

You will also need:

1 Large Mixing Bowl
1 Small to Medium Size Mixing Bowl
Measuring Cups
Measuring Spoons
Hand Blender
Parchment Paper
Baking Tray


LOVE BAKING? CHECK OUT THESE OTHER RECIPES!


HOW TO BROWN BUTTER

If you have never made browned butter before, don’t fret, it’s actually super easy and only takes a few minutes. What you are going to do is put 1 cup of butter in a sauce pan and place it on medium heat to melt nice and slow.

Once it melts it will slowly start to heat up eventually starting to bubble and them foam. This is when you want to start stirring the butter gently and continuously as it continue to get darker and darker until it turns a rich amber in colour (approximately 4-5 minutes).

NOTE: you want to stay close here so to ensure you don’t burn the butter. Keep stirring, keep the heat low and be patient, the magic will happen.

Once it’s that beautiful amber colour and you can really smell the nutty richness of the butter, remove it from the heat and transfer to a heat safe glass bowl or ramekin. Make sure to get all the little browned butter bits at the bottom as that is where a lot of the flavour lies!

I like to then let the browned butter cool down to room temperature by either leaving it on the counter for a half hour or placing it in the fridge for a few minutes.

Cadbury Mini Eggs in Easter Egg cookies - Cadbury cookies _ mini-egg cookies_ cadbury choc chip cookies - how to brown butter for easter cookies - browned butter

Let your browned butter cool to room temperature before you began preparing your cookie dough.

HOW TO MAKE MINI EGGS COOKIES

Once the butter has cooled down to room temperature you are ready to start preparing your cookie dough! The first thing you are going to do is combine your granulated sugar with your light brown sugar in a large bowl. Pour in your room temperature butter and mix using a hand blender until the sugar crystals start to melt and combine with the butter to produce a golden amber colour. Apx 2 minutes.

Next add in one egg and the vanilla, continue to blend for another 2 minutes before adding in the last egg for a quick blend.

In a separate, smaller bowl, combine all your dry ingredients (flour, baking powder and salt) and using a whisk, give it a good mix.

Next, using a sifter, sift the dry ingredients in three or four parts into the wet ingredients bowl, mixing in between each time. Make sure to scrape the side of the bowl with a spatula to get all the goodness that builds up on the side.

Next add in your dark chocolate chips and cookie dough portion of your Cadbury mini eggs, and give it a good mix until they are well incorporated into the dough.

Cadbury Mini Eggs in Easter Egg cookies - Cadbury cookies _ mini-egg cookies_ cadbury choc chip cookies - mini egg cookies dough recipe

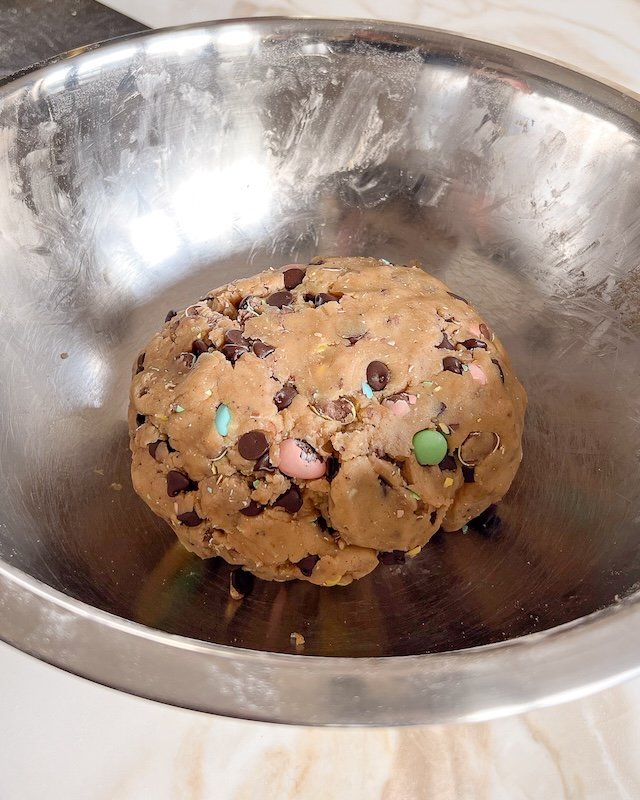
The dough for my Cadbury Mini-Egg Cookies is ready to be portioned out!

What I like to do next is roll the dough into a giant log approximately two inches thick before cutting it into 1/2 inch to 3/4 inch pieces. I then roll each cut up piece into a ball using my palms and place it on a parchment paper lined baking tray or in a ziplock back. Once I have done this will all the pieces I place the tray in the fridge for at least an hour to overnight.

Cadbury Mini Eggs in Easter Egg cookies - Cadbury cookies _ mini-egg cookies_ cadbury choc chip cookies - mini egg cookies dough recipe

I find rolling out the cookie dough into balls make them easier to store and bake!

Cadbury Mini Eggs in Easter Egg cookies - Cadbury cookies _ mini-egg cookies_ cadbury choc chip cookies - refrigerate overnight

To avoid the cookies from spreading to much/thinning out, I like to place the dough in the fridge for a few hours or overnight before baking.

When ready to start baking, preheat oven to 350 degrees! Place cookie balls on a parchment paper lined baking tray about two inches apart. Allow the cookies to bake for 9 minutes before removing them from the oven and topping them with your 2nd portion (the garnishing portion) of your lightly crushed Cadbury mini eggs. Once each cookie has been garnished, place cookie tray back in the oven for an additional 3-5 minutes*.

Cadbury Mini Eggs in Easter Egg cookies - Cadbury cookies _ mini-egg cookies_ cadbury choc chip cookies - browned butter choc chip cookies with mini eggs

After 9 minutes of baking I like to take the cookie dough out of the oven and add some extra chunky pieces of Cadbury Mini Eggs to the top before placing them back into the oven again for the last 3-5 minutes


FOLLOW ME ON INSTAGRAM @ISTHATSOH


*I prefer my cookies soft and chewy but if you prefer you cookies to have more crunch to them you can continue to bake them for 5-7 minutes.

Optional: When ready, remove the cookies from the oven and using a round cookie cutter or a glass, twirl your cookies to make them perfectly round.

Once done, allow the Cadbury cookies to cool on the baking tray for 10 minutes before transferring them to a cooling rack.

Cadbury Mini Eggs in Easter Egg cookies - Cadbury cookies _ mini-egg cookies_ cadbury choc chip cookies - browned butter choc chip cookies with mini eggs-2

Allow your Mini-Egg Cookies to cool for 10 minutes before eating!

Cadbury Mini Eggs in Easter Egg cookies - Cadbury cookies _ mini-egg cookies_ cadbury choc chip cookies - Cadbury mini egg cookies

I hope you enjoyed this Easter Cadbury min egg cookies with browned butter recipe as much as I do. If you have any comments please leave them below and I'll be happy to answer them as soon as I can! Happy Easter and happy baking!!!

Cadbury Mini Eggs in Easter Egg cookies - Cadbury cookies _ mini-egg cookies_ cadbury choc chip cookies - Cadbury mini-egg cookies

I like my Mini Egg Cookies to be soft and chewy but if you like yours more crumbly, bake them for an extra couple minutes!


PIN THIS POST

Cadbury Mini-Egg Cookies with Browned Butter

AUTHENTIC BAJA FISH TACOS WITH CHIPOTLE SAUCE & COLESLAW + BAJA SHRIMP TACOS!

Authentic Baja Fish Tacos and Baja Shrimp Tacos served with a spicy chipotle sauce and coleslaw

I have always been a big fan of Baja fish tacos but being pregnant has put my cravings for fish tacos into overdrive! I crave them and Baja shrimp tacos (I don’t discriminate) at least twice a week so when I went to Punta Mita, Mexico to visit my mom last month, I asked her housekeeper and cook to teach me how to make authentic Mahi Mahi fish tacos from scratch!

I don’t think I’ve ever tasted anything better! I mean, that week we were in Mexico we had tacos two or three times over the course of a week but the fish tacos we made at home were definitely my favourite. Maybe it was because the fish was fresh - we had gone to La Cruz that morning to the Mercardo del Mar to purchase the Mahi Mahi caught by local fisherman that morning - but they were out of this world!

Of course I didn’t leave Mexico without snagging the recipe for myself. I mean, now that I know how easy they are to make at home, I’ll definitely be making them whenever a pregnancy craving strikes!

* Please Note - Some links in this post may be affiliate links *


FOLLOW ME ON INSTAGRAM @ISTHATSOH


INGREDIENTS FOR BAJA MAHI MAHI FISH TACOS & BAJA SHRIMP TACOS:

SERVES 4 PEOPLE
- BATTER FOR BAJA FISH TACOS & BAJA SHRIMP TACOS -

2 Cups of Flour

2 x 355ml Cans of Beer (I used Corona!)

1 TBSP of black pepper

1 TBSP of Salt

- COLESLAW FOR FISH TACOS -

4 Cups of Green or Red Cabbage (shredded)

3 TBSP of Lime Juice

1/2 TSP of Salt


- BAJA FISH TACO SAUCE -

3 Chipotle Chilies - you can freeze any leftover Chipotle peppers from the can by placing them in a Ziplock bag.

3/4 Cup of Mayonnaise

A pinch of salt

A pinch of pepper

2 TBSP of lime juice

- ADDITIONAL INGREDIENTS -
1.5 - 2 lbs of Mahi Mahi cut into 1 x 3 inch strips 

20 pieces of Shrimps - de-veined with shell and tail removed 

Vegetable Oil for Frying

1 Lime cut into wedges for serving

Flour or Corn Tortillas - warmed
Guacamole *optional

Cilantro for Garnish *optional


CHECK OUT THESE OTHER SEAFOOD RECIPES


HOW TO MAKE BAJA FISH TACOS:

Begin by making the coleslaw for your fish tacos. Toss the cabbage, lime juice and pinch of salt in a bowl and mix well before setting aside to soak. The acidity in the lime juice will help soften the cabbage.

Next, begin making your Baja fish taco sauce. In a blender combine your chilies, lime juice, and mayonnaise with a pinch of salt and pepper. Blend and taste. Add more chilies if you want it spicier or mayonnaise to cool it down.

Fill your frying pan with vegetable oil (you’ll need about a 1/2 inch depth of oil) and slowly let it rise to temperature on the stove over medium heat. You want it to heat to 350 degrees Fahrenheit. Use a deep fry thermometer if you have one or test the oil with a wooden spoon - if it sizzles when dipped in the oil, it’s ready.

While you are waiting for the oil to heat up you can make your batter for the Baja fish tacos and Baja shrimp tacos. Mix the flour, salt and pepper in a medium size bowl and slowly whisk in the beer, little by little until you have a smooth consistency with no lumps.

Once the oil in the pan is up to the correct frying temperature, dip the fish strips and cleaned shrimp in the beer batter, making sure to coat both sides well but letting any excess batter to drip off. Place battered fish and shrimp in the frying pan, a few pieces at a time so not to overcrowd the pan too much. Allow each piece to fry until golden brown and cooked through (approximately two minutes) before transferring the cooked pieces to a plate lined with paper towel. The paper towel will soak up all the excess oil. Repeat until all the fish is cooked.

Baja fish taco recipe - making mahi mahi fish tacos and baja shrimp tacos

Fry the battered fish and shrimp in a half inch of vegetable oil over medium heat until golden (approximately 2 minutes)

While you are cooking the fish you can also warm the tortillas in the oven for a few minutes.

When ready to plate, line the tortillas up on a plate and place a piece of fish or 2-3 pieces of shrimp in each taco shell. Top with some cabbage slaw and drizzle with some Chipotle fish taco sauce.

You can garnish the Baja fish tacos and Baja shrimp tacos with cilantro before servicing if you like but make sure to also include a wedge of lemon.

This dish also goes well with guacamole and chips or just guacamole on its own which you can always add on as an extra topping to your fish tacos.

Enjoy!


I hope you enjoyed this Baja fish taco recipe with Chipotle Baja fish taco sauce and coleslaw as much as I do. If you have any comments please leave them below and I'll be happy to answer them as soon as I can! Hasta Pronto!!!


PIN THIS POST

Baja fish taco recipe - making mahi mahi fish tacos and baja shrimp tacos from scratch - baja style fish tacos.jpg

CHRISTMAS DESSERTS: EGGNOG GLAZED BAKED DOUGHNUTS RECIPE

Eggnog Glazed Baked Donuts - A Delicious Holiday Treat!

The sweet smell of cinnamon and nutmeg filled my kitchen as fluffy pillows of dough began to bake and rise in the oven. I have always enjoyed baking but there is something about the holiday season and Christmas desserts that makes me love it! Perhaps it’s the great memories attached to these quintessential holiday scents or the fact that I get to share it with others. Either way, I’m finding holiday baking even more intoxicating this year, pushing my excitement level to an all time high!

With restrictions beginning to ease, it seems as though I am not the only one feeling excited about the upcoming holiday festivities. I have already begun to see my agenda populate with upcoming events and parties, and it looks as though my friends are also eager to make up for lost time. In preparation, my friend Kate and I have begun to comb through some of our favourite recipes for scrumptious Christmas desserts that we plan to offer up as additions to dessert tables, edible hostess gifts, and baked goods for charity bake sales this holiday season.

Gifted a box of these delicious eggnog glazed baked donuts last year from Kate herself, I have waited a whole year to share this Christmas dessert recipe for baked donuts with you. I was never a huge fan of spiked eggnog but incorporating virgin eggnog into desserts has been a huge game changer for me. I love it now! Funny enough, because I was prepping the release of this recipe so early in the season, eggnog was not available in stores yet so I had to make my own. Turns out it’s very simple (let me know if you need a recipe below) and I have tons left over to use in future recipe and experiment with! Point being, even if you are not a big fan of eggnog, don’t knock this glaze until you try it! It’s like a creamy custard melted into one delicious topping that will make you second guess why you ever took a stance against eggnog! Haha! Trust me it’s good!

I love baked doughnuts and find them way easier to make symmetrical in shape and size than fried as well as more satisfying and filling. If you don’t have a donut baking tray, I have linked one below along with a few other items you may find helpful when assembling this recipe. Honestly though, this finger licking eggnog glazed baked donuts recipe is so easy and will definitly impress anyone you share it with this holiday season.

Happy Baking!

* Please Note - Some links in this post may be affiliate links *

INGREDIENTS FOR BAKED DOUGHNUTS:

MAKES 6 BAKED DOUGHNUTS

- BAKED DOUGHNUTS -

1 Cup of Flour
1 TSP of Baking Powder
1/4 TSP of ground Nutmeg
1/4 TSP of Salt
1/3 Cup of Sugar
1 Egg
1/2 Cup + 1 TBSP of Eggnog
2 TBSP of Unsalted Butter (melted)
1 TSP of Vanilla Extract

- EGGNOG GLAZE -
1 Cup of Powder Sugar
3 TBSP of Eggnog
1/2 TSP of Vanilla
Pinch of ground Nutmeg

- FROSTED ROSEMARY SPRIG GARNISH -

Rosemary Sprigs
1/2 Cup of Sugar
1/2 Cup of Water

- Additional Items -
Pipping Bag - you can use a zip lock bag if you don’t have one
Doughnut Baking Tray - greased with unsalted butter!
Cooling Rack


CHECK OUT THESE OTHER HOLIDAY RECIPES


HOW TO MAKE BAKED DOUGHNUTS:

Prep your garnish first by bringing equal parts sugar and water to a simmer before adding in one or two rosemary sprigs for flavor. Once it simmers for 1-2 minutes set aside to cool.

Preheat oven to 450 degrees.

In a large bowl, combine flour, nutmeg, sugar, salt and baking powder. Whisk until well incorporated.

In a second large bowl, combine eggnog, 1 egg (beaten), vanilla and butter (melted). Mix well.

Combine the wet ingredients with the dry ingredients and mix until the batter forms with no dry clumps.

Next, add batter to a pipping bag and pipe batter into a greased doughnut baking tray.

Bake for 8-10 Minutes until donuts become lightly browned and sponge-like. You can do the toothpick test to see if it comes out clean! Set aside when ready and allow to cool on a cooling rack before glazing.

While doughnuts are cooling, go back to the rosemary simple syrup you made earlier and dip a few small pieces of rosemary sprig inside it before setting on a rack till they become sticky. Once sticky, toss them in granulated sugar for a frosted look. Return garnish to cooling rack until you are ready to use them.

After you are done with the garnish, create your eggnog glaze by combining eggnog, sugar, and vanilla to a bowl wide enough to dip your doughnuts in. If your glaze is to watery, add more sugar. If it’s too thick, add more eggnog.

When doughnuts are cool, dip them in the eggnog glaze and place back on the cooling rack. Garnish with a frosted rosemary sprig and a dash of nutmeg before allowing the glaze and garnish to harden together on the cooling rack.

Enjoy!

P.s Although best fresh, these doughnuts can be stored in the fridge for up to a week.


FOLLOW ME ON INSTAGRAM @ISTHATSOH


I hope you enjoyed this Christmas dessert recipe for eggnog glazed baked donuts as much as I do. If you have any comments please leave them below and I'll be happy to answer them as soon as I can! Happy baking!!!


PIN THIS POST

THE YUMMIEST AHI TUNA ALOHA POKE!

Did you know that one of the last few trips Adam and I took before the pandemic was to The Big Island of Hawaii, Kona? It was an extended family trip that consisted of 13 of us staying at a house we rented for a few weeks over Christmas and it was a BLAST! It wasn’t my first trip to Hawaii but it is where I fell in love and really indulged in authentic Hawaiian Poké for the first time! It’s such a staple Hawaiian dish that you will find amazing Tuna Poké in grocery stores and small family owned stores all over the islands!

If you have never heard of Hawaiian Tuna Poké, it is a traditional Hawaiian raw fish salad that consists of raw tuna (although I have used salmon and it taste just as great) marinated in soy sauce, sesame oil, and onions. Ahi Poké may appear complicated or intimidating to recreate at home but let me assure you it is actually super easy to make Hawaiian Tuna Poké at home as long as you buy sushi grade fish. Unfortunately, not all fish will work for making a Hawaiian Poké recipe at home. Since the fish is not cooked it has to have been ‘flash frozen’ in order to kill any parasites that may exist inside the flesh. Because of this, it’s easier and safer to buy sushi grade fish when making not only this Tuna Poké recipe but any Hawaiian Poké.

In terms of accompaniments, a few essentials include sticky rice, edamame, and sliced carrots but I love eating this Tuna Poké Recipe with avocado, cucumber, a few pieces of nori (dried seaweed), and radishes. Sometimes I’ll even include a little pickled ginger as a little extra salty profile addition to the dish! Alternatively, a simple addition of popular poké sauces can turn this recipe into a Spicy Tuna Poké Recipe like the addition of some spicy mayo (ingredients to which I have included below)! The best part, you can make it as spicy or as mild as you wish and use whatever mayo you have in the fridge (full-fat, light, paleo, etc).

Before you begin, it is vital to note that you must marinate your Ahi Tuna Poké for a minimum of 2 hours prior to eating in order to get the full flavor. The marinade really only takes 10-15 minutes to prepare and is super easy (just combined everything in a bowl). If you are thinking of making this for dinner you may want to start the marinating process first thing in the morning or over your lunch break to ensure it is ready for dinner! Although the best time to eat this Tuna Poké recipe is the same day you marinate it, it will keep in the fridge for up to two days.

* Please Note - Some links in this post may be affiliate links *

INGREDIENTS:

SERVES 4

- Tuna Poké Marinade -

2 Lbs of Sushi Grade Ahi Tuna
3 TBSP of Soy Sauce
2 TBSP of Sesame Oil
1 TSP of Fresh Ginger - grated
1.5 TSP of Hawaiian Salt
1/2 Cup of Onion - sliced thinly
1 TBSP of Sesame Seeds - toasted
2 TBSP of Macadamian Nuts - toasted and chopped
1 CUP of Green Onion (green parts only) - chopped
1/4 TSP of Chili Pepper

- Accompaniments -

2 CUPS of Steamed Sticky Rice - can be substituted for short grain brown rice for a healthier choice
Dried Seaweed - cut into 2 inch strips
1 CUP of Edamame - steamed and than chilled
Cucumber - thinly sliced
2-3 Radishes - thinly sliced
1 Carrot - shaved
Pickled Ginger

- Poké Sauce - Spicy Mayo can be added to this dish to turn it into a Spicy Ahi Poké recipe

4 TBSP of Mayonnaise
4 TSP of Sriracha - can be altered to your desired spice level


LOVE SEAFOOD? CHECK OUT THESE OTHER RECIPES!


HOW TO MAKE POKÉ:

Using a sharp knife, skin your filet of tuna and cut away any tendon before cutting the remaining meat into 1 inch chunks.

In a large bowl, mix your marinade ingredients together with the tuna very well before wrapping and placing in the fridge to marinate for 2 hours.


30 minutes prior to eating, prep your accompaniments and steam your sticky rice.

When ready, assemble your tuna poke bowl and garnish with a few additional sesame seeds.


FOLLOW ME ON INSTAGRAM @ISTHATSOH


I hope you enjoyed this Tuna Poké recipe with avocado recipe as much as I do. If you have any comments please leave them below and I'll be happy to answer them as soon as I can! Happy eating!!!


PIN THIS POST

KOREAN KIMCHI PANCAKES (KIMCHIJEON) WITH DIPPING SAUCE - A YUMMY KOREAN STREET FOOD RECIPE

Korean kimchi pancakes (often referred to as kimchijeon in Korea) are a delicious street food dish often enjoyed as a snack or after a night out, that is so easy to make at home! To tell you the truth, it’s just like making traditional pancakes where you add everything together in a bowl and fry it up except Korean Kimchi Pancakes are way more savory than your traditional North American pancake thanks to the addition of green onions and some spicy kimchi! If you enjoy Korean food and want to learn how to make delicious kimchi pancakes at home, check out this foolproof recipe with dipping sauce below!

IS KIMCHI VEGAN?

It all depends on the brand you buy! Traditional kimchi does contain fish sauce but depending on the brand you buy you can also find it without, so make sure to check the ingredient list. Additionally, Kimchi is not difficult to make, so if you want to try making it at home you can just leave out any animal products to make it vegan.

In my opinion, the best kimchi brand is Myungga Mat Kimchi however, I did recently do a Whole 30 cleanse and found a plant-based kimchi brand called LIVE at Ambrosia that I very much enjoy. It doesn’t have any added fish sauce and uses apple for sweetness instead of sugar. *NOTE: This recipe is not whole 30!

WHAT ARE SOME KIMCHI BENEFITS?

Kimchi is so good for your gut! It aids with digestion and is packed full of great probiotics. It is also said to help with inflammation, aid with weight loss, strengthen your immune system and support heart health!

DOES KIMCHI GO BAD

Yes! I recently had to throw out the remnants of a jar of kimchi that was a month or so old. You could tell by the way it smelled that it had ‘over fermented’. It smelled like a bottle of wine that has been sitting out for a few days. If you open your jar and it smells kind of sour with a pungent alcohol smell - it’s most likely gone bad.

* Please Note - Some links in this post may be affiliate links *

INGREDIENTS FOR KIMCHI PANCAKES:

Makes 2-3 Pancakes

3-4 Green Onions (chopped diagonally) - set a little aside for garnish
1/2 a CUP of Kimchi (chopped) *Use a plant-based Kimchi if you want this recipe to be vegan!
1/2 a CUP of Korean Pancake Mix
2-3 TBSP of Kimchi Juice and/or Korean Chili Paste
About 1 Cup of Water (to be added a 1/4 CUP at a time)
1-2 TBSP of Vegetable Oil

- Garnish -
1 TBSP of Seasame Seeds (roasted)
Dried Seaweed (cut into 2-inch strips)

- Dipping Sauce -

2 TBSP of Soya Sauce
1 TBSP of Water
2 TSP of Rice Vinegar
1 TSP of Sugar
2 TSP of Sesame Oil
1 TSP of Sesame Seeds


CHECK OUT THESE OTHER ASIAN INSPIRED RECIPES


HOW TO MAKE KIMCHI PANCAKES:

In a small bowl, add all your dipping sauce ingredients, and using a fork mix it together before setting it aside.

In a bowl add in your green onions (making sure to put some to the side for a garnish later), Korean pancake mix, kimchi, and kimchi juice/ Korean chili paste in a bowl. Stir in a 1/4 cup of water at a time until a batter starts to form. You want it to be the same consistency as a regular pancake mix so keep adding water until you achieve this desired consistency.

Heat up 1-2 TBSP of vegetable oil in a pan and pour in your Kimchi pancake batter when hot. Allow the Kimchi pancake to cook on one side for 2-3 minutes before flipping - same as you would a regular pancake.

When ready, remove from heat, garnish with sesame seeds, more green onion, and dried seaweed strips.

Serve with dipping sauce.


FOLLOW ME ON INSTAGRAM @ISTHATSOH


I hope you enjoyed this easy vegan kimchi pancake recipe with dipping sauce as much as I do. If you have any comments about how to make kimchi pancakes, please leave them below and I'll be happy to answer them as soon as I can! Happy cooking!!!


PIN THIS POST