THE YUMMIEST AHI TUNA ALOHA POKE!

Did you know that one of the last few trips Adam and I took before the pandemic was to The Big Island of Hawaii, Kona? It was an extended family trip that consisted of 13 of us staying at a house we rented for a few weeks over Christmas and it was a BLAST! It wasn’t my first trip to Hawaii but it is where I fell in love and really indulged in authentic Hawaiian Poké for the first time! It’s such a staple Hawaiian dish that you will find amazing Tuna Poké in grocery stores and small family owned stores all over the islands!

If you have never heard of Hawaiian Tuna Poké, it is a traditional Hawaiian raw fish salad that consists of raw tuna (although I have used salmon and it taste just as great) marinated in soy sauce, sesame oil, and onions. Ahi Poké may appear complicated or intimidating to recreate at home but let me assure you it is actually super easy to make Hawaiian Tuna Poké at home as long as you buy sushi grade fish. Unfortunately, not all fish will work for making a Hawaiian Poké recipe at home. Since the fish is not cooked it has to have been ‘flash frozen’ in order to kill any parasites that may exist inside the flesh. Because of this, it’s easier and safer to buy sushi grade fish when making not only this Tuna Poké recipe but any Hawaiian Poké.

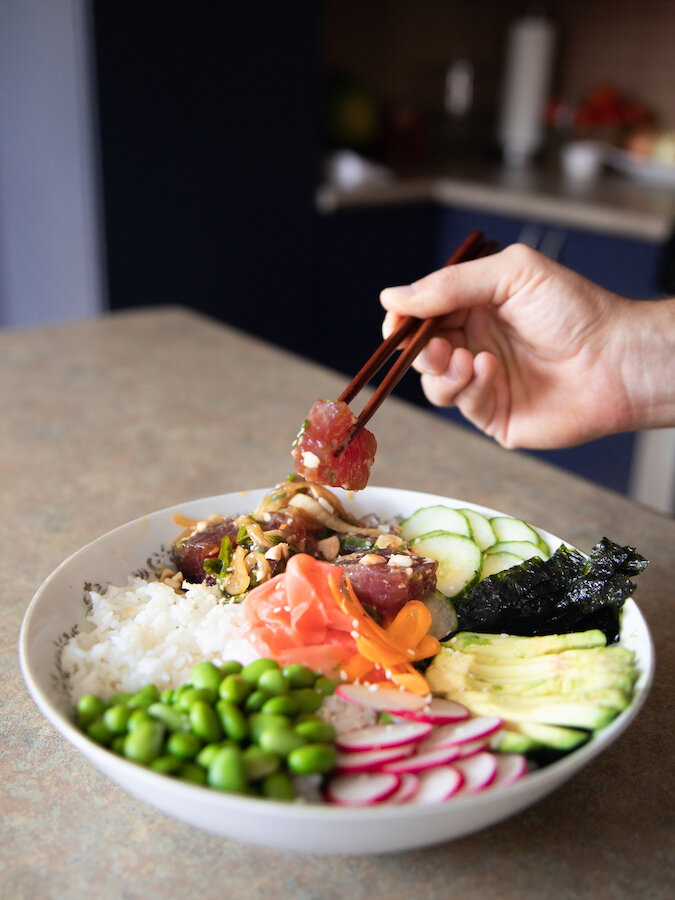
In terms of accompaniments, a few essentials include sticky rice, edamame, and sliced carrots but I love eating this Tuna Poké Recipe with avocado, cucumber, a few pieces of nori (dried seaweed), and radishes. Sometimes I’ll even include a little pickled ginger as a little extra salty profile addition to the dish! Alternatively, a simple addition of popular poké sauces can turn this recipe into a Spicy Tuna Poké Recipe like the addition of some spicy mayo (ingredients to which I have included below)! The best part, you can make it as spicy or as mild as you wish and use whatever mayo you have in the fridge (full-fat, light, paleo, etc).

Before you begin, it is vital to note that you must marinate your Ahi Tuna Poké for a minimum of 2 hours prior to eating in order to get the full flavor. The marinade really only takes 10-15 minutes to prepare and is super easy (just combined everything in a bowl). If you are thinking of making this for dinner you may want to start the marinating process first thing in the morning or over your lunch break to ensure it is ready for dinner! Although the best time to eat this Tuna Poké recipe is the same day you marinate it, it will keep in the fridge for up to two days.

* Please Note - Some links in this post may be affiliate links *

INGREDIENTS:

SERVES 4

- Tuna Poké Marinade -

2 Lbs of Sushi Grade Ahi Tuna
3 TBSP of Soy Sauce
2 TBSP of Sesame Oil
1 TSP of Fresh Ginger - grated
1.5 TSP of Hawaiian Salt
1/2 Cup of Onion - sliced thinly
1 TBSP of Sesame Seeds - toasted
2 TBSP of Macadamian Nuts - toasted and chopped
1 CUP of Green Onion (green parts only) - chopped
1/4 TSP of Chili Pepper

- Accompaniments -

2 CUPS of Steamed Sticky Rice - can be substituted for short grain brown rice for a healthier choice
Dried Seaweed - cut into 2 inch strips
1 CUP of Edamame - steamed and than chilled
Cucumber - thinly sliced
2-3 Radishes - thinly sliced
1 Carrot - shaved
Pickled Ginger

- Poké Sauce - Spicy Mayo can be added to this dish to turn it into a Spicy Ahi Poké recipe

4 TBSP of Mayonnaise
4 TSP of Sriracha - can be altered to your desired spice level


LOVE SEAFOOD? CHECK OUT THESE OTHER RECIPES!


HOW TO MAKE POKÉ:

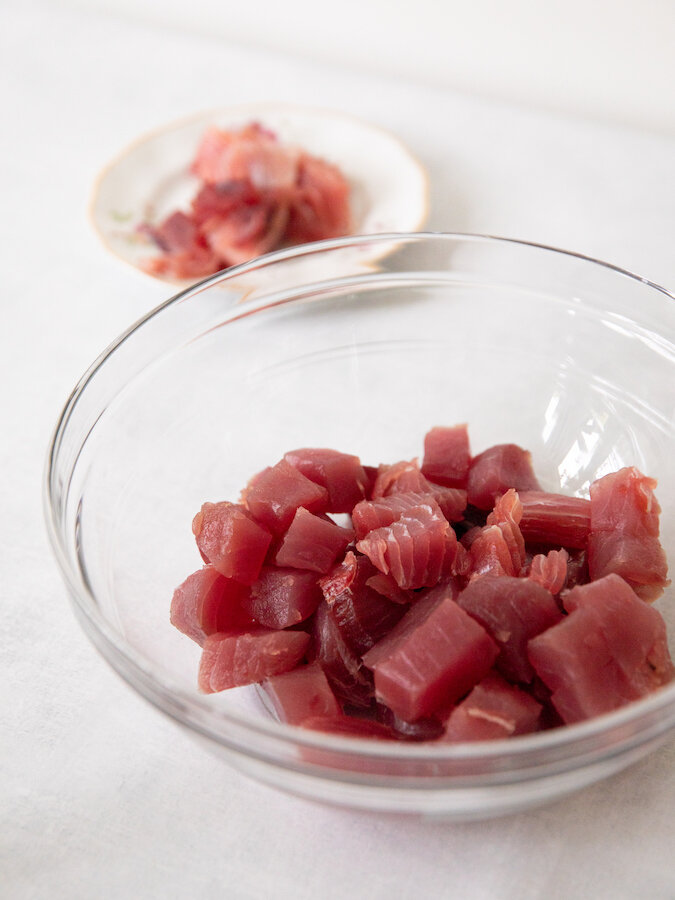
Using a sharp knife, skin your filet of tuna and cut away any tendon before cutting the remaining meat into 1 inch chunks.

In a large bowl, mix your marinade ingredients together with the tuna very well before wrapping and placing in the fridge to marinate for 2 hours.


30 minutes prior to eating, prep your accompaniments and steam your sticky rice.

When ready, assemble your tuna poke bowl and garnish with a few additional sesame seeds.


FOLLOW ME ON INSTAGRAM @ISTHATSOH


I hope you enjoyed this Tuna Poké recipe with avocado recipe as much as I do. If you have any comments please leave them below and I'll be happy to answer them as soon as I can! Happy eating!!!


PIN THIS POST

SPAGHETTI AGLIO E OLIO - A SIMPLE ITALIAN CLASSIC

Leave it to the Italians to create an incredibly flavourful pasta dish using only a few inexpensive ingredients! This absolute classic is one of my all-time favs and takes less than 10 minutes to whip up. In my household, we like to serve it alongside meat dishes like my mom’s coveted rack of lamb recipe or occasionally by itself with a few added shrimp on top! If you are looking for a quick, student-friendly pasta dish to whip up or something to add to a protein as a side, you can’t go wrong with a simple yet flavorful dish like this one!

* Please Note - Some links in this post may be affiliate links *

INGREDIENTS:

Serves 4 People

2 TBSP of Olive Oil
4 Cloves of Garlic - Minced
1 Pack of Spaghetti - cooked al dente
Italian Parsley - Roughly Chopped
Parmesan Cheese - Grated
Salt and Pepper

You can also add chilli flakes to make it a little spicy or a few shrimp!


CHECK OUT THESE OTHER DELICIOUS ITALIAN RECIPES


DIRECTIONS:

Bring water to a boil on the stove, salt, and cook your pasta.

When pasta is almost ready, heat up your olive oil on medium heat in a large skillet. When hot, add in your garlic and cook for 2-3 minutes. If you like a little spice, feel free to add in some chili peppers too.

Once garlic is fragrant, add in your cooked pasta, sprinkle on some grated parmesan, and some roughly chopped parsley.

Salt and pepper to taste and serve with more parmesan on the side.

Enjoy!


FOLLOW ME ON INSTAGRAM @ISTHATSOH


I hope you enjoyed this recipe as much as I do. If you have any comments please leave them below and I'll be happy to answer them as soon as I can! Happy cooking!!!


PIN THIS POST

MOROCCAN BROCCOLI SALAD - GLUTEN FREE, KETO & VEGAN

Packed full of antioxidants, this delicious Moroccan raw broccoli salad is both beautiful to look at and packed full of nutrients. If you, like me, are looking for ways to eat healthier without compromising on taste, this gluten free, vegan, keto broccoli salad is perfect. Since it can be prepared a day in advance and keeps well in the fridge, it also is great for meal planning or a grab-and-go snack. Not to mention it takes only a few minutes to make!

Enjoy!

INGREDIENTS:

Serves 4

- Dressing -
6 TBSP of Grape Seed Oil
1 TSP of Ras-El-Hanout Spice
1 Garlic Clove (pressed or chopped finely)
2 TBSP of Fresh Lemon Juice
2 TBSP of Balsamic Vinegar
1 TBSP of Honey (can be substituted with Agave if you are vegan)
Salt and Pepper to taste

- Salad -
6 CUPS of Broccoli Florets
1 Shallot (chopped Finely)
1 Jalapeno (chopped finely)
1/3 CUP of Dates (pits removed and chopped finely) - reduce the amount or leave out if you want more of a keto broccoli salad)
1/4 Cup of Roasted Pistachios (chopped finely)
Salt and Pepper to taste

- Optional Garnish-
1/4 CUP of Pomegranate Seeds
5-6 Slices of Pickled Beets (use sugar-free pickled beets if you want more of a keto broccoli salad)


LOOKING FOR SOME HEALTHY RECIPES? CHECK THESE OUT TOO!


DIRECTIONS:

Remove sauce pan from heat and add in lemon juice, balsamic vinegar, and honey (or agave). Salt and pepper to taste and set aside to cool.

Next, add your broccoli, shallots, dates, jalapenos and pistachios to a large salad bowl. Dress with your ras-el-hanout dressing, toss and garnish with pomegranates and slices of picked beats. Salt and pepper once again to taste.

Cover and chill if prepared in advance otherwise enjoy!


FOLLOW ME ON INSTAGRAM @ISTHATSOH


I hope you enjoyed this gluten free, vegan, keto broccoli salad recipe as much as I do. If you have any comments please leave them below and I'll be happy to answer them as soon as I can! Happy cooking!!!


PIN THIS POST

MEDITERRANEAN VEGAN BEAN SALAD!

As someone who is always looking for ways to make ‘honouring my body’ easier, following a balanced diet such as the traditional Mediterranean diet makes doing so not only satisfying but undeniably more delicious! If you are looking for ways to add more protein to your diet without always gorging on meat, mix bean salad make a great substitute. Packed full of protein and carbs, this Mediterranean vegan bean salad will give you a boost of energy to help sustain you throughout the day. It has more nutritional value than a regular leafy green salad and keeps well for 3-4 days in the fridge, making it perfect for meal planning. It’s also very inexpensive to make and can be whipped up in less then 10 minutes! Regardless of your motivation, I know you’ll not only love the flavour, but feel good about eating it too!

Enjoy!

INGREDIENTS:

Serves 4-5

1 Shallot (finely chopped)
3TBSP of White Wine Vinegar
1/2 Cup of Parsley (roughly chopped)
1/4 Cup of Chives (roughly chopped)
1/4 Cup of Mint (roughly Chopped
Olive Oil
2 x 15 oz Mix Bean Medley
Salt and Pepper


LOOKING FOR VEGAN RECIPES? CHECK THESE OUT!


DIRECTIONS:

Add white wine vinegar to shallots and set aside for 5 minutes.

Next get a large bowl and add in your chopped parsley, chives and mint. Coat in olive oil. Add bean medley. Salt (generously) and pepper to taste.

Lastly add in your white wine vinegar shallots, toss and serve!


FOLLOW ME ON INSTAGRAM @ISTHATSOH


I hope you enjoy this vegan bean salad recipe as much as I do. If you have any comments please leave them below and I'll be happy to answer them as soon as I can! Happy cooking!!!


PIN THIS POST

ELOTE - MEXICAN STREET CORN

Elote or Mexican street corn is one of my favorite appetizers!! Whenever I go out for tacos I always have to order the Mexican street corn otherwise the dining experience isn't complete! The thing you might not realize is that it is so simple to make and you can do it so easily right at home. I made mine on the bbq this past week which I think was even better than boiling it because when you boil it you dilute the sugars in the kernels whereas if you bbq it, they get sealed in and the corn tastes extra sweet! Give it a go, you’ll be surprised just how delicious and easy it is to make.

INGREDIENTS:

Sweet Corn - Two per person is my usual estimate
Butchers Twine
2 TBSP of Vegetable Oil
Cream Fresh
Chipotle Chilli Seasoning Spice
Feta Cheese, Cotija Cheese or Queso Fresco
Lime Wedges - optional

DIRECTIONS:

Peel back the husk of corn and tie back with a piece of butchers twine

Coat corn in a light layer of oil and place on the bbq, turning frequently so that it becomes only slightly charred

When the corn is ready, drizzle with creme fresh, sprinkle with chipotle seasoning and garnish with cheese.

Serve warm with a slice of lime.

Enjoy!


I hope you enjoyed this recipe as much as I do. If you have any comments please leave them below and I'll be happy to answer them as soon as I can! Happy cooking!!!


PIN THIS POST