CAULIFLOWER EGG FRIED RICE (LOW CARB & KETO)

Always on the lookout for a low carb option to make with my next meal, this cauliflower egg fried rice is my new favorite recipe. It’s so easy to make, is great for batch meal planning, and only takes a few minutes to prepare. If you are looking for a tasty low carb, keto, gluten-free recipe that is packed full of flavor and taste just like the traditional egg fried rice, you got to try this recipe!

Enjoy!

INGREDIENTS:

- Makes 4 Servings -

2 TBSP of Vegetable Oil
3 Scallions - Chopped
4 Garlic Cloves - Minced
1'“ of Fresh Ginger - Minced
1 CUP of Frozen Peas
1 500 gram Pack of Frozen Cauliflower Rice
4 TBSP Low Sodium Soya Sauce
2 TBSP Sesame Oil
3 Eggs - lightly beaten
Salt and Pepper to Taste

DIRECTIONS:

Heat up vegetable oil in a large skillet on high. When hot, throw in your chopped scallions and minced garlic and ginger. Allow to cook for 3-4 minutes before adding in your frozen peas.

When peas begin to turn bright green (about 4-5 minutes) add in your frozen cauliflower rice and mi thoroughly until well incorporated and there are no big chunks. Allow water to evaporate by continuing to cook for 5-7 minutes.

Next, add in your soya sauce and sesame oil, Mix until all the rice is coated before pushing the rice to one side fo the skillet.

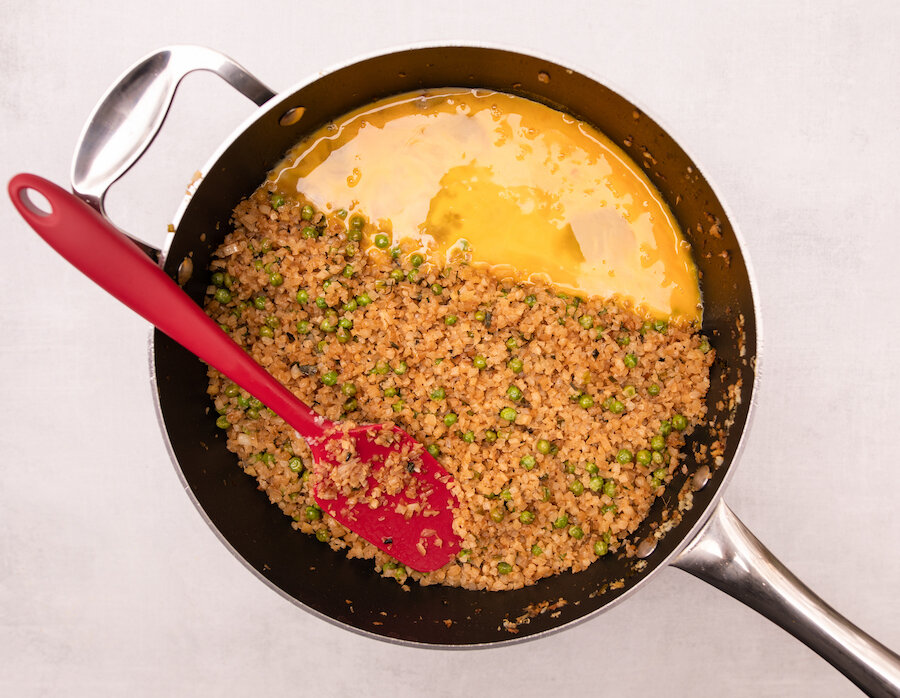
On the empty side oft he skillet, add in your egg. Salt and pepper to taste. Fry it up, scrambling as it goes. Once cooked mix in with the rice and remove from heat.

Enjoy!


If you like this recipe or have any comments/questions, feel free to leave them in the comment section below!


PIN THIS POST

SUMMER OF PROSCIUTTO - 2 APPETIZERS THAT REQUIRE ZERO COOKING

*Disclosure: I have participated in a paid partnership with Mastro/San Daniele.
Opinions in this post are my own.

Summer has always been my favourite season in Canada and this year I am determined to make the most of it! For me, that means less time in the house and more time outdoors, enjoying the cottage, hanging out at the beach and of course, watching the sunset. Whenever I’m looking for a quick and easy meal to whip up to take along with me, I always prefer the non-cook option (actually, my boyfriend Adam and I like to joke about how I’m an even better ‘assembler’ than I am a cook)! This means that I’m always on the lookout for delicious food items that are not only versatile but also bursting with flavours that enhance any dish I throw together. One such item is San Daniele Prosciutto! Made according to old world tradition and cured for 12 months, this pre-packaged prosciutto helps turn a simple salad, crostini or charcuterie board into an amazing appetizer or even meal, not to mention it travels well and can easily be assembled on the go! So next time you’re at the grocery store, make sure to grab a pack of San Daniele prosciutto from the bulk deli counter at your grocery store and enjoy its bursts of classic flavour, unique fragrance, and naturally rosy colour with your next meal.

This week I used my pack of San Daniele prosciutto to whip up these brie and prosciutto crostini to enjoy on the beach while watching the sunset, along with this Joso’s inspired summer salad (my favourite restaurant in Toronto) that is light yet very filling!

INGREDIENTS:

- Serves 4 People -

- Crostini -

1 Pack of Paris Toast
1 Round of Brie Cheese
1 Jar of Jam (I recommend an apricot or raspberry)
1 Pack of San Daniele Prosciutto

- Large Salad -

1 Large White Potato - Boiled and Chopped
2 Cups of Fresh Arugula
2 Cups of Romain - Chopped
1 Vine Tomato - Chopped
1/2 Can of Chickpeas - Rinsed and Drained
2 Green Onions - sliced lengthwise
1/2 Cup of Feta Cheese
1 Persian Cucumber - Chopped
1 Pack of San Daniele Prosciutto
Salt and Pepper

- Salad Dressing -

1 Part Red Wine Vinegar
4 Part Canola Oil or Vegetable Oil
Salt and Pepper (lots of salt!)

DIRECTIONS:

- Crostini’s -

Top a few Paris toast with brie cheese.

Next, add a dollop of jam on top.

Garnish with San Daniele Prosciutto and serve.

Enjoy!

- Large Salad -

Bring a pot of water to a boil and place you pealed potato inside. Cook for 20 minutes or until it is soft. You can check if it has become soft by sticking a fork in it. If you can easily slide a fork inside it then it is ready. When ready, drain the hot water out of the pot and blanch the potato with cold water for 2 minutes to prevent it from cooking further.

Place Arugula, Romain, chopped tomato, chickpeas, chopped green onion, chopped cucumber, crumbled feta, and cooled, chopped boiled potato in a large bowl. Top with San Daniele Prosciutto, some fresh cracked pepper, and a pinch of salt.

Dress with salad dressing, toss and serve.

Enjoy!


If you like this recipe or have any comments/questions, feel free to leave them in the comment section below!


PIN THIS POST

EASY KETO CAULIFLOWER GNOCCHI RECIPE

Since getting back on the Keto diet (click here to read about my Keto diet experience) I have been experimenting with new recipes to help me stay on track. One recipe that I developed using a combination of recipes I found online and experimenting with a few times, was Keto cauliflower gnocchi recipe that you can make using an air fryer or some oil in a pan if you don’t have an air fryer. Turned out that my entire family approved and actually preferred it over the regular Gnocchi I whipped up for the taste test. PLUS, it’s super easy to make! A double win! If you are looking for a healthy pasta alternative - you got to try this cauliflower gnocchi recipe!

Enjoy!


INGREDIENTS:

- Serves 4 people

1 Head of Cauliflower
1 CUP of Almond Flour
1/2 CUP of Arrowroot Flour
1 TSP of Garlic
1 TSP of Salt
1 CUP of Freshly Grated Parmesan Cheese
1 TBSP of Olive Oil if you are pan frying it


LOOKING FOR KETO RECIPES? CHECK THESE OUT TOO!


DIRECTIONS:

Cut the cauliflower florets off the stem in small chunks and steam until tender.

Once tender, remove the cauliflower from pot and place in a food processor. Pulse until the consistency of the cauliflower is like mash potatoes before piling it in the middle of a clean dishcloth and wringing out as much excess water as possible. Even when you think you’re done, you’re probably not so give it another wring!

Place the cauliflower in a bowl and add in the garlic, almond flour, arrowroot flour, salt, and parmesan cheese. Mix until thoroughly incorporated till it forms a soft dough. Cut dough into quarters.

On a lightly floured surface, roll each quarter of the dough out using your hands to form a long rope about 3/4 to 1 inch in diameter. Cut the dough into 1/2 inch pieces and picking up each one, smooth the edges into small oblong balls resembling gnocchi. Once done, place on a lightly floured baking sheet lined with parchment paper.

Now it is time to cook the cauliflower gnocchi. I recently used an air fryer and loved the results. If you have one you can cook them at 400 for 6 -7 minutes or fry in a tbsp of olive oil on the stove in a pan until golden brown.

When ready, serve with sauce of choice.


FOLLOW ME ON INSTAGRAM @ISTHATSOH


If you like this air fryer cauliflower gnocchi recipe or have any comments/questions, feel free to leave them in the comment section below!


PIN THIS POST

FOREVER DREAMING OF ITALY: CACIO E PEPE, A SIMPLE ITALIAN CLASSIC

We may not be able to travel during this global pandemic but that doesn’t stop me from dreaming about Italy!

A couple of years ago Adam and I ate our way through Tuscany and spent some time in Rome (click here to read my food guide to Rome) and during our time there we took a fantastic authentic Italian cooking/pasta making course. It was during that course that I first had Cacio E Pepe and feel in love with the bite of the pepper against the salty cheese. Not only did we love our time in Italy but this classic, simple dish always reminds me of our great adventures there.

Buon Appetito!

INGREDIENTS:

- Serves 2 people

120 Grams of Pasta of Your Choice
Salt
3 TBSP of Unsalted Butter
1/2 TSP of Freshly Ground Pepper
3/4 Cups of Finely Grated Parmesan
1/2 Cup of Finely Grated Pecorino

DIRECTIONS:

Boil water, add salt followed by your pasta of choice. Cook slightly before al dente.

Before draining the pasta, set aside about 1/2 a cup to 1 cup of pasta water.

Warm up butter in a skillet and add in the freshly ground pepper. Toast the pepper for 1-minute stirring continuously.

Add in 1/2 a cup of pasta water followed by the pasta - coat the pasta so it cooks a little further. The sauce should be wet so once you fold in the parmesan and allow it to cover the pasta fully if the pasta water is absorbed fully, add more before lowering the heat and adding pecorino.

Stir, serve and enjoy!


If you like this recipe or have any comments/questions, feel free to leave them in the comment section below!


PIN THIS POST

CACIO E PEPE 2.jpg
CACIO E PEPE.jpg

HOMEMADE PEROGIES FROM SCRATCH!

“Food is our common ground, a universal experience.” –James Beard

Life hasn’t been all sunshine and rainbows lately. I know this global pandemic raging over the world has taken away everyone’s ability to move freely and enjoy the comforts we once took for granted, dining out included. For me personally, I feel like I am in a constant state of limbo unsure of what the future may hold or when self-isolation and social distancing will end. Turning to comfort foods that both keeps my mind busy and nourish my soul has been a great escape from this new reality.

Perogies for me are one of those comfort foods that take time and patience to prepare but always manages to soothe the mind and soul. They are also great if you want to batch make something to keep in your fridge so you can enjoy them over the course of a week or want something relatively inexpensive to give to someone in need. During this time we must all be a little bit kinder to ourselves and to others, and giving someone a home-cooked meal is a great way to show you still care even when you can’t be there physically. Whatever your purpose for making them, I hope they bring you the same happiness and enjoyment as they have brought me. Stay well!

INGREDIENTS:

Serving: 6 People @ 5 Perogies Each,

- Cheese and Potato Perogies: Filling-
1 1/2 LBS of Russet Potatoes (typically around 2-3 potatoes should suffice) - peeled and chopped into 1-inch squares
2 TSP of Olive Oil
1/2 a CUP of Onion (diced)
1 Clove of Garlic (minced)
1/2 CUPS of Cream Cheese
1/2 TSP of Salt
Pepper to taste

- Dough For Perogies -
2 1/2 CUPS of All-Purpose Flour
1/2 TSP of salt
1/4 CUP of Sour Cream
1 Egg
2/3 CUP of water

-What To Serve With Perogies - Optional Toppings -
Bacon
Chives
Sourcream
Caramelized Onion


CRAVING COMFORT FOOD? CHECK OUT THESE OTHER RECIPES!


HOW TO MAKE PEROGIES:

First, we need to make the filling.

Put your cut up potatoes in a pot with lukewarm water, add salt and bring to a boil.

In a pan, drizzle a little bit of olive oil and allow it to heat up on medium. Once hot, add in your chopped onions and allow them to cook until they become translucent. This may take 3-5 minutes and you may want to reduce the heat to ensure they don’t burn.

Add in your garlic to the onions when they are close to being done (garlic cooks faster than onion).

Once the potatoes are ready, strain the water out and place the cooked potato back in the pot before starting to mashing them into a smooth texture. To help you make them creamier, add in your cream cheese.

When onions and garlic are ready, add them to the potato pot as well, mix until well incorporated, salt and pepper to taste, and set aside to cool down to room temperature.

Dough For Perogies

Next, we need to make the dough.

Add flour and salt into a large bowl and mix until well combined.

Make a well in the middle and add in your eggs, water, and sour cream. Using a fork or spoon start to mix it together starting from the inner circle and working your way toward the outer edges. You may need to eventually switch to using your hands.

Once the dough starts to form, use a countertop to knead it till it isn’t powdery and has a smooth texture. Place dough back in the bowl, cover with a cloth and let sit for 10 minutes.

After 10 minutes, flour a working station and roll out 1/3 of the dough till it is 1/8’ in thickness. Cut out circles using a circle cookie cutter with a 4’ diameter. You can also use a lip of a cup as a stencil and a pizza cutter if you don’t have a circle cookie cutter! Feel free to get creative! If you don’t have a 4’ wide diameter cup you can always roll out the dough a little thicker, use a 3’ wide diameter cup and then roll them out a little thinner after to spread out the dough wider. It doesn’t have to be perfect.

Set dough pancakes aside on a floured surface and cover with a cloth. Once you have a few cut out, fill the middle with about a tablespoon of the mashed potato filling and fold the dough over, pinching the sides to create a seal. If the seal doesn’t hold use a little water along the edge to help. Secure the seal by pressing the prongs of a fork along the dumpling edge and making indents into the dough.

How To Cook Perogies & How Long To Boil Perogies

Once you have a few complete, boil a pot of water. Once boiled, add salt and drop in 3-4 dumplings. You will need to stir the water at first so they don’t stick together. Eventually, after 3-5 minutes the Perogies, will float to the surface of the water, when that happens, allow them to cook for an additional 30-45 seconds before taking them out of the water and setting them aside on an oiled tray or casserole dish. As you add more cooked perogies to the oiled tray or casserole dish, make sure they are covered in olive oil to avoid them sticking to one another. You can store them like this for a few days in the fridge if you don’t want to eat them right away.

I like my perogies fried so typically I will heat up some butter in a pan on medium and once hot, place a few of these finished, pre boiled perogies in the plan flipping them as they become nicely browned. When ready, remove them from the pan, add a dollop of sour cream, chives, and bacon bits and serve!

Pierogies in Air Fryer

You can also air fry pierogies in an air fryer if you have one! It usually only takes 4-5 minutes to get them crispy and golden brown but I have found that each air fryer I have tried them with is a little different so just keep an eye on them. Typically 4-5 minutes though is good!

Enjoy!


FOLLOW ME ON INSTAGRAM @ISTHATSOH


If you like this recipe for perogies with bacon or have any comments/questions about how to make homemade perogies or suggestions as to what to serve with perogies, feel free to leave them in the comment section below!


PIN THIS POST

HOMEMADE PEROGIES FROM SCRATCH.jpg Perogies - how to make perogies, homemade perogies