PAD GRA PROW - EASY THAI STREET FOOD RECIPE!

Since I am always and forever dreaming of travel, I thought I’d share a new recipe and popular street food dish today from a country on my bucket list, Thailand. Pad Gra Prow (sometimes also seen spelled Pad Gra Pow or Pad Kra Prow) is a flavourful, ground pork dish that is served on top of a bed of steamed Jasmin rice and topped with a sunny-side-up egg. Not only is it super simple to make but it will have you asking for second helpings! Don’t like pork? That’s okay! Tofu makes a great vegetarian substitute for pork or even ground chicken. Alternatively, if you are looking for a low-carb option you can also substitute the rice for a lettuce wrap which adds an extra refreshing element to this already delicious dish. No matter what your preference, this recipe will have you daydreaming of traveling to Thailand one day soon too.
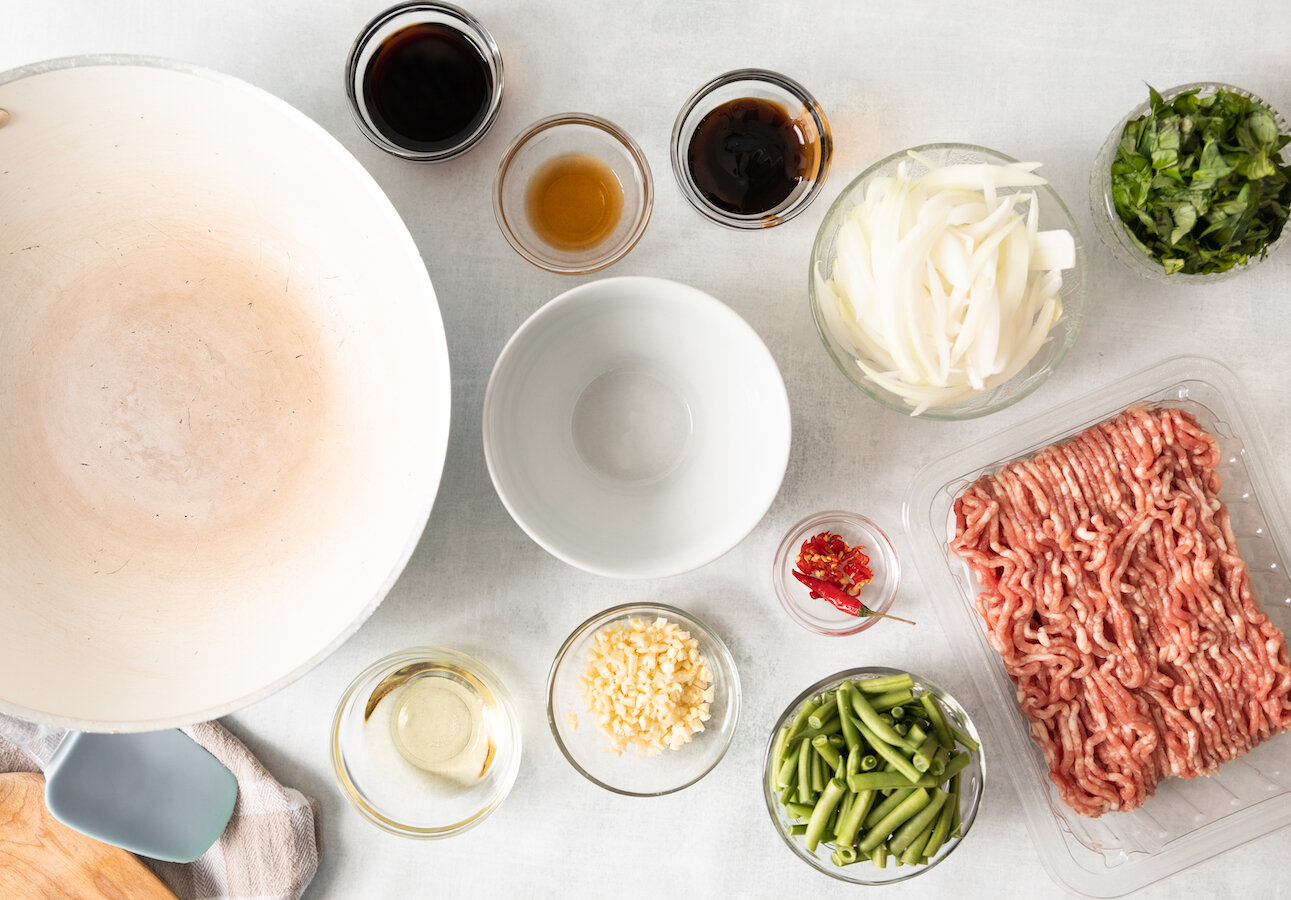
INGREDIENTS:

Yields 2-3 Servings

2 CUPS of Steamed Jasmin Rice
4 TBSP of Vegetable Oil divided - 1 TBSP and 3 TBSP
1 TBSP of Oyster Sauce
1 TBSP of Soy Sauce
1.5 TSP of Fish Sauce
2 TBSP Garlic - minced
1/2 TSP of Thai chili - minced
1 LB or 450g of Ground Pork - you can substitute for chicken or tofu but squeeze out all the water if you use tofu
1 Cup of French Beans - cut in 1” pieces
1/2 a White Onion - cut in 1/4 inch strips
2 Eggs
1 Cup of Thai Holy Basil - roughly chopped - if you can’t find Thai Holy Basil you can use regular Italian Basil instead
Salt and Pepper


MORE MOUTHWATERING ASIAN RECIPES


DIRECTIONS:

Cook rice and set aside.

While rice is cooking, add the oyster sauce, soy sauce and, fish sauce to a bowl and mix thoroughly, set aside

Next, in a wok heat up your vegetable oil and add in your garlic and chili. Cook until fragrant.

Once fragrant, add in your ground pork (or substitute with chicken or crumbled tofu) and allow to cook completely. Salt and pepper as desired.

Next, add in veggies (onion and beans) and continue to cook for about 2 minutes.

During this time/, fry eggs sunny side up in a skillet with a little bit of vegetable oil until whites are cooked but yolk is still runny, set aside.

Once pork/veggies are done, add the sauce mixture you made earlier to the wok and stir until well incorporated.

Next, stir in basil until wilted

Lastly, plate the pad gra prow on top of a bed of rice adding the fried egg on top and garnish with a piece of fresh basil.

Additionally, you can add a lime wedge on the side as well as a few extra small pieces of chili in a tablespoon of fish sauce when serving.

Enjoy!


FOLLOW ME ON INSTAGRAM @ISTHATSOH


I hope you enjoyed this recipe as much as I do. If you have any comments please leave them below and I'll be happy to answer them as soon as I can! Happy cooking!!!


PIN THIS POST

DECADENTLY DELICIOUS MUSHROOM BRUSCHETTA WITH GOAT CHEESE AND TRUFFLE OIL

If you love truffle anything as much as I do, you are going to love this mushroom bruschetta with goat cheese recipe!! My boyfriend Adam originally created this easy mushroom bruschetta recipe with some leftover mushrooms we had and it was so decadently delicious, I had to steal it for the blog! I have always been a fan of tomato bruschetta and first learned how to make bruschetta when I was in Italy a few years back and it’s honestly one of my favourite appetizers. Although I do love a good classic bruschetta, I enjoyed trying different bruschetta toppings this time around. So here you guys go! An Adam original -Mushroom Bruschetta with Goat Cheese and Truffle Oil - bound to make your mouth water, just like it did mine! Enjoy!

INGREDIENTS:

Serves 4- 5 people or makes 15 -18 pieces

18 oz Cremini Mushrooms - Chopped
1/4 Cup of Butter - divided into two portions
Salt and Pepper to Taste
1/4 TSP of Dried Thyme
1/4 TSP of Dried Oregano
1/4 TSP of Chilli Flakes
French Baguette - cut into crostinis
2-3 TBSP of Olive Oil
1 Small Pack of Goat Cheese
Truffle Oil - as desired


FEELING ITALIAN FOOD TONIGHT? CHECK OUT THESE OTHER ITALIAN RECIPES?


DIRECTIONS:

Before we get started with making the bruschetta with mushrooms, preheat the oven to 375 so we can toast the bread.

Heat up a skillet on medium heat and once hot, add in one portion of the butter.

Once completed melted, add in mushrooms and turn up to high heat. You will notice after a few minutes a lot of water will start to release out of the mushroom. Continue to cook on high heat, making sure all mushrooms are coated in butter and allow the water to evaporate.

Once evaporated turn heat down to medium, salt, and pepper as desired, and add in your herbs and spices. Mix until well incorporated.

Next, add in your second portion of butter and coat mushrooms thoroughly. Allow to cook for another 10 or so minutes, stirring every few minutes to avoid burning.

While that cooks, place slices of bread on a baking tray and coat each piece with some olive oil before placing it in the oven for 5 minutes or until toasted. When ready remove, allow to cool for a few minutes before coating with goat cheese.

When mushrooms are ready, add them on top of the goat cheese covered crostini’s and garnish with truffle oil before serving.


FOLLOW ME ON INSTAGRAM @ISTHATSOH

Gallery Block
This is an example. To display your Instagram posts, double-click here to add an account or select an existing connected account. Learn more

I hope you enjoyed this easy recipe for mushroom bruschetta with goat cheese and truffle oil as much as I do. If you have any comments please leave them below and I'll be happy to answer them as soon as I can! Happy cooking!!!


PIN THIS POST

KOREAN PICKLED RADISH RECIPE

I am sure by now you can tell that I have recently developed a slight obsession with Korean food. Now having been introduced to Yangnyeom chicken by my boyfriend’s brother’s Korean girlfriend and already having a previous love for Bibimbap, I now wanted to start sharing recipes for some little side dishes that you often see being served with Korean food like this one, a simple Korean pickled radish dish. Unlike regular radish, Korean radish is massive in size and white on the outside as well as the inside. Usually served pickled along with other small side dishes, I find Korean pickled radish to be refreshing, almost like a palette cleanser that goes well with spicy dishes. Pickled korean radish can also be stored easily in the fridge for up to two weeks and made in batches which makes it easy to pull out during mealtime. We recently made Korean pickled radish to go with our Yangnyeom chicken dinner the other week and it was the best compliment for the dish! I think you will feel the same way also! Hope you like it!


INGREDIENTS:

- Pickled Korean Radish -

1 lbs of Korean Radish, peeled and cubbed
1/3 CUP of Sugar
1/3 CUP & 1 TBSP of White Vinegar
3/4 CUP of Water
1 TSP of Kosher Salt


CHECK OUT THESE OTHER ASIAN INSPIRED RECIPES!


DIRECTIONS:

Combine sugar, vinegar, salt, and water in a large glass pickling jar and give it a stir so that it can mix well.

Next, add in your cubed radish, seal with a lid, and place in the fridge.

Allow to ‘pickle’ for a minimum of 2 hours before serving.

Korean pickled radish can be stored in the fridge for up to two weeks.

P.S. This recipe is usually served and pairs really well with Korean Fried Chicken (pictured below).


FOLLOW ME ON INSTAGRAM @ISTHATSOH

Gallery Block
This is an example. To display your Instagram posts, double-click here to add an account or select an existing connected account. Learn more

I hope you enjoyed this pickled Korean radish recipe as much as I do. If you have any comments please leave them below and I'll be happy to answer them as soon as I can! Happy cooking!!!


PIN THIS POST

LEMON BLUEBERRY POUND CAKE WITH ICING

It’s August, which means blueberry season is upon us here in Canada and since the price of one of my favorite berries has become insanely affordable, I thought it would be fun to create a few recipes using them. One such recipe that I decided to make was this lemon, blueberry pound cake which, even without icing is still sweet, light, and amazing. The best part about pound cake is that you can always make it ahead of time and freeze it to enjoy at a later date as an after-dinner dessert or alongside your morning coffee. Further, since it stores so well, you can even make it in batches as a back up for when that unexpected guest drops by and you need something quick to offer them. Either way, I know you will enjoy it!

INGREDIENTS:

- Lemon Blueberry Pound Cake -

1.5 CUPS of All-Purpose Flour
1/8 TSP Baking Soda
1/4 TSP Salt
2 TBSP of Lemon Juice
Zest from 1 Lemon (try not to get to much of the white layer under the top layer as it is bitter)
1/2 a CUP of Unsalted Butter (bring to room temperature)
1.5 CUPS of Sugar
3 Eggs
1 TSP of Vanilla Extract
1/2 a CUP of Buttermilk
1/2 - 3/4 CUP of Blueberries (depending on how much blueberries you want)

- Lemon Icing Glaze -
2 TBSP of Lemon Juice
1.5TBSP of Buttermilk
1.25 CUPS of Icing Sugar

DIRECTIONS:

Preheat oven to 325 degrees.

Butter and flour your loaf pan - mine was 9x5 inches.

Next, in a bowl, sift in your flour, baking soda, and salt before mixing in your lemon zest and stiring until well incorporated.

In a separate bowl, add in your butter and 1/2 cup of sugar and using a hand mixer cream the sugar on medium speed. Continue to add sugar 1/2 cup at a time until fully incorporated.

Next add the eggs, one at a time until well incorporated. Once all eggs are in turn the speed up to high and beat the mixture till it becomes fluffy.

Once fluffy, reduce speed back to medium and add in lemon juice and vanilla.

Once well incorporated and fluffy you can now start to add in the flour mixture and buttermilk. Start with 1/3 of a CUP of flour followed by 1/4 Cup of Buttermilk and repeat until all the flour and buttermilk is incorporated.


Next, fold in blueberries using a spatula before moving the entire mixture to your loaf pan and baking for 85-95 minutes or until a toothpick comes out clean.

Allow the pound cake to cool in the pan before moving it to a cooling rack.

At this point, you can make the icing (optional) by combining the lemon juice and buttermilk together in a bowl before slowly incorporating the icing sugar.

One loaf has cooled, drizzle the lemon icing glaze on top of the loaf. Store in the fridge to help it harden before cutting and serving or wrap and move to the freezer for storage.

Enjoy!


I hope you enjoyed this recipe as much as I do. If you have any comments please leave them below and I'll be happy to answer them as soon as I can! Happy baking!!!


PIN THIS POST

HEALTHY-ISH SPICY KOREAN 'FRIED' CHICKEN (YANGNYEOM)

Yangnyeom (or Yum Yum chicken as we like to call it), is a fried Korean chicken recipe, usually served breaded, and coated in a red, spicy, Korean fried chicken sticky red sauce. My boyfriend’s brother’s Korean girlfriend recently made this fried Korean chicken for the family and we all loved the sweet-salty-spicy flavors. Since we are all health-conscious, slight changes were made to the typical traditional recipe (no flour, frying in oil, and less sugar) but the results were just as tasty. If you feel like making something unique and easy for dinner, I highly recommend giving this recipe a go. It pairs beautifully with Korean pickled radish, a bowl of sticky rice, and of course, a nice cold beer!

Enjoy!

INGREDIENTS:

- BBQ Chicken Marinade -
3 LBS of Drumsticks
Vegetable OIl (enough to coat chicken)

- Korean Sauce -
2 TBSP of Rice Vinegar
2 TSP Ginger (minced or grated)
3 TBSP of Ketchup
2 TBSP of Honey
2 TBSP of Brown Sugar
2 TBSP of Soya Sauce
2 TBSP of Garlic (minced or grated)
1 TBSP of Sesame Oil
2-2.5 TBSP of Hot Chilli Paste (Gochujang) *depending on how hot you want

- Garnish -
Roasted Sesame Seeds
Green Onions, finely shredded


CHECK OUT THESE OTHER ASIAN STYLE RECIPES


DIRECTIONS:

Coat the chicken in vegetable oil and bbq till they are cooked through.

In a deep saucepan or wok create your Korean Chicken Sauce and heat up over low to medium heat, stir well. Once it starts to bubble, reduce heat, add in your bbq chicken and toss until well coated in sauce.

Remove chicken from heat and garnish with roasted sesame seeds and green onion before serving.

Enjoy!

P.S. This recipe is usually served and pairs really well with Korean pickled radish (pictured below)!


FOLLOW ME ON INSTAGRAM @ISTHATSOH


I hope you enjoyed this spicy Korean chicken recipe as much as I do. If you have any comments please leave them below and I'll be happy to answer them as soon as I can! Happy cooking!!!


PIN THIS POST