CHRISTMAS DESSERTS: EGGNOG GLAZED BAKED DOUGHNUTS RECIPE

Eggnog Glazed Baked Donuts - A Delicious Holiday Treat!

The sweet smell of cinnamon and nutmeg filled my kitchen as fluffy pillows of dough began to bake and rise in the oven. I have always enjoyed baking but there is something about the holiday season and Christmas desserts that makes me love it! Perhaps it’s the great memories attached to these quintessential holiday scents or the fact that I get to share it with others. Either way, I’m finding holiday baking even more intoxicating this year, pushing my excitement level to an all time high!

With restrictions beginning to ease, it seems as though I am not the only one feeling excited about the upcoming holiday festivities. I have already begun to see my agenda populate with upcoming events and parties, and it looks as though my friends are also eager to make up for lost time. In preparation, my friend Kate and I have begun to comb through some of our favourite recipes for scrumptious Christmas desserts that we plan to offer up as additions to dessert tables, edible hostess gifts, and baked goods for charity bake sales this holiday season.

Gifted a box of these delicious eggnog glazed baked donuts last year from Kate herself, I have waited a whole year to share this Christmas dessert recipe for baked donuts with you. I was never a huge fan of spiked eggnog but incorporating virgin eggnog into desserts has been a huge game changer for me. I love it now! Funny enough, because I was prepping the release of this recipe so early in the season, eggnog was not available in stores yet so I had to make my own. Turns out it’s very simple (let me know if you need a recipe below) and I have tons left over to use in future recipe and experiment with! Point being, even if you are not a big fan of eggnog, don’t knock this glaze until you try it! It’s like a creamy custard melted into one delicious topping that will make you second guess why you ever took a stance against eggnog! Haha! Trust me it’s good!

I love baked doughnuts and find them way easier to make symmetrical in shape and size than fried as well as more satisfying and filling. If you don’t have a donut baking tray, I have linked one below along with a few other items you may find helpful when assembling this recipe. Honestly though, this finger licking eggnog glazed baked donuts recipe is so easy and will definitly impress anyone you share it with this holiday season.

Happy Baking!

* Please Note - Some links in this post may be affiliate links *

INGREDIENTS FOR BAKED DOUGHNUTS:

MAKES 6 BAKED DOUGHNUTS

- BAKED DOUGHNUTS -

1 Cup of Flour
1 TSP of Baking Powder
1/4 TSP of ground Nutmeg
1/4 TSP of Salt
1/3 Cup of Sugar
1 Egg
1/2 Cup + 1 TBSP of Eggnog
2 TBSP of Unsalted Butter (melted)
1 TSP of Vanilla Extract

- EGGNOG GLAZE -
1 Cup of Powder Sugar
3 TBSP of Eggnog
1/2 TSP of Vanilla
Pinch of ground Nutmeg

- FROSTED ROSEMARY SPRIG GARNISH -

Rosemary Sprigs
1/2 Cup of Sugar
1/2 Cup of Water

- Additional Items -
Pipping Bag - you can use a zip lock bag if you don’t have one
Doughnut Baking Tray - greased with unsalted butter!
Cooling Rack


CHECK OUT THESE OTHER HOLIDAY RECIPES


HOW TO MAKE BAKED DOUGHNUTS:

Prep your garnish first by bringing equal parts sugar and water to a simmer before adding in one or two rosemary sprigs for flavor. Once it simmers for 1-2 minutes set aside to cool.

Preheat oven to 450 degrees.

In a large bowl, combine flour, nutmeg, sugar, salt and baking powder. Whisk until well incorporated.

In a second large bowl, combine eggnog, 1 egg (beaten), vanilla and butter (melted). Mix well.

Combine the wet ingredients with the dry ingredients and mix until the batter forms with no dry clumps.

Next, add batter to a pipping bag and pipe batter into a greased doughnut baking tray.

Bake for 8-10 Minutes until donuts become lightly browned and sponge-like. You can do the toothpick test to see if it comes out clean! Set aside when ready and allow to cool on a cooling rack before glazing.

While doughnuts are cooling, go back to the rosemary simple syrup you made earlier and dip a few small pieces of rosemary sprig inside it before setting on a rack till they become sticky. Once sticky, toss them in granulated sugar for a frosted look. Return garnish to cooling rack until you are ready to use them.

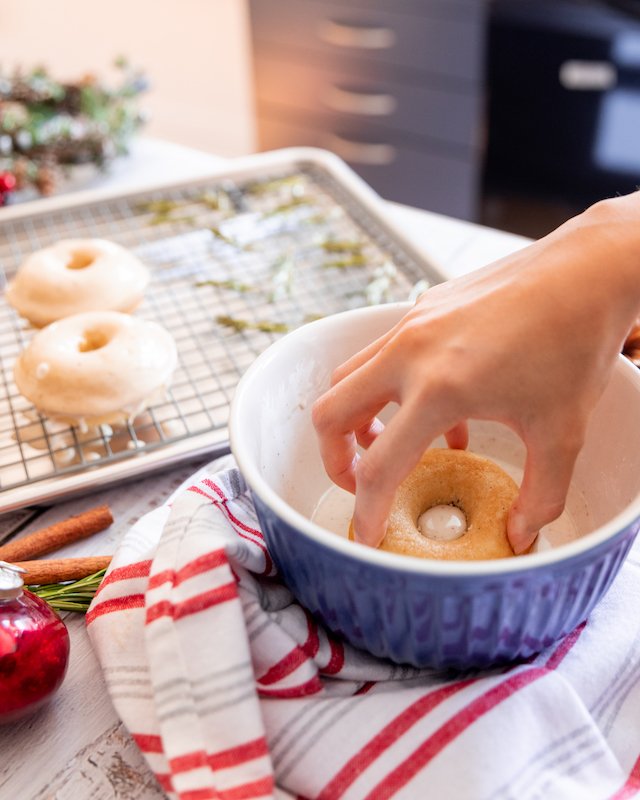
After you are done with the garnish, create your eggnog glaze by combining eggnog, sugar, and vanilla to a bowl wide enough to dip your doughnuts in. If your glaze is to watery, add more sugar. If it’s too thick, add more eggnog.

When doughnuts are cool, dip them in the eggnog glaze and place back on the cooling rack. Garnish with a frosted rosemary sprig and a dash of nutmeg before allowing the glaze and garnish to harden together on the cooling rack.

Enjoy!

P.s Although best fresh, these doughnuts can be stored in the fridge for up to a week.


FOLLOW ME ON INSTAGRAM @ISTHATSOH


I hope you enjoyed this Christmas dessert recipe for eggnog glazed baked donuts as much as I do. If you have any comments please leave them below and I'll be happy to answer them as soon as I can! Happy baking!!!


PIN THIS POST

S'MORES COOKIES IN A JAR

Friendly reminder, you don’t need to spend a million dollars to show loved ones that you care about them this holiday season. Instead, give them a gift that is both homemade and personalized like that of some freshly baked sweets!

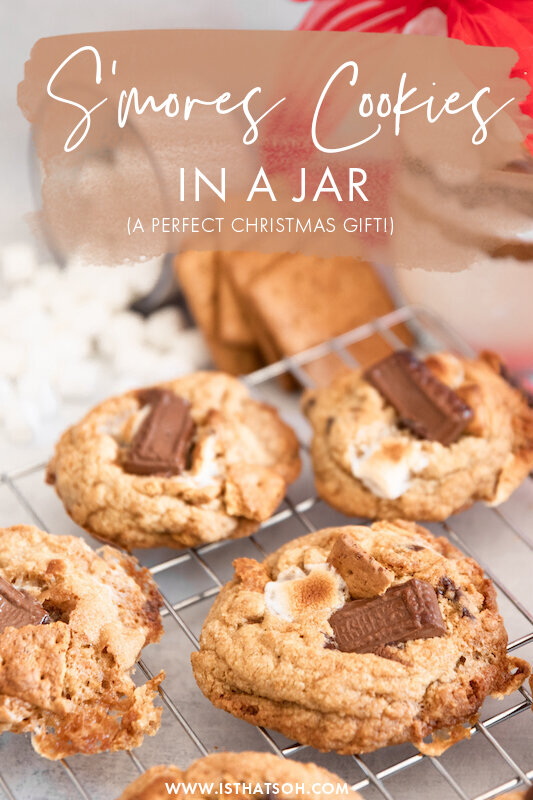
I for one love receiving homemade cookies or handmade gifts during the holiday season and one such gift I love to not only give but receive is ‘cookies in a jar’. This year, wow your friends with this festive s’more’s cookies recipe! No matter if you decide to bake them yourself or give a jar of cookie mix to someone as a gift, these cookies are sure to impress everyone on your list!


INGREDIENTS:


You will need 1L jars! Each jar yields approximately 9-10 cookies!

- FOR THE JAR -
1.75 CUPS of All-Purpose Flour
1 TSP of Cornstarch
1/2 TSP of Baking Soda
1/2 TSP of Salt
1/3 CUP of Brown Sugar
1/4 CUP of Granulated Sugar
1/4 CUP of Semi-Sweet Chocolate Chips
4-5 Graham Crackers
1 Cups of Mini Marshmallows
9 Hersey Pieces


- FOR BAKING -

1/2 CUP of Salted Butter
1 Egg
1/2 TSP of Vanilla


CHECK OUT THESE OTHER FESTIVE DESSERTS


DIRECTIONS:

When building the cookie mix jar, first make sure they are clean and dry inside.

Mix all-purpose flour, cornstarch, baking soda, and salt in a bowl, and then dump it into the jar using a paper funnel and packing it down.

Next dump in your Brown sugar, followed by your granulated sugar, and topped with the semi-sweet chocolate chip to create three additional layers.

Next, add a layer of cling wrap followed by your graham crackers, marshmallows, and Hershey bars. You want to do this so that they can be easily removed from the jar and separated from the mix when your recipient is ready to make the cookies.

Seal the jar and decorate as desired.

Make sure while decorating the jar to add a tag with the following instructions on how to bake the cookies:

- Preheat oven at 350
- Add 1/2 Cup of Salted Butter, 1 Eggs, and 1/2 TSP of Vanilla to a large bowl and beat until well combined.
- Open the jar and removed the top layer that is wrapped in cling wrap - set aside
- Dump the remainder of the jar in with butter and egg mixture and blend till cookie dough starts to form.
- Break graham crackers up and add 2/3 of broken crackers and 2/3 of mini marshmallows to the dough, folding it in. *You will want to save the remaining 1/3’s for garnish!
- Line a baking tray with parchment paper and create dough balls 2-3 TBSP in size and bake for 8 -10 minutes or until almost done, before removing the cookie trays from the oven, garnish with the remaining graham crackers, marshmallows, and pieces of the Hersey chocolate, and return to oven for an additional 2 minutes. (If desired, switch the oven to broil and toast the marshmallows on top. Just be sure to watch them because the small marshmallows burn quickly!)
- Cool for 2-3 minutes on a wire cooling rack before eating or storing in an airtight container.


FOLLOW ME ON INSTAGRAM @ISTHATSOH


I hope you enjoyed this recipe as much as I do. If you have any comments please leave them below and I'll be happy to answer them as soon as I can! Happy cooking!!!


PIN THIS POST

Smores.jpg

3D GINGERBREAD CHRISTMAS TREE

* Please Note - Some links in this post may be affiliate links *

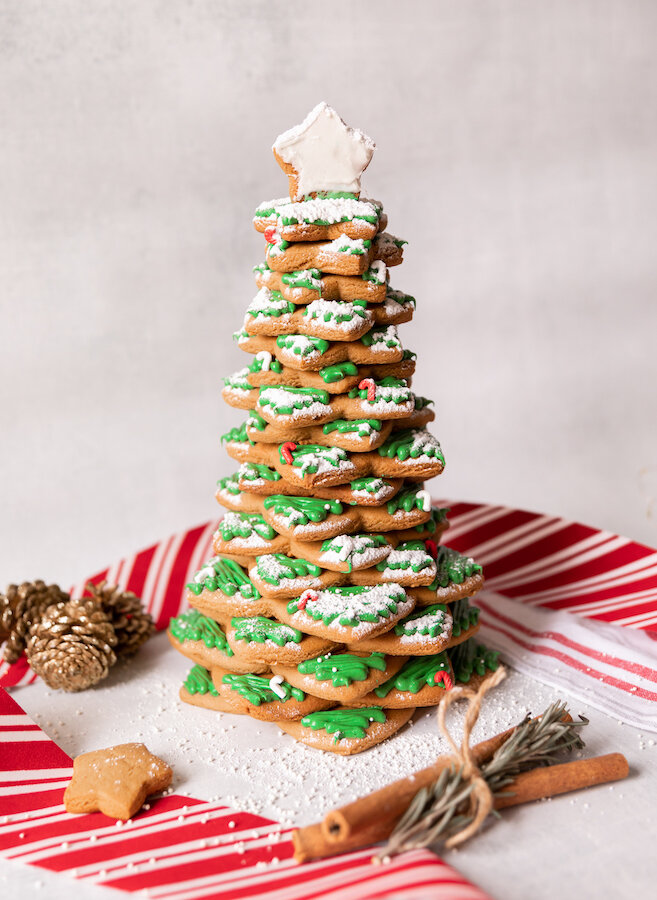
Level up your dessert table this year with this 3D Gingerbread Christmas Tree! It is not only so fun to make but it is also the perfect centerpiece at Christmas dinner. If you are looking for something to do that not only fill the house with the best smell (HELLO GINGERBREAD COOKIES!!) but is also a great activity the whole family can get involved in, this is it!

Happy Holidays my friends!


FOLLOW ME ON INSTAGRAM @ISTHATSOH!


INGREDIENTS:

Makes 1 Christmas Tree

- Gingerbread Cookie Recipe -
2/3 of a CUPS of Butter (unsalted) - softened
2 CUPS of Granulated Sugar
2 Large Egg - at room temperature
2/3 of a CUP of Fancy Molasses
5.5 CUPS of Flour (All Purpose)
3 TSP of Ginger
2 TSP of Cinnamon
1 TSP Baking Soda
1/2 TSP Ground Cloves
Large Pinch of Salt

- Decorations -
Cookie Icing - White, Green, Red are traditionally used
Sprinkles
Icing Sugar

- Tools -
10 PC Christmas Star Cookie Cutter - I found mine on Amazon and it arrived in 2 days! *Please note I did not use all 10 stars, I started from the smallest and worked my way larger. If you want to use all 10 stars (and have a massive tree) you will need to double your gingerbread cookie ingredients)
Wax Paper
Parchment Paper
Baking Tray
Icing Piping Bag and Decorative Tips


CHECK OUT THESE OTHER FESTIVE RECIPES

DIRECTIONS:

Blend softened butter and sugar together until fluffy. Add in your egg and fancy molasses.

In a separate bowl mix your flour, ginger, cinnamon, baking soda, ground cloves, and salt. Whisk until well mixed.

Slowly start to add your flour mixture into your butter mixture until a dough starts to form. You may want to finish it off with your hands.

Make two dough balls from the mixture and wrap them in plastic wrap before placing them in the fridge for an hour.

After an hour, remove the dough balls from the fridge and let them rest for 10 minutes before rolling them out to 1/4 inch thickness. I used my clean countertop to roll the dough out and placed wax paper on top of the dough for easy rolling.

Preheat oven to 350.

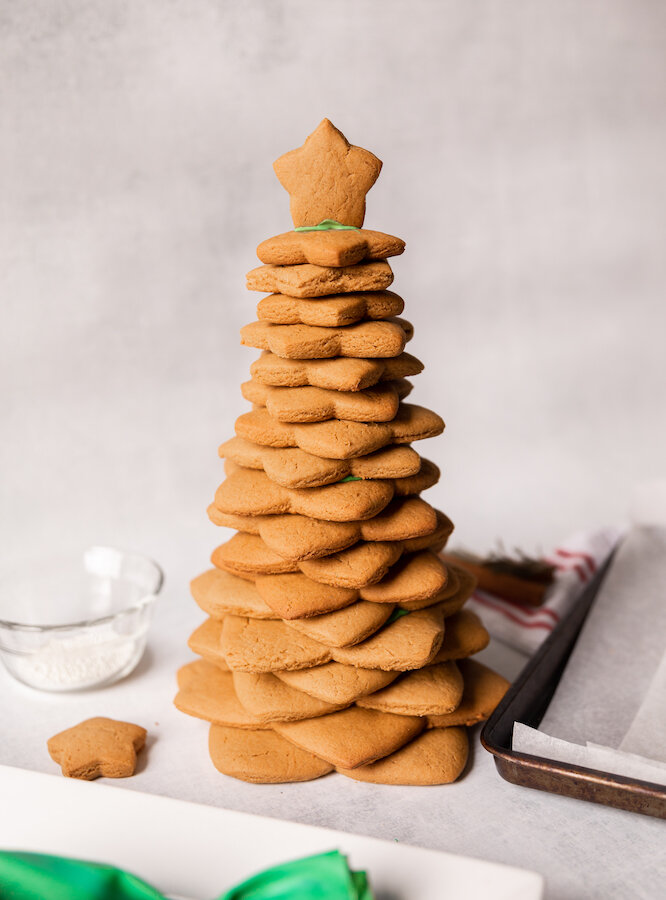
Cut out 2-3 cookies of each size (starting from smallest and working your way larger) of the Christmas Star and place them on a baking tray lined with parchment paper. Place each shape 1/2 - 1 inch apart because the cookies do spread out and puff up a little. I didn’t use all 10 of my stars (I think I stopped at 7) as I didn’t want my tree to be too big.

Bake for 11 minutes.

Remove from oven and allow to cool down before stacking them from the largest size to the smallest size. Use a little bit of icing when stacking to help hold them in place and level them out.

When you get to the final star cookie use icing to stick it to the top standing up to create a Christmas tree star!

Decorate as desired.

Allow to dry/harden in a safe place and store at room temperature.


I hope you enjoyed this recipe as much as I do. If you have any comments please leave them below and I'll be happy to answer them as soon as I can! Happy cooking!!!


PIN THIS POST

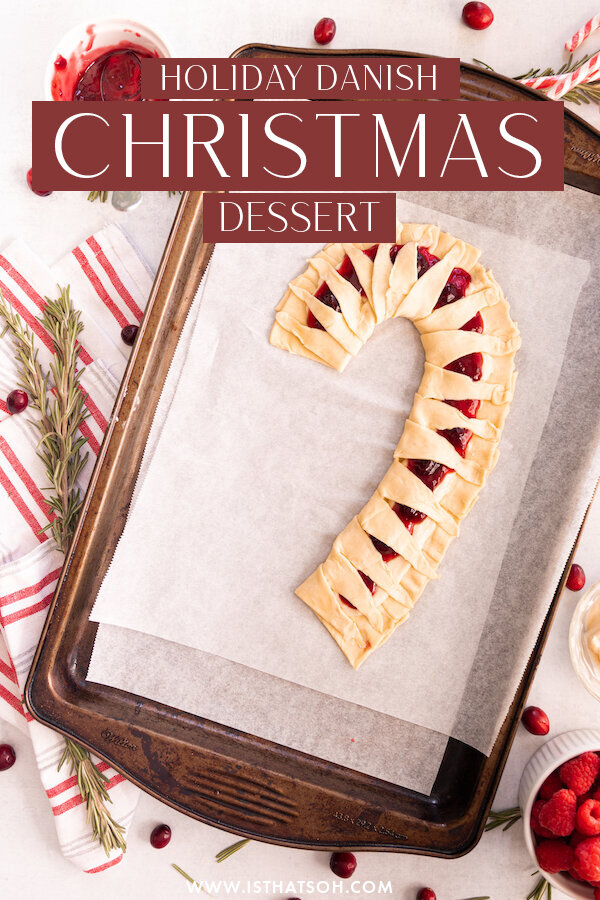
HOLIDAY DANISH WITH CREAM CHEESE DRIZZLE

With the holidays just around the corner I thought I would get a head start on trying some festive recipes, and since sweets go hand in hand with festive celebrations I thought I’d kick things off with this candy cane shaped danish! It’s the perfect dessert to bring to a friends for dinner and totally enhance any dessert table! I used store bought puff pastry and the left over cream cheese filling to create a icing drizzle which cut down on the time needed to whip this dessert up significantly. Also, feel free to switch up the jam and put your own unique twist on it! Happy Holidays!


FOLLOW ME ON INSTAGRAM @ISTHATSOH!


INGREDIENTS:

Serves 4-5 People

1 Sheet of Puff Pastry - leave out 2 hours in advance so it has time to de-thaw or place overnight in the fridge
2-3 TBSP of Flour - to sprinkle
2 TBSP of Unsalted Butter - melted as a wash

- Filling -

4 Oz of Cream Cheese
1 TSP of Vanilla
1/4 CUP of Sugar
Jam of Choice - I went with Raspberry

- Cream Cheese Icing -
Remaining Cream Cheese Filling
1 TBSP of Milk

- Tools -
Ruler
Knife


CHECK OUT THESE OTHER FESTIVE RECIPES!


DIRECTIONS:

Preheat oven to 375 degrees

Roll out puff pastry leaving the parchment paper on the backside. Using a ruler, measure and cut the pastry dough in half. Starting with one half, create isosceles triangles by notching every two inches down the longest side and finding the halfway point on the opposite side.

Next, overlap the triangles one by one in the shape of a candy cane. Press overlapping sides together to bind them.

In a bowl combine your cream cheese, sugar, and vanilla. Beat with a hand mixer until well combined.

Spoonful cream cheese mixture onto the thickest part of the dough leaving a 1/2 inch border along the outer edge followed by your choice of jam.

Fold triangle points over and pinch along the 1/2 inch border to secure in place.

Brush dough with melted butter. You can also use to it seal the triangle points into place.

Bake for 16-20 minutes or until golden brown and allow to cool for 5 -10 minutes before adding icing.

Combine the remaining cream cheese mixture with 1 TBSP of milk and beat with a fork. Depending on how much cream cheese you used for filling you may need to add a little bit more milk to the mixture to make it more liquid. You will know you have the right consistency when you hold the fork above the mixture and have a pretty steady stream. Drizzle cream cheese icing over the danish and serve.

Alternatively, you can also sprinkle with powdered sugar.

Enjoy!


I hope you enjoyed this recipe as much as I do. If you have any comments please leave them below and I'll be happy to answer them as soon as I can! Happy cooking!!!


PIN THIS POST