EPISODE 3: SWEAT EQUITY - RENOVATING MY TORONTO VICTORIAN HOME

RENOVATING MY TORONTO VICTORIAN HOME - EPISODE 3!

When Adam and I first started talking about renovating our Toronto Victorian home, we knew we had to split it up into two phases. Phase 1 would focus on fixing the structural issues and redoing the entire main floor, while Phase 2 would focus on re-configuring the layout of the second floor and enlarging the third floor by replacing the back half of the roof with a new dormer.

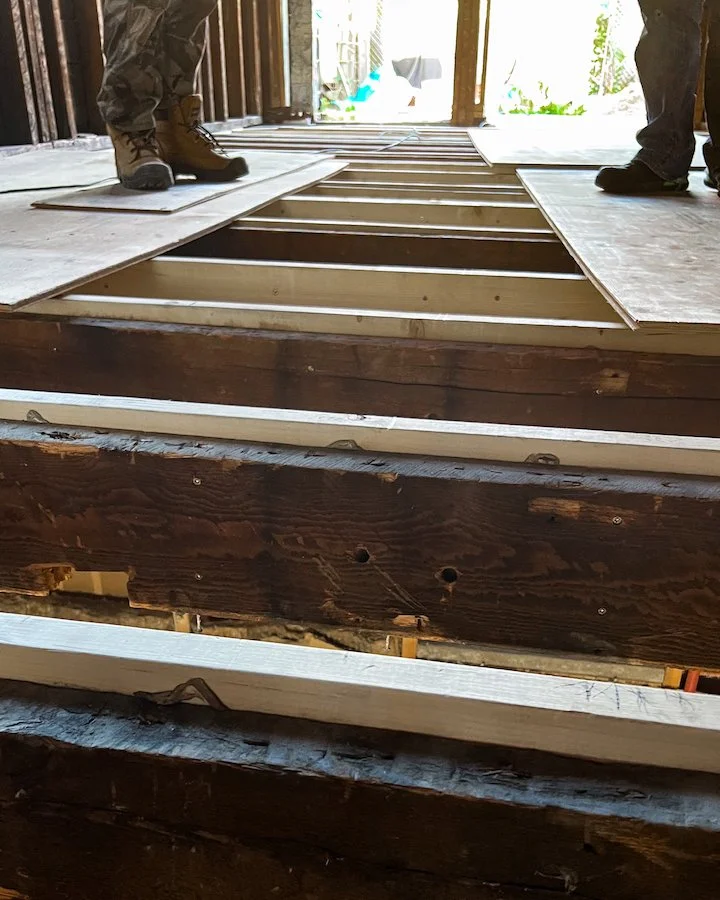
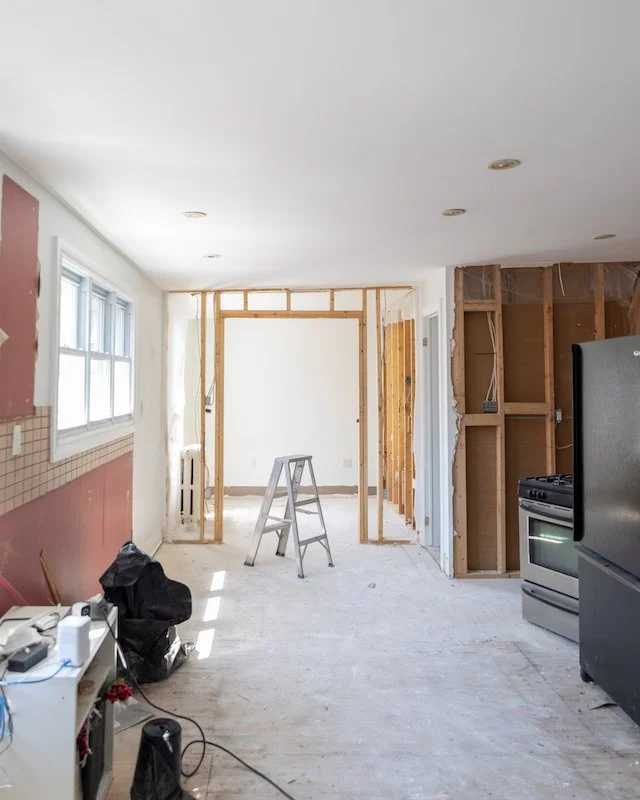
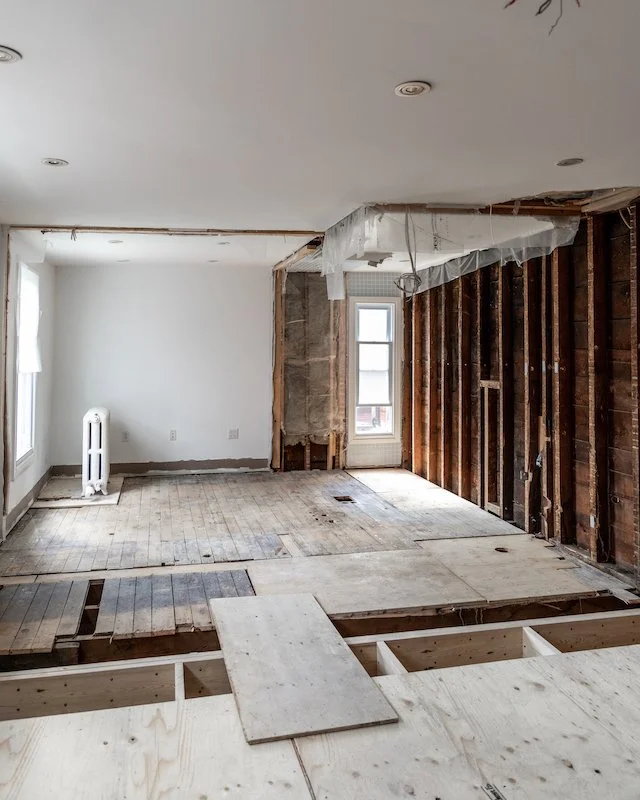
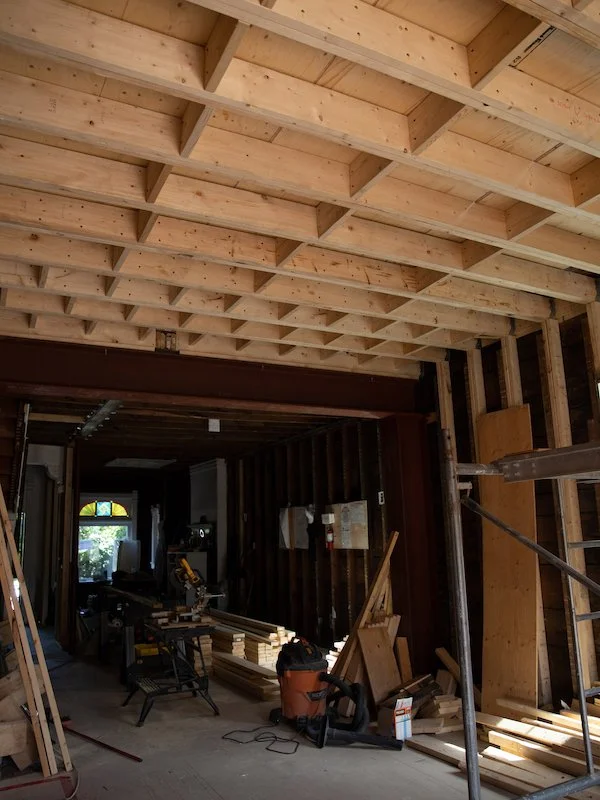
What we didn’t anticipate, was how bad the condition of the main floor ceiling joists were in the back half of the house. Half didn’t span the entire width of the room, big chunks were cut out of them, and many were being held together by other, smaller, pieces of wood. We were Shoooketh!

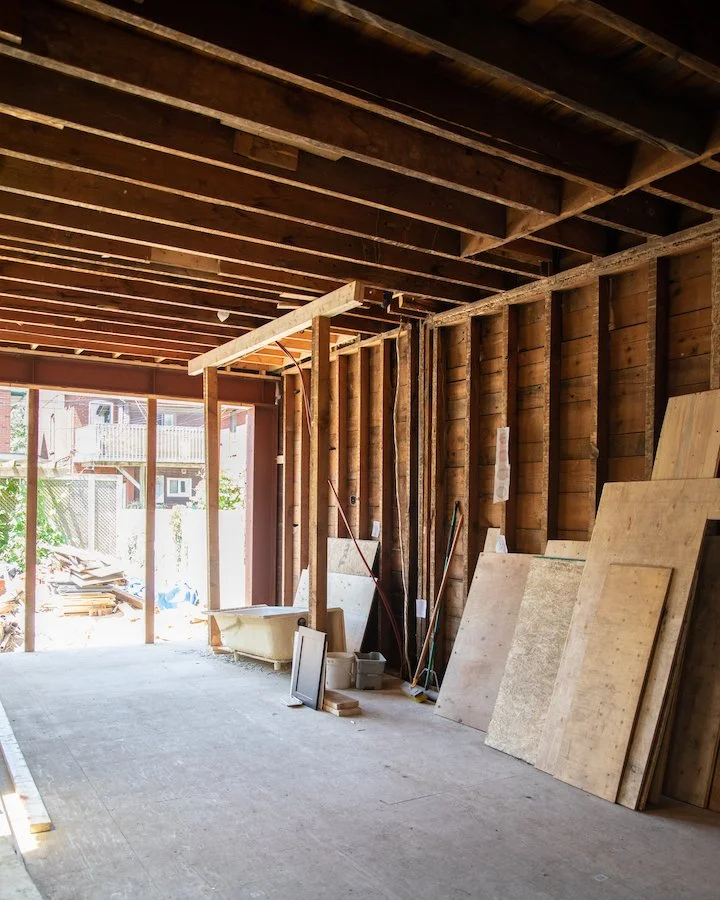
Many of the ceiling joist on the main floor did not span the full width of the house!


FOLLOW ME ON INSTAGRAM @ISTHATSOH


Originally, we thought all we would have to do was sister each ceiling joist (to sister a joist you add an extra identical joist to the existing over-spanned, damaged or inadequate joist, and tie the two together with glue and screws (or nails) to add structural support – sounds super easy, right!?), but after the demo was completed and structural work commenced, it became obvious that there was way more work to do! For one thing, 80% of the ceiling joists needed to be replaced. In order to do that, we would need to demo whatever was above. And yes, I’m talking about the second floor!

our 2nd floor ktichen before our renovation

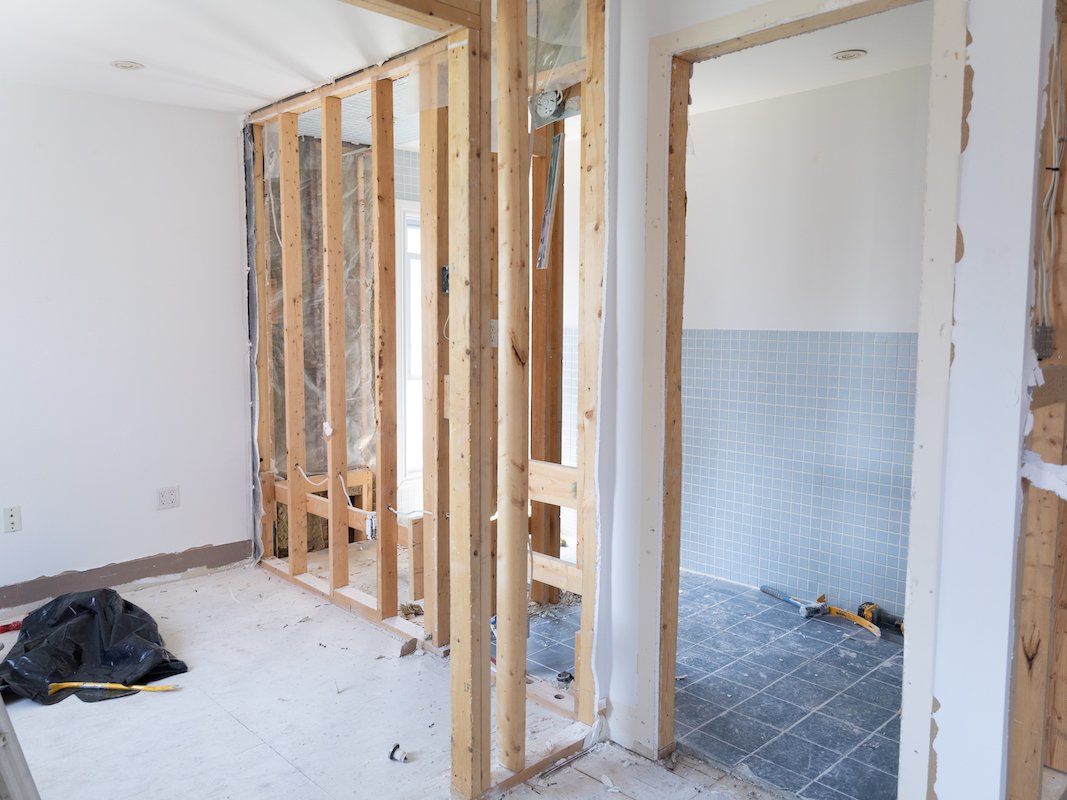
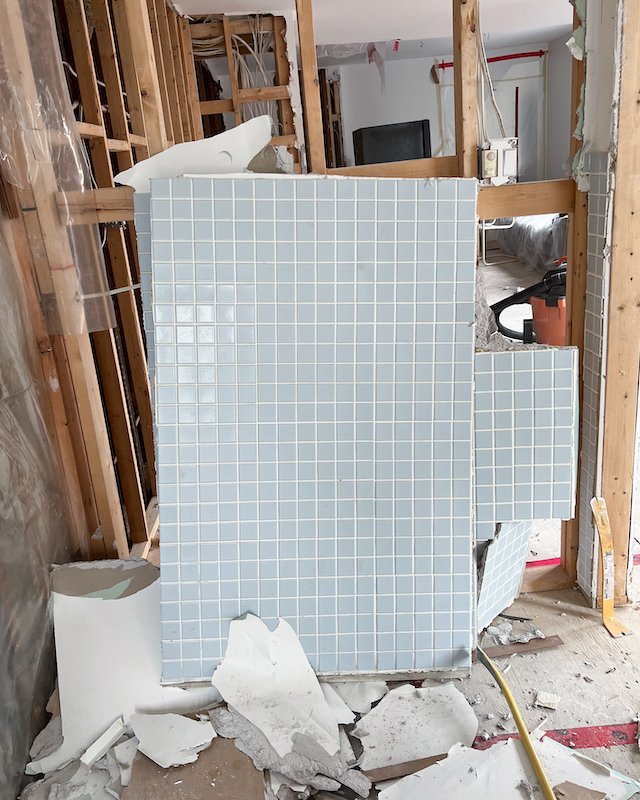
We had not anticipated needing to renovate the 2nd floor kitchen (above) or the 2nd floor bathroom (below)

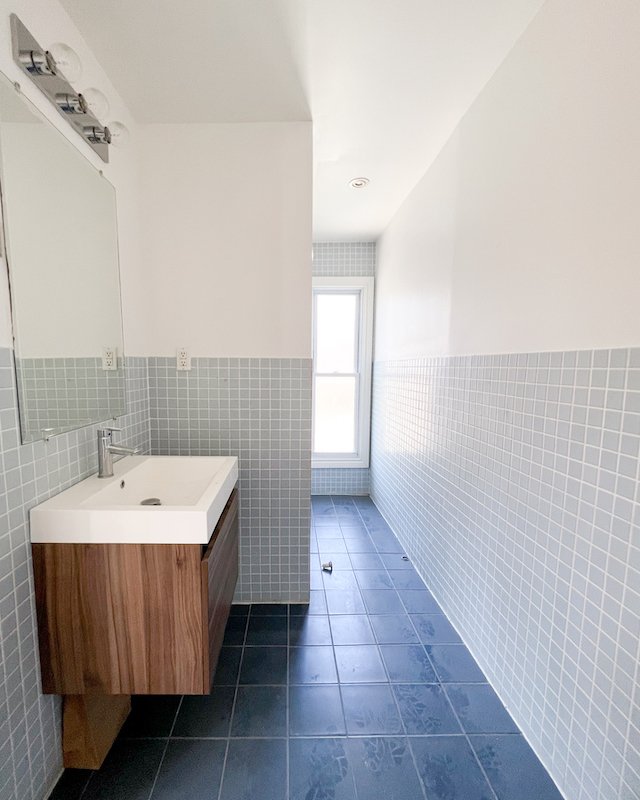
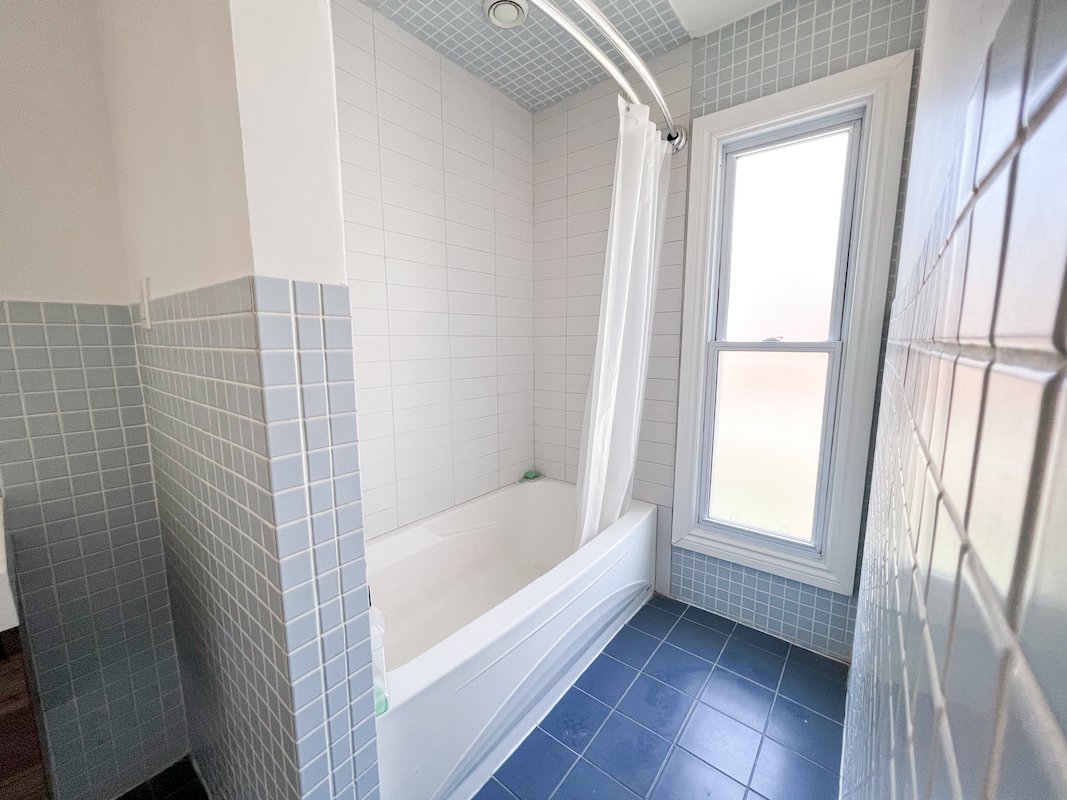
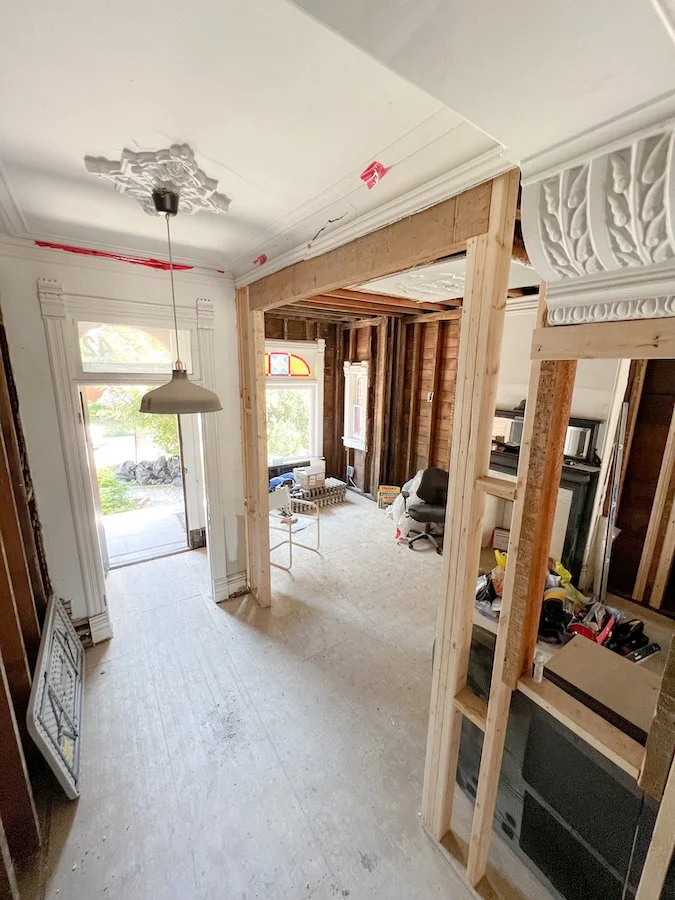
At that time, that area of the second floor was occupied by our second floor kitchen, my little back office, and a small bathroom with a stand-up tub shower. If I’m being honest, I didn’t love the quality of the cabinetry and the ‘master bath’ left much to be desired, but we were willing to wait. True, we had no real bedrooms but we had our master and two small twin rooms on the third floor that were being used as his and her closets. The house definitely needed more bedrooms and a bathroom worthy enough to be considered a master, but still, we had a plan, two phases.

p.s. I had not taken any photos of the second floor prior to the demo, so this was all I could find. The kitchen photo is from our viewing, prior to buying the house!

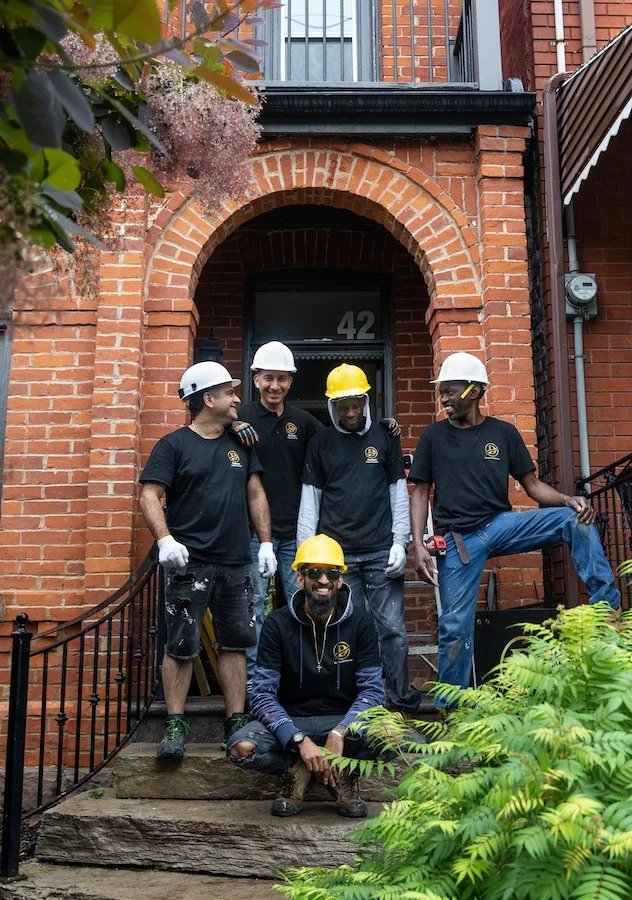
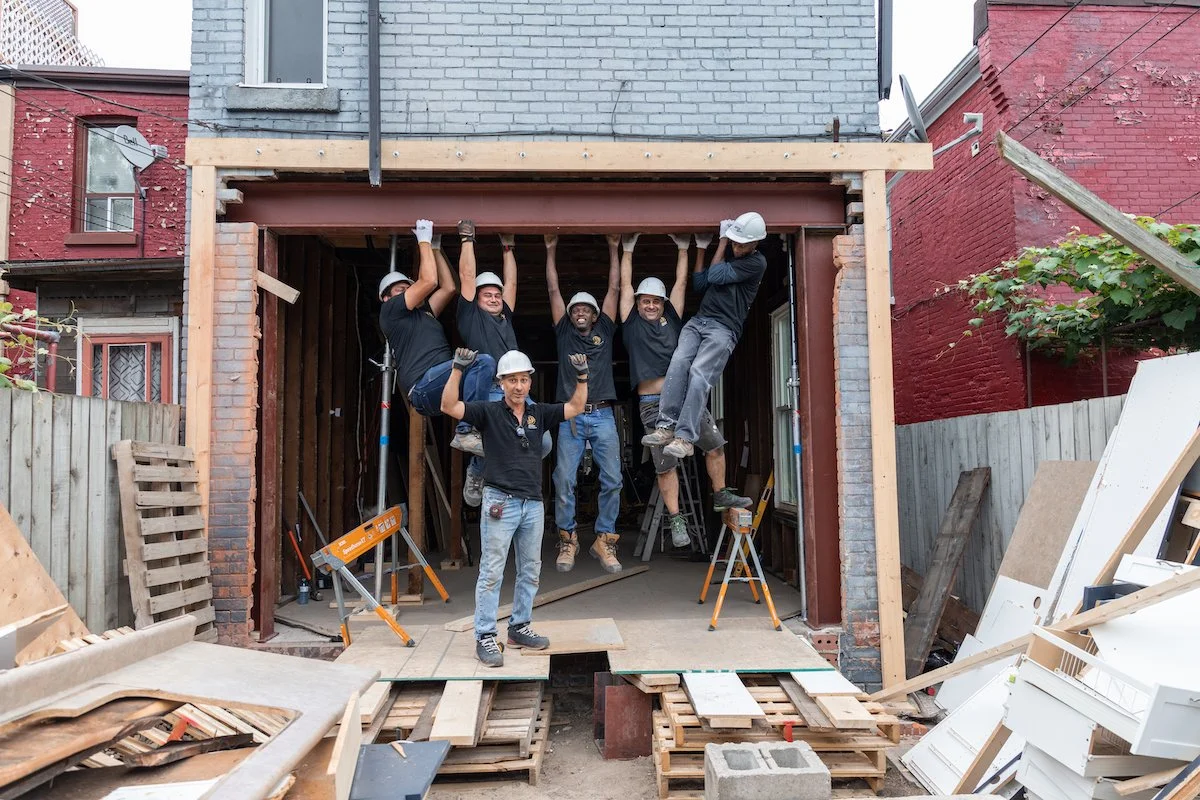
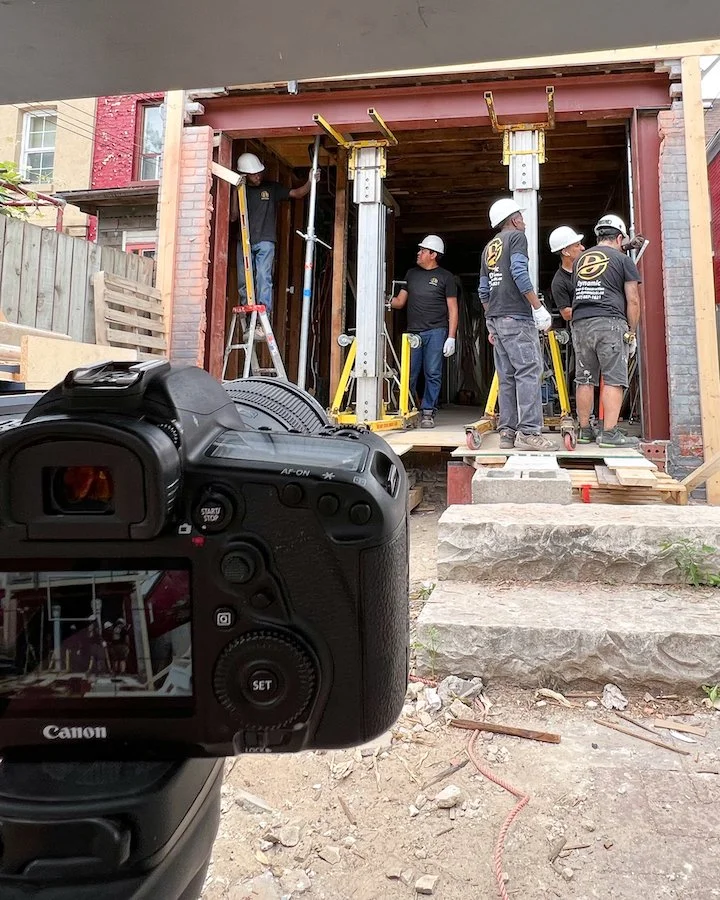
I guess this is the part where I should tell you that we not only did we end up pulling the second floor into the first phase of our Toronto home renovation but we decided to do it ourselves! In episode 3 of my home renovation series I share the last two months of sweat equity Adam, his dad, and myself poured into fixing our Toronto Victorian home. In this episode, we tackle the demolition of the second floor, how we replaced each ceiling joist one by one, us installing a new levelled subfloor as well as everything that happened behind the scenes! The crucial question is, will our work pass inspection? Find out in Episode 3: Sweat Equity! Haha!

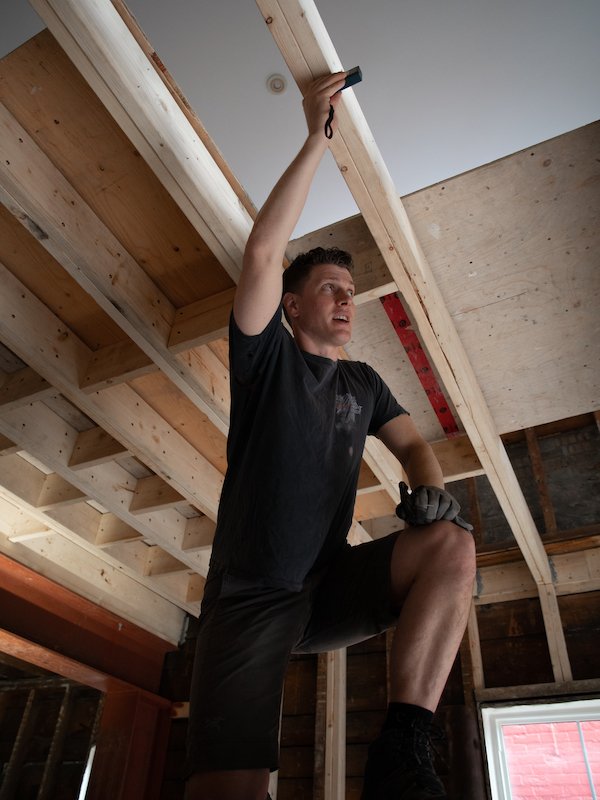
Adam and I are ready to start replacing ceiling joists!

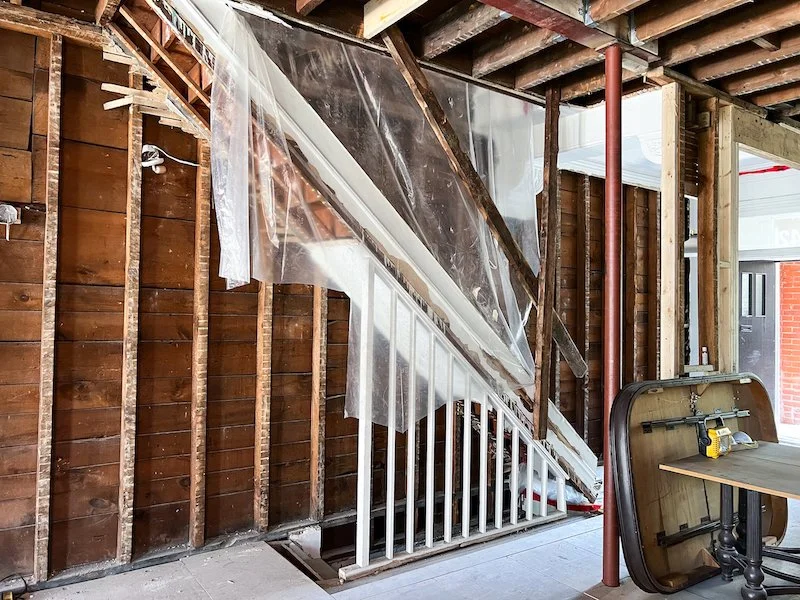
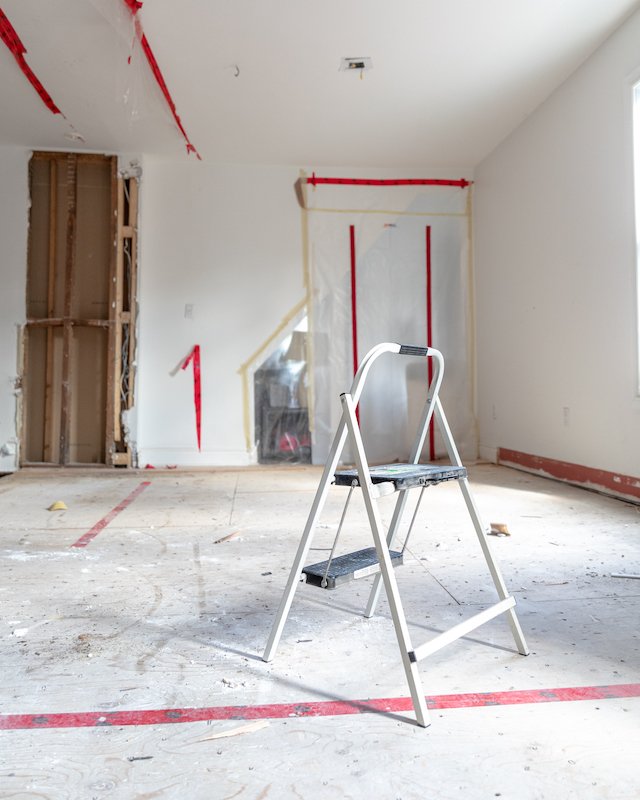
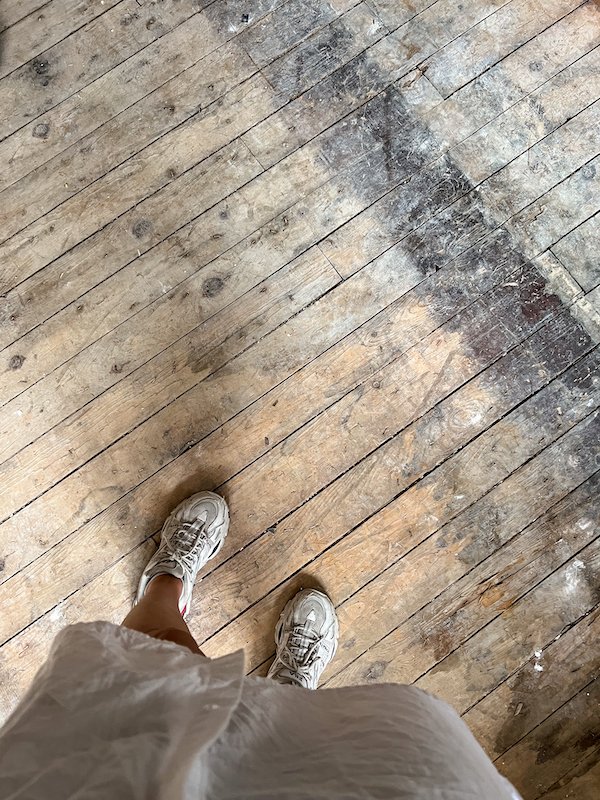
PHOTO’S FROM OUR SECOND FLOOR DEMO!

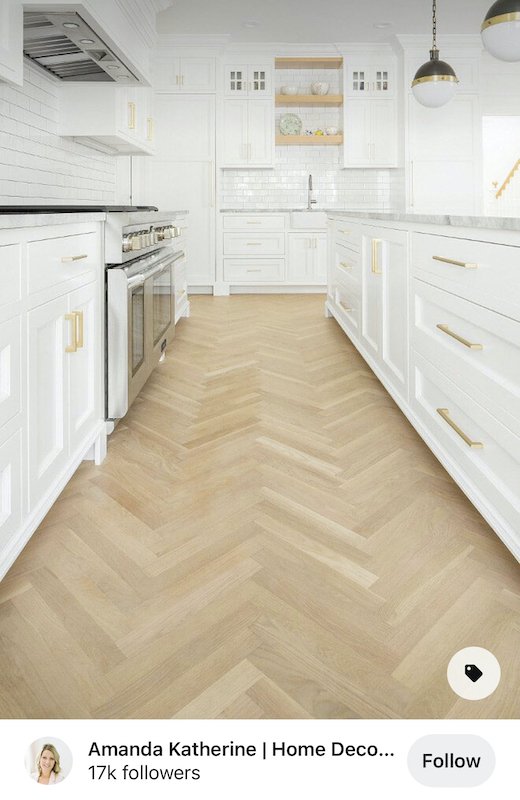
While Adam and I were busy working on the house, a few things did happen behind the scene. For one, our appliances finally showed up along with our new natural oak herringbone floors from Chestnut Flooring.

Chestnut Flooring - Herringbone flooring companies in Toronto

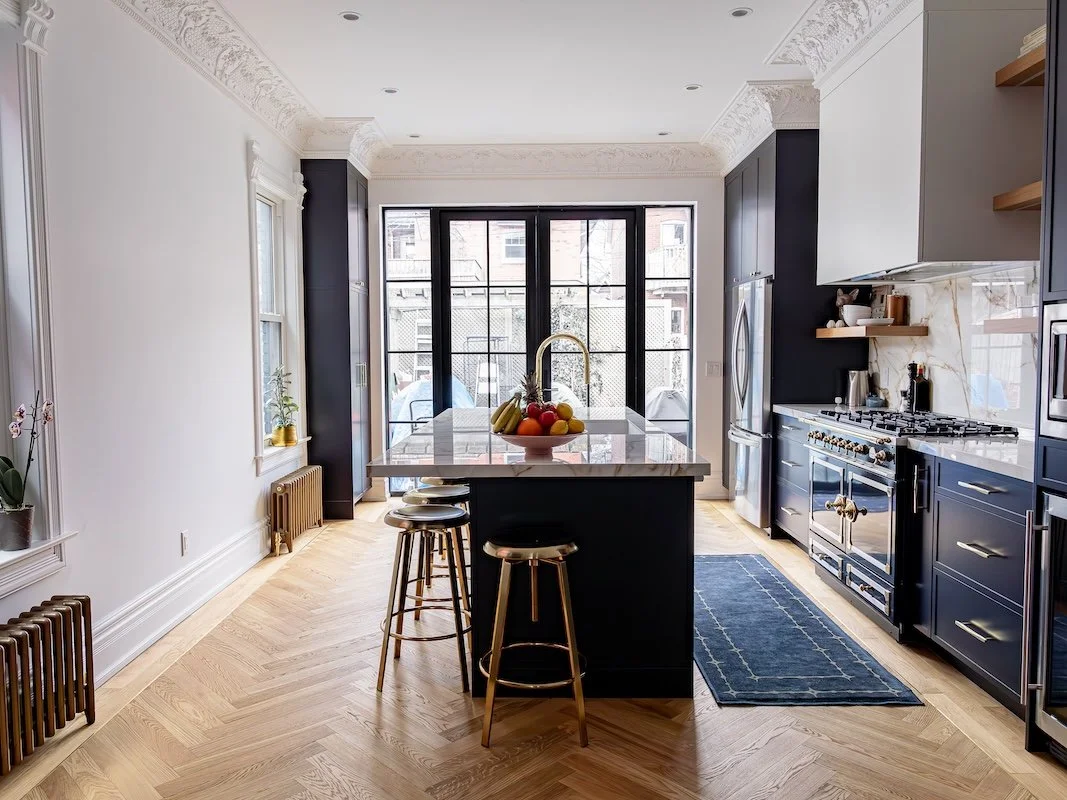
Our order from Chestnut Flooring arrived! We ordered some beautiful natural oak herringbone floors for the main floor!

If anyone is in the market for flooring, I highly recommend visiting Chestnut Flooring’s showroom in Vaughan. They are a family-owned, full service (that’s right, they don’t just sell you the flooring, they will help you install it too!), one stop shop for all your flooring needs. They offer a wide range of flooring products including hardwood, engineered, laminate, carpet, vinyl and even tile from both well-known domestic and international brands.

When Adam and I first began to look for herringbone floors we visited numerous showrooms but none stood up to the quality and variety that Chestnut Flooring provided. Their engineered herringbone flooring was superior in both top layer thickness and durability which meant down the road, if we ever wanted to re-sand and re-finish the floors we could do it without issue. Of course they also offer solid hardwood floors however, given our Canadian climate, engineered hardwood flooring is better suited for herringbone oak floors. Since the core of engineered hardwood consists of 5 to 7 layers of plywood pressed together in a crisscrossed pattern, it is its construction that makes engineered hardwood flooring less likely to shift, expand or contract when exposed to environmental changes in temperature, moisture and humidity (and when it comes to specialty floors like herringbone and chevron you don’t want movement). Further, our installer who had worked with numerous types of flooring from numerous flooring companies in Toronto, independently suggested we visit their showroom and commented on how he preferred the quality of Chestnut’s flooring products over others he has worked with. So really, that sealed the deal for us! Of course, now that we are redoing the second floor we will be revisiting the Chestnut Flooring showroom to order additional flooring. Stay tuned for our selection!

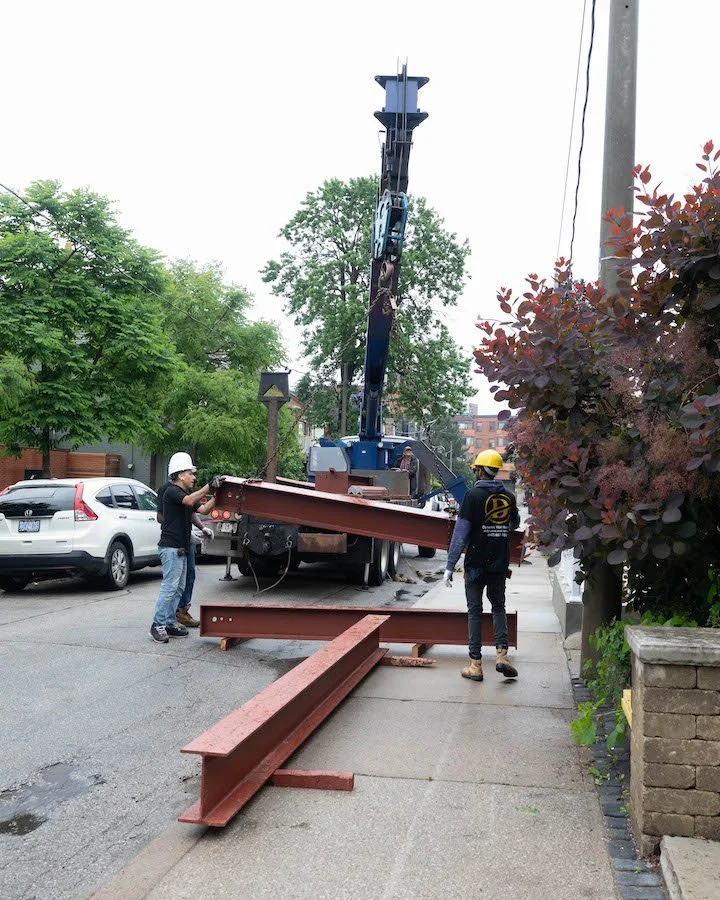
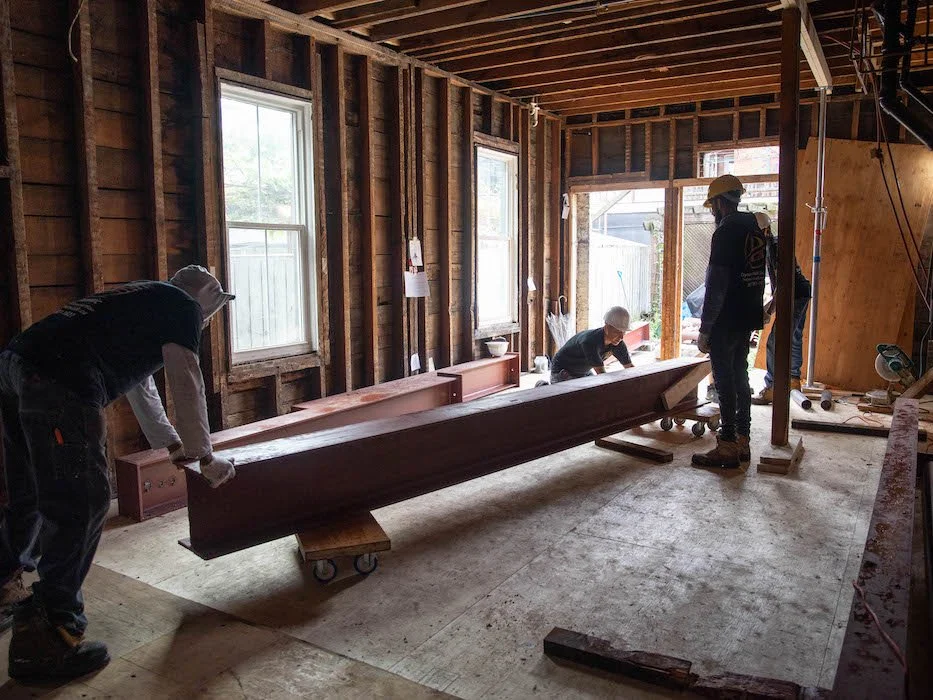
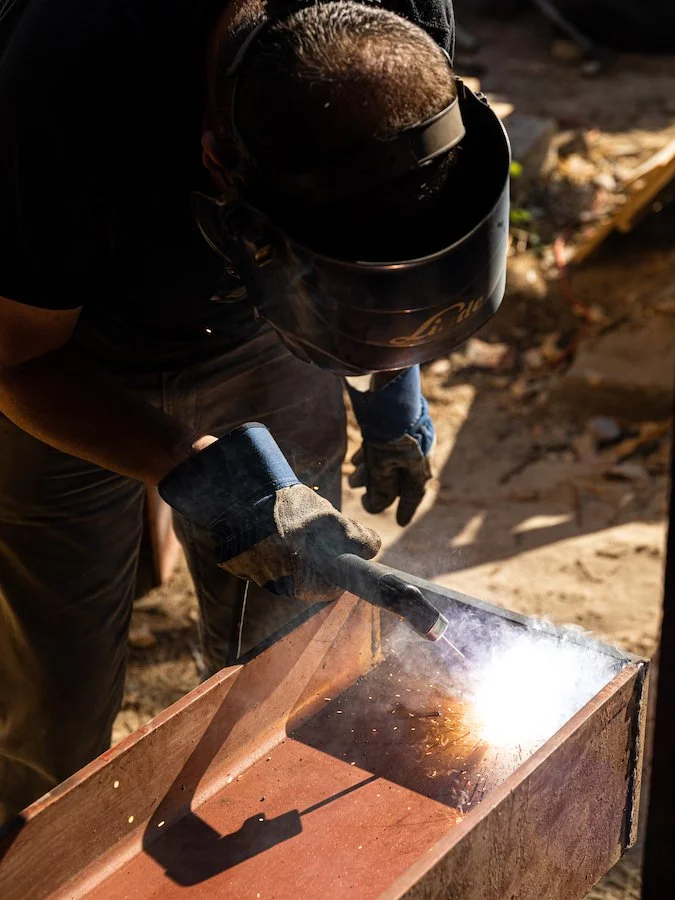
OUR TORONTO HOME RENOVATIONS - BTS PHOTOS OF US REPLACING JOISTS BETWEEN THE MAIN AND SECOND FLOOR.

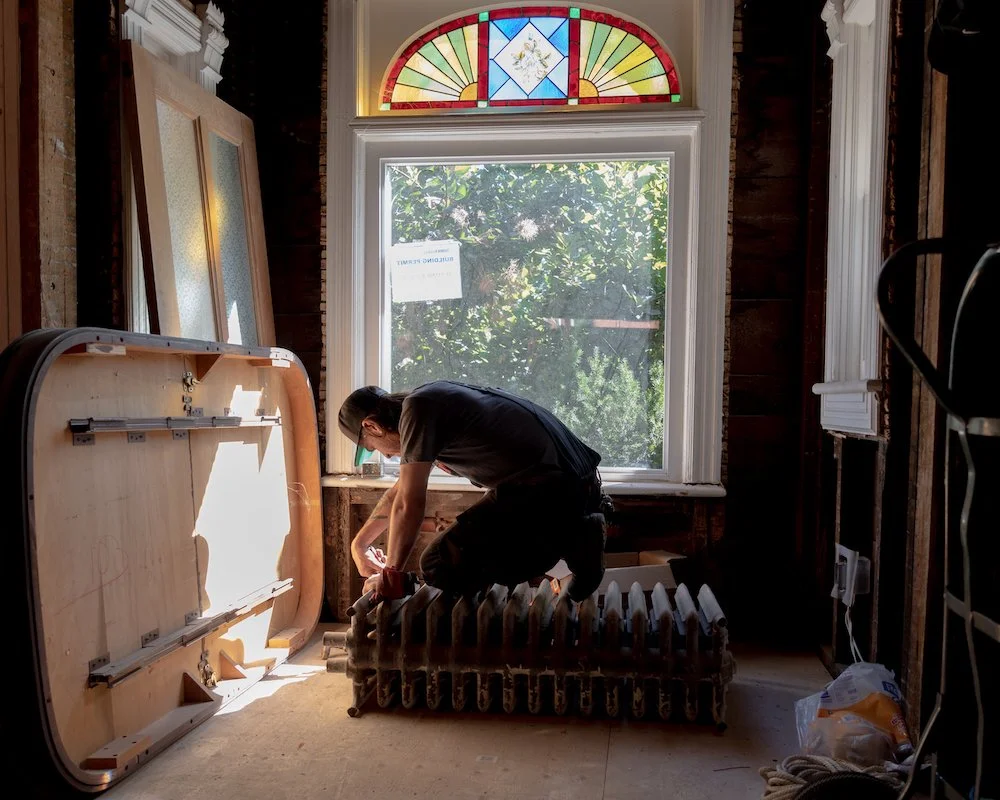
Additionally, Adam and I also pulled the trigger on getting two of our column radiators refurbished! Prior to the demo of the main floor, we discovered a beautiful ornate Victorian radiator in the main floor bedroom. It had been hidden behind a clunky rad cover, had not been maintained and desperately needed to be refurbished, but it was beautiful and I was ecstatic about its discovery!

Victorian Radiator repair - Ironworks pickup

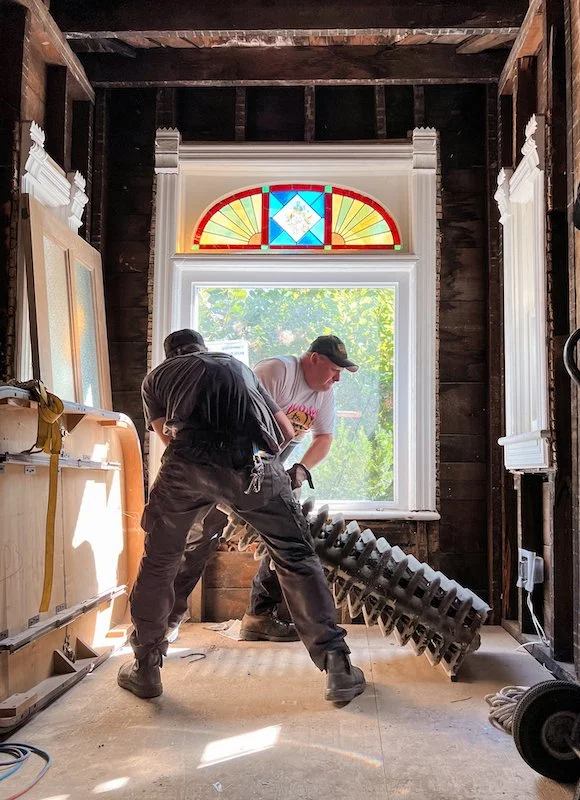
Ironworks Radiator Inc picking up my Victorian radiator for refurbishment

Of course, since we were doing such a big renovation, the possibility of switching from cast iron radiators to forced air was an option but after learning more about the pros and cons of other types of central heating systems (particularly a forced air system) – like how they can collect dust and cause allergies, how the duct systems require regular cleaning, and that the furnace system serviced – central heating radiators just seemed like less yearly maintenance. Further, cast iron radiators are spectacular in moist climates such as Canada where we get tons of snow in the winter and rain in the spring. They are known for keeping basements bone dry during these months not to mention don’t require additional bulkheads like a forced air system. Lastly, they can be a beautiful showpiece (like a piece of jewellery for your home!) when refurbished and considering I am trying so hard to keep the charm of my Toronto Victorian home intact, it was an obvious choice.

In order to pass Toronto building code we would have to meet a certain BTU output, so enlisting the help of a heating experts at Ironworks Radiators Inc felt like the ideal next step.

CAST IRON RADIATOR REFERBISHMENT & REPAIR

Based in Toronto, Ironworks Radiator Inc. offers a multitude of services including consultation, radiator resizing, refurbishment (which includes custom repainting), is a supplier of radiator parts and accessories (including super fancy radiator bleeder keys), and offers pickup and delivery services. They also have a huge stockyard of rare vintage radiators to choose from and are licensed distributor for various new steel and cast iron radiator from international industry leading brands like Castrad.

Discovering Ironworks has been immensely beneficial for us. Not only were we interested in getting two column radiators refurbished, but we were in the market for an additional vintage radiators and two new custom modern radiators for under the twin windows in the kitchen. Jennifer at Ironworks was an invaluable help, organizing the pickup of our cast iron radiators for refurbishment (a rare service that many moving companies including piano moving companies won’t attempt because of how heavy they are!) and recommending new and vintage cast iron radiators to meet our BTU requirement, aesthetic and new main floor layout. She didn’t just recommend product though, she also provided a personalized consultation explaining the best course of action for the main floor given what we currently had to work with in other areas of the house. She really took the time to explain things to me as well, which I very much appreciated because I had a lot of questions! Central heating was a whole new world to me and I was on a mission to drill down and get all of the details. Our consultation of course ended with an invitation to come check out her stockyard. Inventory changes frequently in the Ironworks stockyard so who knows what rare Victorian radiator I will find when I go! I can tell you one thing for certain though, this is one treasure hunt I could not be more excited for! Stay tuned for more on this in the next episode!

If you don’t want to wait for the next episode to catch a glimpse of what is happening behind the scenes you can always follow me on Instagram where I share up-todate stories of my interior design and renovation progress!


CHECK OUT THESE OTHER HOME & LIFESTYLE BLOG POSTS


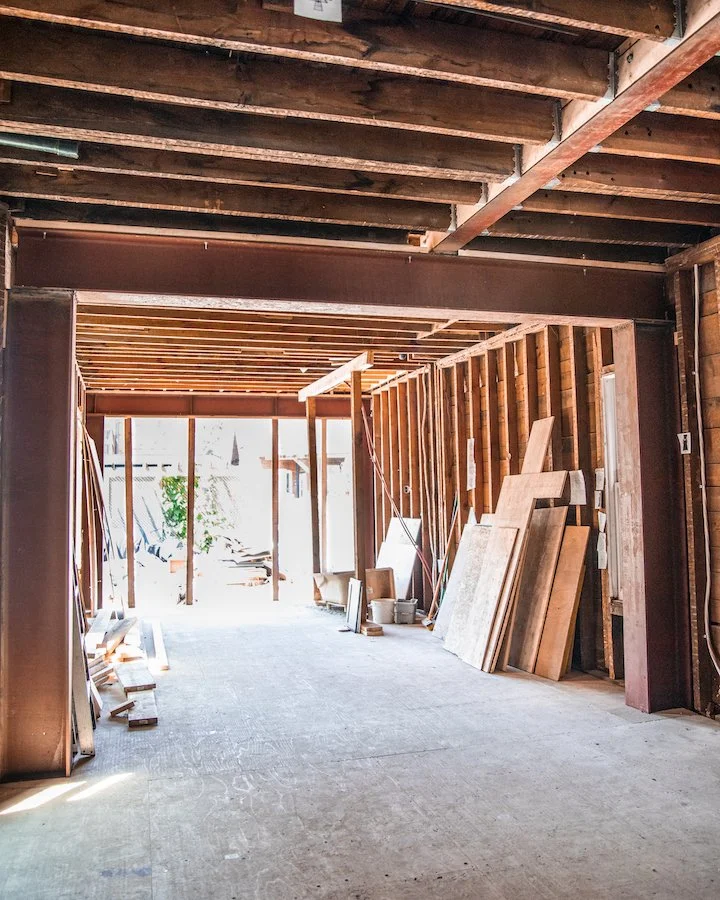
PHOTOS AFTER SISTERING AND REPLACING THE CEILING JOISTS IN OUR TORONTO VICTORIAN HOUSE

Thank you so much for joining me today and for checking out my new Toronto home renovation series on Youtube. I am super excited to be modernizing a Victorian home while still keeping the charm of an old Victorian house. If you have any questions about my Victorian house renovations, what it’s like to live in Little Portugal, Toronto or recommendations for Toronto contractors, hit me up in the comments below!

Before I sign off, I’d also like to say a big thank you to Chestnut Flooring and Ironworks Radiator Inc for partnering with us on this project. I’m so excited to be working with local industry experts on our Toronto home renovations but want to reiterate that, like always, all opinions remain my own.

Until next time,

- Soheila


PIN THIS POST!

EPISODE 2: INDESTRUCTIBLE - RENOVATING MY TORONTO VICTORIAN HOME

Toronto Victorian Ceiling Medallion

TORONTO VICTORIAN HOME RENOVATIONS

Prior to starting renovations on my Toronto Victorian home, I knew that we were going to need to do some structural work.

When we bought the house it was split into two units and there was a big bedroom located in the middle of the main floor. In order to change the layout, we were going to need to remove a load bearing wall which meant finding a structural engineer and structural contractor in Toronto.

Additionally, the staircase was original and very narrow. Its condition was worse for wear and you could clearly see it was starting to tilt to one side. Eventually, it was going to need to be replaced and if we ever wanted to get a king mattress up the stairs, increasing the size was a must.

Lastly, Adam and I also noticed that there was some serious sagging in the floors. We suspected a load bearing wall was removed in the basement and if I ever hoped to install herringbone floors, this would need to be fixed as well.

Structural work is no joke though. In Toronto, you are legally required to get a permit and getting over this hurdle meant finding a seasoned structural engineer who has had plenty of experience dealing with issues like ours as well as a structural contractor that was capable of removing walls and installing both LVLs and steel beams.


FOLLOW ME ON INSTAGRAM @ISTHATSOH


TORONTO HOME RENOVATIONS - MODERNIZING A VICTORIAN HOME

In episode two of my new home renovation series we launch right into structural work! In total we spent over a month focusing on improving the structural elements of the house including installing structural beams, sistering joists, levelling floors, adding several new footings and steel posts in the basement and installing two massive steel moment frames that pretty much make our house indestructible!

If this is your first time tuning into my new home renovation series, make sure to check out my previous episode ‘Sledgehammer Therapy’ and keep up with upcoming episodes by subscribing to my YouTube channel!

TORONTO CONTRACTORS

Our search for a good structural engineer and structural contractor in Toronto wasn’t easy. Adam and I reached out to a handful while putting together our budget for this reno and definitely ran into a few characters along the way. Finding someone ‘word of mouth’ proved challenging, especially since a lot of people we knew hadn’t taken on a renovation of this magnitude before. Since Adam and I weren’t interested in bringing on a general contractor we instead researched potential companies, looked at their reviews/references, spoke with the owners, made sure they were licensed and insured, and scheduled site visits. Even after all that, making a decision was hard and given the gravity of the ask and the money it would require, it was imperative we make the right one.

K.H. Davis Engineering Consultants LTD has a great reputation in Toronto. During our search for construction trades, Ken Davis’s name popped up a few times. A couple of them had worked with his plans before and mentioned how thorough they were. One also mentioned how responsive he was when a question arose because it saved him from delaying his project. After meeting Ken Davis himself during a site visit, we knew he was the guy we wanted to work with. He was incredibly knowledgeable, had worked on Toronto century homes before and was familiar with how they were generally constructed. He also assured us that he could address all our issues and was happy to apply for the permit and deal with the city on our behalf. When we finally pulled the trigger and started to work with him he scheduled a meeting with us to walk us through every aspect of the plans. It was clear during this meeting that he was not only taking into account what we wanted to do in this phase of our Toronto home renovations, but also our next phase which we really appreciated. Even after receiving our permit, when we hit a snag and needed to pivot, he shared a few possible solutions with us so we could figure out a financially feasible new strategy. When you are dealing with old homes, Adam and I knew that things don’t always go as planned but we both definitely appreciated having Ken by our side to guide us.

Toronto Contractors - Home renovations - dynamic design and construction

Raouf and his team at Dynamic Design and Construction - our Toronto structural contractor

Finding the right structural contractor proved even more challenging. Many of them had experience with removing a load barring wall and installing LVL’s but installing a steal beam was a whole different ball game. We needed a Toronto contractor with steel beam experience and know how.

With over 15 years in the industry Raouf has been leading his team at Dynamic Design and Construction through numerous Toronto home renovations of varying magnitudes. He has restored century homes in Rosedale, built houses from the ground up, and has plenty of experiences removing load bearing walls and installing structural steel beams like the H beams we had in our plans. Once we started to work with Dynamic, any anxiety I had going into this next step of our Toronto Victorian home renovations subsided. Raouf was great at communicating his needs, questions and concerns so that we could prepare and avoid possible upcoming challenges. His dedication to getting the job done and getting it done right was duly noted and appreciated, along with the commitment of his hard working team. I watched both moment frames get installed and moving heavy H beams into place is no easy task. Like a conductor and his orchestra, Raouf and his team worked together harmoniously, positioning and installing 7 steel beams and a steel post in one day. It was incredible!

He also levelled my floors, sistered joists, installed several footings in the basement, widened our staircase opening, poured concrete in our crawl space, created concrete footings for one of our moment frames and installed two steal frames on the foundation walls for the other. Adam and I knew it was going to be a challenging assignment and Dynamic Design and Construction rose to the occasion with total competency and professionalism.

P.s. If you are starting a Toronto home renovation and need some contractor recommendations Adam and I have put together a stellar list of contractors and tradesman for this project! I’ll be sharing more about our renovation process in upcoming episodes and the companies we are using but if you can’t wait, feel free to leave a comment below or shoot me an email via my contact form for a recommendation!

Dynamic Desing and Construction - Toronto Home Renovation Contractors

Roufe and his team celebrating after installing 6 steel beams that make up the two moment frames we needed to install in our Toronto Victorian home.


CHECK OUT THESE OTHER HOME & LIFESTYLE BLOG POSTS


soheila hakimi of isthatsoh

Me after another day of home renovations!

So there you have it! Stage two of our Toronto home renovations is complete and we can now move onto the next step, framing, plumbing and electrical work.

While the structural work was going on we also finally receive our kitchen appliances (including our new La Cornue range) and finalized our new kitchen designs with Domani Design Group. Everything we are going to be doing in our Toronto home renovation moving forward will be preparing us for the install of our new kitchen, a large Crittall style back door and a whole new main floor layout! Plus I have some BIG NEWS which I will be revealing in my next episode, so don’t miss out and subscribe!

Additionally, behind the scenes I also started my search for tiles to replace the ones we had in our basement bathroom as well as demoed the area around our staircase, cleaned up the mechanical room and removed a large old decommissioned cast iron stack from the side of the house. If you want to see more behind the scenes you can always follow me on Instagram where I share more up to date stories of my interior design and renovation progress!

PICTURES FROM AFTER THE STRUCTURAL WORK HAS BEEN COMPLETE IN MY TORONTO HOME RENOVATIONS!


Thank you so much for joining me today and for checking out my new Toronto home renovation series on Youtube. I am super excited to be modernizing a Victorian home while still keeping the charm of an old Victorian house. If you have any questions about my Victorian house renovations, what it’s like to live in Little Portugal, Toronto or recommendations for Toronto contractors, hit me up in the comments below!

monarch butterfly

PIN THIS POST

SPILLING TEA: ALL MY JUICY RENO PLANS & INSPO!

My Romanesque style Toronto Victorian home


It’s been almost six months since we moved into our Toronto Victorian Home and yet waking up and walking from one room to the next still feels so unreal sometimes. The spark we first felt when we initially toured the house is still very much alive and it all just goes to show that our crazy first time home buyer experience was worth the struggles. In the end, we found a beautiful house in a great neighborhood that we have been loving learning more about and exploring.

OUR CREEPY HIDDEN STAIRCASE

Being over 125 years old, our Romanesque style Victorian home does come with its fair share of quirks. For one, we discovered a creepy hidden staircase in a wall while planning out our main floor renovations! We suspect it was closed off to hide plumbing to the second floor bathroom and make room for a new staircase to the basement, but given it features the same high baseboards you see in other parts of the house, the staircase was likely part of the original house.

Additionally, when we bought the house we noticed that the floors sagged. This is a common characteristic of old houses usually equated to their age, but upon further inspection by our structural engineer, we began to suspect that load bearing walls in the basement had been removed by a previous owner at some point. Thankfully the foundation of the building is sound and our renovation plans will address this issue.


FOLLOW ME ON INSTAGRAM @ISTHATSOH


One thing I am 1000% doing is preserving the historical charm of the house as much as possible. Both the entrance way and drawing room feature high baseboards and crown molding centered around exquisite Victorian ceiling medallions. I also love the original ornamental molding that can be found throughout the first floor that embellishes the doorways including the main entrance. Unfortunately, a lot of these decorative molding features have been removed from the second floor, so one thing I’m definitely including on my ‘to do’ list is custom mill work to incorporate it back in.

Speaking of ‘to do list’, the reason why I am sharing today’s post is not only to expand on my pre reno tour, kitchen appliance tips, and share interior design inspiration for my upcoming renovations but it’s also to introduce a new Youtube series I’m going to be filming, documenting our renovation journey! I feel like this house and first floor renovation is going to be an amazing opportunity to share about my love for design and create entertaining content to excite you. There no doubt will be challenges but it’s in those challenges that great stories are made so I hope you will join me on this journey.

Of course, by way of this blog post I also wanted to give you a sneak peak into all the beautiful inspiration I’ve been collecting, what we are planning, and why we called in a structural engineer to help us. SPOILER: it goes beyond sagging floors!


RENOVATING A VICTORIAN HOME

Given our budget after buying the house and the fact that it is currently split into two units, Adam and I decided the best way to approach our top to bottom renovation is to split each floor into phases. This way, we can continue to live in the house during the renovations while still having a working kitchen on the second floor.

As you have probably guessed by now, phase one of this project is going to include a complete first floor renovation. Structural changes to support this, including widening the staircases on both the main and lower floor, will also be taking place as well as reintroducing an entrance way from the front hallway into the drawing room and removing unoriginal walls to create an open concept layout towards the back of the house where you will find a new kitchen, powder room, and bar. The sun-room at the back of the house will eventually be demolished so as to reclaim more of the backyard and a larger door opening will be created to replace it allowing for maximum natural light.

I will be elaborating further about these design choices throughout this blog post as well as providing inspirational images to help you visualize what we are planning. So without further ado, let’s start with diving into each element our renovation plan starting with structural changes.


STRUCTURAL CHANGES

I knew prior to starting our first time home buying journey that I loved Victorian homes so while on our quest we visited many renovated Toronto Victorian homes. A common repeated feature we noticed was an open concept layout on the first floor which, when paired with high ceilings, not only made the house look bigger but grander! Since original walls only seem to exist at the front of our house, Adam and I had no hesitations when deciding to alter the main floor layout by removing walls to make room for a larger kitchen and overall entertaining space. We learned that making these layout changes would require additional steel beams to provide stability and prevent structural issues that could arise later in the other phases of our renovations.

Additionally, since we wanted to demolish the sunroom and reclaim more backyard space we saw this as an opportunity to install a larger opening for a new doorway leading to the backyard. Doing this would require a steal frame to be installed to support the brick wall at the back of the house.

Pre Reno Kitchen and Sun Room - Photo Cred Raffi Tutundijan @jaggedlens

CRITTALL STYLE DOORS

Originally, Adam and I were thinking of doing a large steel Crittall style doors as the back entrance door, however after pricing it out and seeing what the lead times would be to have one made big enough for the opening (it would have to be custom made) we got cold feet.

Living in a cold climate, steel Crittall doors aren’t known for being the most energy efficient door systems since they aren’t great at preventing heat from escaping or blocking the cold from coming in. The Toronto Building Code does have a minimum thermal break requirement for all external doors which is why aluminum doors or fiberglass doors are more common (they offer superior energy efficiency when compared to steel) as well as cheaper. Alas, we are still undecided which way we will go but here’s some inspiration of what we are thinking.


ENJOYING THIS POST? CHECK OUT SOME OF MY OTHER RECENT LIFESTYLE POSTS


Further, it wasn’t until we moved in and tried to get furniture to the second floor and basement that we realized how narrow our staircases are! When it comes to staircases, Toronto’s current building code requires staircases in new builds to be a minimum of 36 inch wide. Historically, staircases were never this wide and although our staircase is not original, the opening was never widened by a previous owner. Our staircase comes in at 27 inches making it extremely hard to fit assembled furniture upstairs. For the longest time Adam and I wracked out heads trying to figure out how the previous owners managed to get the kitchen appliances up to the second floor. It wasn’t until we finally measured the width of the doorway to the small front balcony off our master bedroom that we figured out they must have removed the door temporarily and craned them in through the small balcony! Crazy right!? One of the biggest and possibly most pivotal decisions we had to make when putting together our renovation plans was figuring out whether we were going to address our narrow stair issue, how it would impact the structure of the home, and how much widening and replacing both staircases would be.

WOOD STAIRCASE DESIGNS

After finally deciding to move forward with widening the staircases, Adam and I debated whether to go more modern or keep it classic with the new stairs. We both love the look of floating stairs but given how much traditional character the house has, we ended up going for a more traditional design. But I’m sure we will add a modern twist somehow.

Lastly, structural issues in the basement that caused the floors on the main level to sag needed to be addressed before we can lay down a new subfloor and install new floors. To do this it seems that a few new beams will have to go in on the lower level - especially at the front of the house - to ensure the new floors won’t buckle a few years down the road. Installing these new beams will be also help us address the issues on unsupported over-spanned joists that we believe were caused by the removal of a load bearing wall in the basement by a previous owner.

Speaking of floors, I’ve been obsessed with mosaic and herringbone floors for years! Prior to buying a house, I told Adam that I hope whatever we ended up with needed new floors so I would have an built in excuse. During our viewings we saw a few Toronto Victorian's with mosaic and inlaid floors that only continued to fuel my obsession.


CURRENT FLOORING

Currently, the main floor has three different types of flooring going on, one of which does look original. However, it’s only a small section at the back and they aren’t in the greatest shape. If there was more of it and it was in better shape I may reconsider redoing the floors, but in our case this is one ‘out with the old in with the new’ sacrifice I’m willing to make. Traditionally herringbone floors were made of oak and these days you can get them in engineered oak in many different sizes and colours. Narrowing it down to a size was exceptionally hard given the size of the space. Too large and you don’t notice them, but too small and it’s all you notice. It needs to be balanced! In the end we went with a 90 mm natural oak herringbone colour which I am so excited about. It’s going to add warmth back into the space and match beautifully with what we have planned for the kitchen. I can’t wait!

HERRINGBONE FLOOR INSPO

I’ve shared a little bit about the kitchen appliances we ordered a few months back but when it comes to designing my dream kitchen you can bet it won’t be all white! In order to ensure flawless execution for this part of the project, I brought in the big guns, Domani Design Group. Not only does Domani distribute luxury European brands like Pedini but they also specialize in custom cabinetry for both kitchens and bathrooms as well as custom millwork! Just what I needed!

To us, the kitchen is truly the heart of the house and both Adam and I love to cook and entertain. With 10 foot ceilings and an open concept layout, I wanted the kitchen to feel airy but still anchoring, warm and full of natural light. Currently we have two big beautiful windows in our hallway that we plan to position the island between. For cabinetry we are keeping it simple, timeless, and classic but modern with a shaker style kitchen in a dark French navy to match our La Cornue range in the same colour with brass accents. The La Cornue range is going to be the centrepiece so I wanted cabinetry to compliment it, but not compete.

SHAKER STYLE KITCHEN INSPO

A warm porcelain countertop in a Calacatta with brown-gold warms up the space and plays on the natural oak herringbone floors. Floating shelves in a cool natural wood surround a simple and understated range hood which extends all the way to the ceiling to accentuate the height of the room. Bar seating will surround the kitchen island sink. I have even gone so far as to start to think how I will organize the kitchen and have submitted special millwork request to Oscar at Domani including a pull out spice rack and cabinet pull out drawers for my small appliances! I’m so excited!


KITCHEN STORAGE & ORGANIZATION IDEAS


I obviously don’t expect this renovation to go smoothly. I’m actually banking that it’s not so that I have some great stories to come back and share, but I am super excited for all that is to come. I’m also super excited to document and create my Youtube series around it so you guys can get a sense of the process too! If you aren’t following me already make sure to subscribe to my YouTube channel and follow me on Instagram for updates on this phase 1 renovation and more design projects I have in mind!


PIN THIS POST

TIPS FOR PICKING THE BEST KITCHEN APPLIANCES!

Best Kitchen Appiance Brand

Want to hear a funny story?

When Adam and I moved into our Toronto Victorian home, so many appliances didn’t work.

The washer and dryer were both broken, my dishwasher was a glorified drying rack, my freezer was frozen shut. At one point, I opened the island cupboard and the door completely came off in my hand. The previous owners didn’t even put screws to attach the hinge! It was comical!

We knew the house needed work when be bought it but I didn’t expect our appliances to be in such bad shape when we moved in. Thankfully, Adam’s response to this series of unfortunate events was to give me the green light to start planning an entire first floor renovation which, if you haven’t already guessed, included a new dream kitchen and a slew of new appliances.

KITCHEN INSPO

Now, something you should know about Adam is that he loves to cook as much as I do so designing a ‘chef’s kitchen’ and upgrading the range was a must for us. This meant I could splurge on a gas range with high BTU’s and a large electric oven but didn’t need nor want to go for expensive designer brand appliances for everything. As a matter of fact, if there is one thing I learned from the research I did comparing price to function to design for each appliance, it’s that there are tons of really beautiful, sleek appliances out there with great consumer reviews at palatable prices. You don’t need to spend $17,000 on a fridge to have the best kitchen appliances, trust me.

Fast forward to today and your girl has ordered all of her appliances! Since I know first hand how grueling the process of picking appliances can be, I though i’d come back and share a few tips for purchasing appliances, what I found to be the best brands for each appliance category (research backed) and what I ended up purchasing!


FOLLOW ME ON INSTAGRAM @ISTHATSOH


TIPS FOR PICKING THE BEST KITCHEN APPLIANCES

TIP 1: FIGURE OUT YOUR NEEDS & BUDGET

If you are looking to buy the best kitchen appliances my first piece of advice would be to figure out your needs and budget before visiting showrooms, and doing your research. Appliances come in a range of prices and designer brands like Sub Zero and Wolf, La Cornue, Miele, Bosch, and Thermador offer super sleek designs with superior functionality but can come with a hefty price tag.

On the other hand, brands like LG, Samsung, Kitchen Aid and GE are considered more affordable and offer a larger range of products with great ratings at decent prices. These more affordable brands still offer great appliances with good capabilities but they tend not to have as many bells and whistles as the designer brands and aren’t as ‘sleek’; although they have gotten way better in recent years!

Adam and I ended up giving ourselves a healthy budget for kitchen appliances knowing that we wanted to splurge on a designer duel range while also still needing a new microwave, dishwasher, fridge, hood vent, washer and dryer. We also knew mixing and matching designer appliances brands with non-designer brands would help us keep our cost down significantly while still allowing us to build our dream kitchen with the best kitchen appliances.

Kitchen Inspiration - Sourced from Pinterest

TIP 2: PICK WHICH APPLIANCE TO UPGRADE

Once you have outlined your needs and budget you can then pick which appliance you feel you would benefit the most from upgrading (if any). Do you hate doing dishes? Perhaps a high performance dish washer will be the most beneficial. Do you love cooking and need a stove with high BTU’s for searing? Perhaps a designer range is the item you should splurge on. Do you have a big household and need a larger fridge or freezer to accommodate all the groceries you buy? Asking yourself these questions will not only help you pick the right appliances, but will also help you narrow down budget allotments for each appliance.

SINGLE VS. DUEL RANGES

One thing I learned while visiting showrooms for the best kitchen appliances is that designer ranges tend to offer higher BTU’s than more affordable brands. Additionally, many designer brands also offer duel systems meaning you can have a gas range AND an electric oven. The benefit of having an electric oven is that the temperature for baking is more accurate and even compared to gas because the temperature is measured using inferred in gas ovens, making temperature harder to control and less accurate relative to electric. However, when it comes to the range, gas allows you to cook at higher temperatures and brings things to a boil faster than electric. For this reason, duel ranges tend to be more expensive than single ranges and since this was the kitchen appliance Adam and I decided to splurge on we allotted the largest proportion of our budget to it.

A La Cornue ConfuFé 110 duel range in white with brass trim

Although Sub Zero Wolf, Thermador, and Miele all offer great gas ranges, I fell in love with the look and capabilities of the La Cornue CornuFé 110. The range itself features 5 powerful burners - one 17,500 BTU central burner, three 12,000 BTU burners, and one 6,000 BTU burner for simmering; two electric convection ovens - one of which is a seven mode multifunction oven; and one large storage drawer. We ended up going with the classic French dark navy blue with polished brass trim accents which we plan to build the rest of the kitchen around. It’s like a piece of art you can cook with! Adam will have the searing power he loves and desires while I will have the two electric ovens for optimal non-stop baking. I can’t wait!

TIP 3: GET CONSUMER REPORTS

Once you have figured out your budget and what appliances you would benefit most from upgrading, I would highly recommend going online to Consumer Reports to check out the rankings and reviews for each appliance category you are interested in. Doing so will help you narrow down which brand is making the best kitchen appliances for that specific category and make choosing the right one for you less overwhelming. I love going to this website when purchasing any electronic or kitchen appliance because it ranks its performance, its reliability, how environmentally friendly it is and the overall customer satisfaction with the product.


CHECK OUT THESE OTHER LIFESTYLE & HOME DECOR BLOG POSTS!


I turned to Consumer Reports for help choosing the remainder of the appliances and that’s how I ended up going for another designer brand appliance - the stainless steel Bosch Ascente SHX3AR75UC dishwasher. The reviews for this dishwasher were amazing and the price was surprisingly reasonable for a designer brand appliance. According to consumer reports, Bosch makes great, high performance, reliable dish washers with great load capacity that are super water and energy efficient. After watching a few review Youtube videos and seeing how well it ranked, going with the Bosch Ascante was a no brainer. In addition to Bosch, Thermador also rose to the top as one of the best kitchen appliance brands in the dishwasher category according to Consumer Report rankings.

TIP 4: GO INTO THE SHOWROOMS

After doing your research and narrowing down which brands make the best kitchen appliances in each category, you should then go into the showroom and check them out in person. Doing so will help you visualize what your kitchen will look like and help you narrow down the features and visual aesthetic you want to go for. I actually learned a lot more about fridges by doing this including the difference between ‘counter depth’ and ‘cabinet depth’.

MORE KITCHEN INSPO

COUNTER DEPTH VS CABINET DEPTH

One of the biggest differences between designer brands and non-designer brands (other than the massive price difference) was that designer brand appliances come in ‘cabinet depth’ whereas non-designer brands tend to be ‘counter depth’ or deeper. This means that designer fridges are shallower in depth and look more seamless or flush when installed alongside cabinetry. I also noticed that designer fridges tend to be taller then non designer fridges and the compressors usually don’t eat into the freezer space as much as non designer fridges. Just something to think about…

Although important, a designer fridge was not something Adam and I thought we needed to splurge on (they can go beyond $17,000). This, in addition to not being fussed about it sticking out beyond the counter by three inches or not having extra height (finally it pays to be short), we decided something more budget friendly would suit our needs and aesthetic which is why we started looking at non-designer French door fridges.

Three Birds Renovations - Kitchen Inspiration - Sourced from Pinterest

To my surprise and after further research, I learned that LG actually outperformed many of the designer brands when it came to overall customer satisfaction. Although their fridges may not be as tall or shallow as a designer fridge, LG makes great, energy efficient fridges that have temperature uniformity and are reliable. Adam and I ended up choosing a counter depth french door LG (LFCC22426S) fridge in stainless steal which not only matched our Bosch dishwasher quite well but performed really well against other top non-designer brands in this category like GE, Samsung and Kitchen Aid, in addition to designer brands like Dacor, Thermador and Jenn-Air.

TIP 5: MATCH AS MUCH AS POSSIBLE

My last tip for picking the best kitchen appliances for you is to try to make your appliances match as much as possible. This will add a cohesiveness to the space and make it look more visually appealing. You can do this easily by picking all stainless steal appliances, by going with the same brand for everything, or by choosing appliances with similar looking handles. Adam and I chose to get everything in stainless steel to make matching them together easy and lucked out with our fridge handles matching our dishwasher handle despite being from different brands.

Further, for our washer and dryer, we ended up going with matching LG units because not only does it give a cohesive look but the reviews were really great. LG recently came out with new front load washer (LG WM4500HBA) and electric dryer (LG DLEX4500B) with 5.8 cubic feet load capacity - the largest yet. It got a 5/5 for washing performance, energy efficient and water efficiency and can easily be stacked on top of one another if you want to eventually put it in a closet like us.

Lastly, for our microwave, we wanted to have something that looked built in so we went with the Panasonic NNST663SC and added on a stainless steel trim kit so it would match our other appliances. It was more expensive than what I expected a microwave to cost but Panasonic as a brand performed well in this appliance category especially when it came to defrosting evenness, speed of heating and overall reliability. Other brands that performed well in this category include GE and Oster.


So there you have it! My tips for choosing the best kitchen appliances and recommendations for kitchen appliance brands in each catagory. I know figuring out what appliances are reliable and high performing can be a daunting/grueling process but the last thing you want to do is spend your hard earned money on complete crap that has to be replaced in a few years. I hope this blog post helped you along a little bit and provided additional knowledge on the differences between designer brands and non-designer brands, as well as which brands are performing the best in each category. Feel free to share what appliances you ended up going with below too! I would love to know!


PIN THIS POST

'WE BOUGHT A HOUSE': TIPS FOR FIRST TIME HOME BUYERS ON HOW TO BE PSYCHOLOGICALLY PREPARED!

If you follow me on Instagram you may have already seen me talking and sharing about Adam and I’s journey with buying a house for the first time. What you may not know is that we finally won a bid! After months of searching and placing numerous bids, we finally came out on top and will be taking possession of our first home on my birthday! The icing on the cake for me though is that we scored a detached Victorian in one of the most coveted downtown neighborhoods in Toronto, Canada! I still can’t believe it!

Although I am thrilled to end this part of our journey victorious, it has not been easy! As a matter of fact, there were plenty of disheartening and heartbreaking moments which at times made me question whether we should throw in the towel. Looking back, there were definitely a few things I wished I had been more mentally prepared for as a first-time home buyer in Canada. For one, I wish someone told me that buying your first home is hard but buying a home in one of the most competitive real estate markets in Canada is even harder!

The Toronto housing market has been hot for a while but this year with the looming effects of COVID, lack of supply, high renovation costs, and low mortgage rates, the 2021 market saw a 21% increase in the average home price, which brought the average Toronto home from $900K to $1.1 million in 1 year. Additionally, I wish someone had warned me about the frustrations of skyrocketing prices thanks to ‘blind bidding’ wars (when a buyer makes an offer on a home without details of other competing offers), which in our experience lead to houses going 500K over asking! Further, because realtors want to capitalize on bidding wars for their clients, they will list a house lower than the house is worth just to create the frenzied environment they want. Had someone taken me by the shoulders and shaken the naivety out of me I probably could have saved myself from numerous sleepless nights, getting too attached, and bouts of elevated anxiety and stress, but alas here we are! That is why I thought I’d share a few ‘tips for first time home buyers’ with you so that you can go into one of the biggest purchases decision of your life a little more mentally prepared and level-headed than I was and avoid feeling hopeless about buying a house.


FOLLOW ME ON INSTAGRAM @ISTHATSOH


- 5 Tips To Mentally Prepare You For Buying Your First Home -

1. Buying a house is kind of like dating


Chances are you won’t end up marrying the first person you date in high school, right! Well, the same thing goes for houses! In total, Adam and I ended up bidding on 11 houses, 10 of which we didn’t even make a shortlist (when the seller’s agent contacts the top bidders to see if they can improve their offers)! The number of houses we bid on would have been higher but Adam talked me out of placing bids on two houses for one reason or another, and although both those houses did end up selling within our price range (imagine my frustration at the time having to watch them pass me by) in hindsight I realized that he was right and that I would have been settling for a house in a neighborhood that left something to be desired instead of holding out for ‘the one’. DID YOU HEAR THAT ADAM?! I SAID YOU WERE RIGHT! LOL.

I guess what I’m trying to say is that buying a house is like dating - expect to match with a bunch of potentials, fall in love a few times, back out once or twice, get your heart broken when you are outbid, only to have to brush yourself off, get back up and continue looking. Seriously though, it’s okay to step back for a few weeks and take a break from house hunting when you start to feel like you are losing hope like Adam and I did once or twice…. there will always be another slew of new houses out there in a few weeks and sometimes it’s better to take a break than give up, or worse, settle!

2. Buckle up!


On that note, buckle up because you’ve got a long journey ahead!

When Adam and I started our house hunting journey, I anticipated figuring out finances, finding the perfect house, and moving in would take 3-4 months tops and boy was I wrong! Adam and I started looking at the beginning of February and only in mid-end June 2021 successfully won a bid. In that time we saw nearly 50 houses, 90% of which fit my desired style (Victorian).

The thing is, even when you win a bid, most sellers want 60-90 days before they hand over possession of the house, so right there you’re adding 2-3 months to your timeline. In fact, it was only in the midst of our journey that I learned it had taken some of my friends close to a year to find their first house let alone move in! The point is, buckle up and prepare yourself for a long ride ahead especially in competitive markets like Toronto where you will have a lot of competition. I remember one house we bid on had 27 offers which apparently is not uncommon these days when there is a limited supply, especially during the winter months.

According to my mom, who is a licensed real estate agent and helped us with our first time home purchase, the housing market gets more competitive during the winter months (Dec-March) when supply is limited and cools in the summer months (June - August) when supply is at its highest. Additionally, spring (April - May) and fall (Sept - Nov) can also be competitive as there is still a transitioning amount of supply (although better than winter months). However, families with children are generally looking to buy in the spring and move during the summer in order to have their kids settled before school starts in September. For this reason, the market gets a bit more competitive in the spring. Regardless, paying attention to the season and the number of new listings could help your chances of being shortlisted when bidding in a competitive market.

A Timeline for Buying A House For The First Time

3. Roll the dice and play the game


As a first time homebuyer trying to buy a house in Toronto - the city I was born and raised in! - one thing this experience taught me was that the housing market in Toronto is F*$ked! There is no way that people my age will be able to purchase a home in the city in the future if prices keep going up the way they have been unless they and their partner/spouse have a combination of two or more of the following: two very strong income streams, are already sitting on a nice nest egg (like I was with my condo), are getting a bit of money from their parents, are willing to lose a large chunk of their paycheck to mortgage payments or are willing to rent out part of the home to subsidize their mortgage payments.

Further, agents have been listing homes below market value across the city in order to entice bidding wars, so it’s not uncommon to see houses listed in your price range (or even for $1 in some cases!) sell way over the listing price. Towards the end of our journey, both Adam and I realized that the listing price means nothing anymore, that’s why you have to think of putting in an offer as playing a game. Instead of looking at the listing and trying to figure out a realistic number to offer that you feel comfortable with, you have to focus more on ‘comparables’ (houses in the same general area that have the same number of bedrooms, bathrooms, and lot size, etc.) to see what a more realistic value for the house is. Obviously, if it doesn’t have parking, a finished basement, a potential rental unit, or the same number of floors, it could decrease the value of the home, but in a competitive market where the listing prices don’t mean anything anymore, it can become a skill to correctly figure out what a house will go for. That is why you should look at it as playing a game! Bet what you feel comfortable with on the houses you want even if it’s below the asking price because you never know! We saw houses listed only to be terminated and relisted 3-4 times before selling below asking!

You could also play the waiting game and wait till summer when supply is highest and delusional sellers (often propped up by their overpromising agents) calm down or get desperate, and submit a bid based on what you think the house is worth (according to comparables) or what it’s worth to you. Either way, don’t worry too much about offending the listing agent with a lowball offer. The worst thing that can happen is you forfeit the $10 you spent on getting a bank draft (we submitted a photo of one with all our offers to make it more enticing - as trivial as that sounds), don’t win the bid or they come back to you and ask you (or everyone who submitted an offer in one case for us *such a slimy move in my opinion*) to improve, at which point you can still walk away as we did once or twice.


CHECK OUT THESE OTHER LIFESTYLE POSTS!


4. Stick to your guns!


With that in mind, remember to stick to your guns! If you’ve submitted a fair bid or even a pretty good bid on a home only for the selling agent to come back and ask you to improve, you can and should say no if you don’t feel comfortable. Like I said before, in two weeks’ time, there will be a whole new slew of houses on the market and the one you just lost out on will be a thing of the past. Agents are in it to get the most out of the sale for their clients, so don’t get offended or discouraged when they come back to you with a cheeky remark. Instead, stick to your guns because there is nothing they can say that will make you feel worse than overpaying for a house!

The same goes for the type of house you want! I knew I wanted a Victorian and although I did entertain Adam and my mom once or twice to see houses that weren’t Victorians, I rarely like them and wanted to move forward with them. In the 1-2 cases where we did, the price and location were so great it would have been too great of an investment opportunity to pass up (although I will admit, I was certainly relieved when we didn’t win)!

The point is, if you know what kind of house you want, stick to your guns because odds are 1) you’ll waste less time if you have a narrow search vs. a wide search (i.e. a specific neighborhood or a type of architecture style) 2) you’ll be able to pick up some interior design ideas for similar spaces to what you inevitably will end up with, and 3) it’s only a matter of time before you do win a bid, so make sure you stick to your guns and get the house you REALLY want!


SOME OF THE VICTORIAN HOUSES WE WENT TO SEE IN TORONTO

5. Take advantage of holidays, snowstorms, etc.


I swear, one of the reasons Adam and I won our detached home was because it was listed 2-4 days before Fathers Day, and offer night was the Monday after. In total, there were 6 bids which, although it was not the lowest number we had seen, was still pretty good! If you want to have less competition on a house, take advantage of holidays like Mother Day, Fathers Day, Canada Day (or 4th of July for those in the US), Labour Day, etc., especially in the summer when people will be outside enjoying the nice weather or heading up to the cottage. Alternatively, I’ve heard from friends that snowstorms in the winter can cause the same effect! Regardless, the fewer people that view the house the higher the chances you will experience less competition which automatically makes your bid more competitive!


I hope you enjoyed this blog post about tips for first time home buyers and my experience buying my first home. I hope it helps you avoid feeling hopeless about buying a house as well as severe anxiety about buying a house. If you have any comments or questions about buying a house for the first time, or want me to write about other topics that could help you figure out how to prepare to buy a house, please feel free to leave them in the comment section below.


PIN THIS POST