HOMEMADE PUFFED RICE GRANOLA WITH SMARTIES!!!

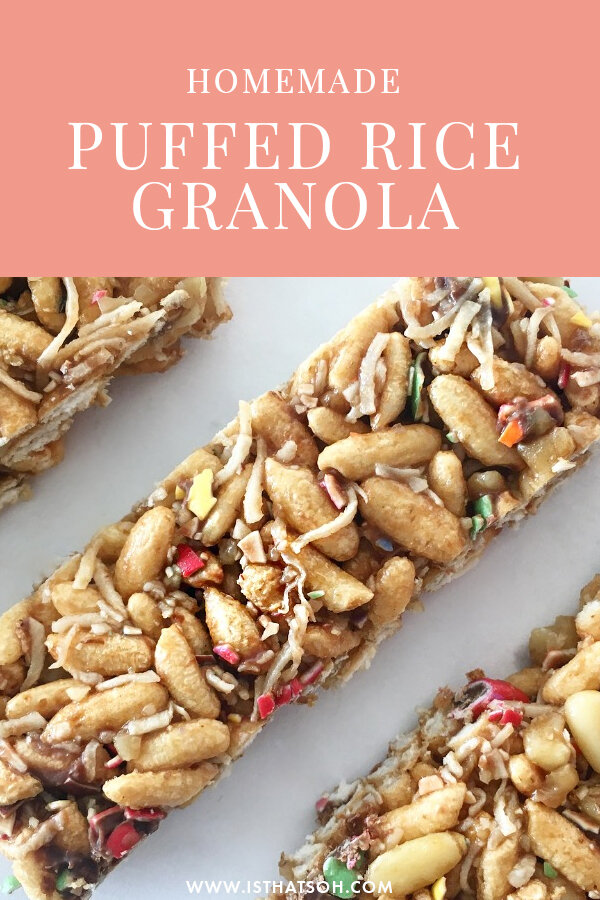
If you like to cook and get creative like me sometimes you end up with a lot of left over ingredients filling up all the space in your pantry. The great thing about homemade granola bars are that you can really use whatever you have on hand. If you want to make them naturally sweet use more dried fruit. Not worried about calories - sweeten with chocolate or caramel! Granola is a great way to create something out of what you've got while still tasting good and satisfying those cravings in a healthy way. Today I made puffed rice granola with walnuts, pine nuts, shredded coconuts and even some crushed smarties! If you are interested in making granola bars at home I have included the recipe below! ENJOY!

INGREDIENTS:

1/3 cup of brown sugar
1/4 cup of honey
1/4 cup of unsalted butter
1 tsp of vanilla extract
1/4 tsp of salt
2.5 cups of rice puffs
1/3 cup of shredded coconut
1/4 cup of crushed walnut
1/4 cup of pine nuts
1/4 cup of crushed smarties

DIRECTIONS:

In a small sauce pan on medium heat melt the brown sugar, honey and butter together. Stir until completely liquefied. Remove from heat, add in your vanilla extract and salt before setting aside.

In a large bowl mix in your puffed rice, shredded coconut, walnuts, pine nuts and crushed smarties - mix up that goodness!!!

Once the melted sugar, butter mixture has cooled a little (dont want it to melt your chocolate) add it to the big bowl of puffed rice and mix until fully incorporated.

Take a deep flat dish and line with aluminum foil before pouring in granola mixture. Spread around using a spatula and let chill for at least 2 hours in the fridge before chopping in granola bars!!! 


I hope you enjoy this recipe as much as I do. If you have any comments please leave them below and I'll be happy to answer them as soon as I can! Bon Appetite!!!


PIN THIS POST

WALNUT & DATE ENERGY BITES!

Okay lets face it, sometimes throughout the day you crave a snack and what you end up choosing can really make or break your diet. One way to avoid making such an easy mistake is to be prepared! These energy bites are both vegan and paleo and taste AMAZING! When hunger strikes or you need a boost of energy grab one of these babies and feel guilt-free! They last for about 7 days when stored in the fridge and are so easy to make that you have no excuse lol ;) Happy eating my friends!

VIDEO POSTED BELOW

INGREDIENT:

1 Cup of Walnuts
1/2 a Cup of Unsweetened Coconut
16-18 Pitted Dates
1 TSP of Cinnamon
1/3 Cup of Almond Butter
1 TSP of Vanilla Extract
3 TBSP of Hemp Hearts
2/3 Cup of Oats

DIRECTIONS:

Place walnuts and unsweetened coconut in a food processor and pulse until the walnuts have been broken down into small chunks.

Add in dates, cinnamon, almond butter and vanilla extract and continue to pulse until the dates have been broken down into small chunks.

Transfer contents to a bowl, add in your hemp hearts and oats, and mix all ingredients together with your hands.

Once nicely mixed start to roll the ingredients into balls and place on a lined baking sheet lined with parchment paper.

Allow balls to sit for 30 minutes to dry and harden.

*You can store them up to a week in the fridge in a sealed container!

ENJOY!!!!

I hope you enjoyed this recipe as much as I do. If you have any comments please leave them below and I'll be happy to answer them as soon as I can! Bon Appetite!!!

COFFEE CHOCOLATE CHIP ICE CREAM

I am not sure what inspired me to want to make ice cream, but I am sure happy I did. When it came to deciding the flavor I must admit it's no secret that I'm a big fan of coffee especially in ice cream form; also chocolate chips just seemed like the next logical step. This recipe calls for a Kitchen Aid Mixer (I borrowed mine from my mom) and takes longer then your average dinner recipe because the key to making good ice cream is letting the temperatures both raise and lower slowly. Meaning it is important to allow things to heat up slowly and cool down slowly so in the final freezing process less crystals are created and thus a creamer ice cream. Enjoy!

VIDEO BELOW!!!!!

INGREDIENTS;
1.5 Cups of Heavy (Whipping) Cream
1.5 Cups of Whole Milk
1 Cup of Cane Sugar (any kind of sugar works)
4 Egg Yokes
3/4 Cup of Freeze Dried (Instant) Coffee
1 TSP of Vanilla Extract
1 Cup of Chocolate Chips - I used Milk Chocolate

DIRECTIONS:

Add whipping cream and whole milk to a pot and heat it up on medium heat. You want it to get hot but NOT to the point of boiling.

Next add in your sugar and stir so that it dissolves.

In a separate bowl add your egg yokes. We are going to temper the eggs (this means slowly raising the temperature of the egg mixture so that it doesn't cook and become chunky)

Mix the tempered egg yokes in with the cream mixture and continue to heat on the stove until the cream thickens. A good way to test if it has thicken is to first take a black spoon and using a finger slide it across the spoon to reveal a line - the more opaque the liquid is in comparison to the colour of the spoon the thicker the mixture is.

Once the cream has thickened (about 10 minutes) take some of the hot cream and add it to the instant coffee to dissolve it before adding it back into the cream mixture followed by the vanilla extract. Stir well until fully incorporated.

Next remove the cream mixture from the heat and strain into a glass seal-able container. Allow to cool uncovered until it reaches room temperature then cover and place in fridge over night to thicken further.

Place the cream mixture into your Kitchen-Aid ice cream bowl and let it stir and churn the cream for 20 min on the lowest speed before adding in your chocolate chips. Allow the cream to continue to churn for an additional five minutes (you want the consistency to almost be that of soft serve ice cream)

Once the cream has a nice texture place back into the glass container, seal and place in freezer overnight to harden. Take the ice cream out of the freezer 2 minutes before you want to serve it and enjoy.

I hope you enjoyed this recipe as much as I do. If you have any comments please leave them below and I'll be happy to answer them as soon as I can! Bon Appetite!!!

BRUSSELS SPROUT CHIPS - VEGAN, VEGETARIAN

Looking for a great low calorie snack? I got you covered! Brussels sprouts are a great vegetable to turn into "chips" Not only are they delicious and crunchy when baked but they are full of vitamin K and vitamin C! This super easy recipe is great for kids and will have them eating their veggies like its popcorn!

INGREDIENTS:

1 LBS of Brussels Sprouts
2 TBSP of Olive Oil
2-3 TSP of Salt

DIRECTIONS:

Preheat oven to 350 degrees.

Wash and clean your brussels sprouts removing the stem and the outer layers. Cut cleaned brussels sprouts in half and place in a bowl.

Add your olive oil and salt to the bowl and mix well so everything is evenly coated.

Place brussels sprouts facing up on a baking pan lines with aluminum foil and bake for 25-35 minutes depending on how crispy you want them. Happy eating!


I hope you enjoyed this recipe as much as I do. If you have any comments please leave them below and I'll be happy to answer them as soon as I can!  Bon Appetite!!!


QUINOA EGG 'FRIED RICE'

Fried rice is one of my favorite Asian dishes but I was looking for a healthier alternative for rice when I realized Quinoa would makes a great substitute for any rice dish. Quinoa is a very good complex carb which is made up of part protein, part carb making it take longer for your body to digest and therefore keeps you full longer. I have never made fried rice before so I looked up a couple recipes to help me and this is what I came up with. Enjoy

INGREDIENTS:

1 Cup Of Quinoa
2 Cups of Water
1.5 TBSP Teriyaki Sauce
2.5 TBSP of Soy Sauce
2/4 TBSP of Sesame Oil
1 TBSP of Olive Oil
1 Small Onion (Chopped)
2 Carrots (Peeled and Chopped)
2 Cloves of Garlic (Minced)
2 Green Onions (Chopped)
2 Eggs (whisked lightly)
1/2 Cup of Frozen Peas (thawed)
1/2 Cup of Frozen Corn (thawed)

DIRECTIONS:

Add the water to a pot and bring to a boil. Once boiling add in your quinoa, lower the heat to a simmer and cover for 15 minutes. After 15 minutes fluff the quinoa and remove from heat. Allow to cool.

In a bowl combine teriyaki sauce, soy sauce and sesame oil, mix and set aside.

Add your oil to a wok and allow to heat up on medium heat before throwing in your onions and carrots. Stir and let saute for two minutes.

Next add in your green onions and garlic - continue to saute.

Once the vegetables are nicely cooked add in your quinoa followed by the sauce mix. Stir until fully incorporated.

Next make a well/hole in the middle of the wok and add in your eggs. Allow to cook a little before scrambling.

Lastly add in your peas and corn. Mix till they are fully incorporated and warm through before plating and serving.


I hope you enjoyed this recipe as much as I do. If you have any comments please leave them below and I'll be happy to answer them as soon as I can! Happy cooking!!!