FOREVER DREAMING OF ITALY: CACIO E PEPE, A SIMPLE ITALIAN CLASSIC

We may not be able to travel during this global pandemic but that doesn’t stop me from dreaming about Italy!

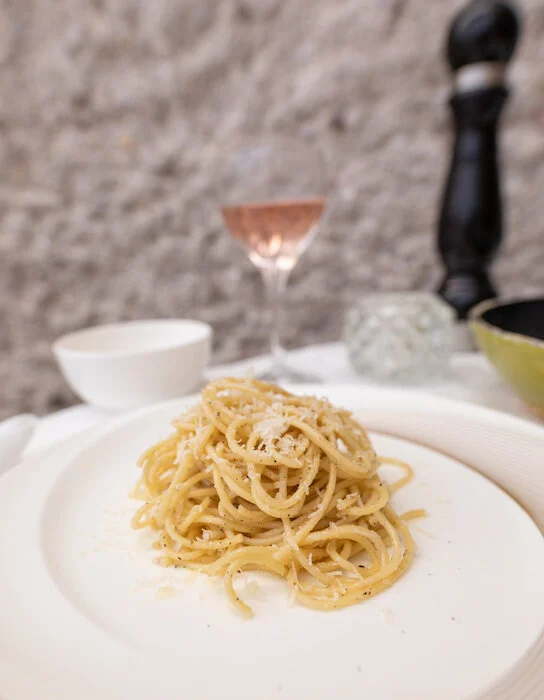
A couple of years ago Adam and I ate our way through Tuscany and spent some time in Rome (click here to read my food guide to Rome) and during our time there we took a fantastic authentic Italian cooking/pasta making course. It was during that course that I first had Cacio E Pepe and feel in love with the bite of the pepper against the salty cheese. Not only did we love our time in Italy but this classic, simple dish always reminds me of our great adventures there.

Buon Appetito!

INGREDIENTS:

- Serves 2 people

120 Grams of Pasta of Your Choice
Salt
3 TBSP of Unsalted Butter
1/2 TSP of Freshly Ground Pepper
3/4 Cups of Finely Grated Parmesan
1/2 Cup of Finely Grated Pecorino

DIRECTIONS:

Boil water, add salt followed by your pasta of choice. Cook slightly before al dente.

Before draining the pasta, set aside about 1/2 a cup to 1 cup of pasta water.

Warm up butter in a skillet and add in the freshly ground pepper. Toast the pepper for 1-minute stirring continuously.

Add in 1/2 a cup of pasta water followed by the pasta - coat the pasta so it cooks a little further. The sauce should be wet so once you fold in the parmesan and allow it to cover the pasta fully if the pasta water is absorbed fully, add more before lowering the heat and adding pecorino.

Stir, serve and enjoy!


If you like this recipe or have any comments/questions, feel free to leave them in the comment section below!


PIN THIS POST

CACIO E PEPE 2.jpg
CACIO E PEPE.jpg

HOMEMADE PEROGIES FROM SCRATCH!

“Food is our common ground, a universal experience.” –James Beard

Life hasn’t been all sunshine and rainbows lately. I know this global pandemic raging over the world has taken away everyone’s ability to move freely and enjoy the comforts we once took for granted, dining out included. For me personally, I feel like I am in a constant state of limbo unsure of what the future may hold or when self-isolation and social distancing will end. Turning to comfort foods that both keeps my mind busy and nourish my soul has been a great escape from this new reality.

Perogies for me are one of those comfort foods that take time and patience to prepare but always manages to soothe the mind and soul. They are also great if you want to batch make something to keep in your fridge so you can enjoy them over the course of a week or want something relatively inexpensive to give to someone in need. During this time we must all be a little bit kinder to ourselves and to others, and giving someone a home-cooked meal is a great way to show you still care even when you can’t be there physically. Whatever your purpose for making them, I hope they bring you the same happiness and enjoyment as they have brought me. Stay well!

INGREDIENTS:

Serving: 6 People @ 5 Perogies Each,

- Cheese and Potato Perogies: Filling-
1 1/2 LBS of Russet Potatoes (typically around 2-3 potatoes should suffice) - peeled and chopped into 1-inch squares
2 TSP of Olive Oil
1/2 a CUP of Onion (diced)
1 Clove of Garlic (minced)
1/2 CUPS of Cream Cheese
1/2 TSP of Salt
Pepper to taste

- Dough For Perogies -
2 1/2 CUPS of All-Purpose Flour
1/2 TSP of salt
1/4 CUP of Sour Cream
1 Egg
2/3 CUP of water

-What To Serve With Perogies - Optional Toppings -
Bacon
Chives
Sourcream
Caramelized Onion


CRAVING COMFORT FOOD? CHECK OUT THESE OTHER RECIPES!


HOW TO MAKE PEROGIES:

First, we need to make the filling.

Put your cut up potatoes in a pot with lukewarm water, add salt and bring to a boil.

In a pan, drizzle a little bit of olive oil and allow it to heat up on medium. Once hot, add in your chopped onions and allow them to cook until they become translucent. This may take 3-5 minutes and you may want to reduce the heat to ensure they don’t burn.

Add in your garlic to the onions when they are close to being done (garlic cooks faster than onion).

Once the potatoes are ready, strain the water out and place the cooked potato back in the pot before starting to mashing them into a smooth texture. To help you make them creamier, add in your cream cheese.

When onions and garlic are ready, add them to the potato pot as well, mix until well incorporated, salt and pepper to taste, and set aside to cool down to room temperature.

Dough For Perogies

Next, we need to make the dough.

Add flour and salt into a large bowl and mix until well combined.

Make a well in the middle and add in your eggs, water, and sour cream. Using a fork or spoon start to mix it together starting from the inner circle and working your way toward the outer edges. You may need to eventually switch to using your hands.

Once the dough starts to form, use a countertop to knead it till it isn’t powdery and has a smooth texture. Place dough back in the bowl, cover with a cloth and let sit for 10 minutes.

After 10 minutes, flour a working station and roll out 1/3 of the dough till it is 1/8’ in thickness. Cut out circles using a circle cookie cutter with a 4’ diameter. You can also use a lip of a cup as a stencil and a pizza cutter if you don’t have a circle cookie cutter! Feel free to get creative! If you don’t have a 4’ wide diameter cup you can always roll out the dough a little thicker, use a 3’ wide diameter cup and then roll them out a little thinner after to spread out the dough wider. It doesn’t have to be perfect.

Set dough pancakes aside on a floured surface and cover with a cloth. Once you have a few cut out, fill the middle with about a tablespoon of the mashed potato filling and fold the dough over, pinching the sides to create a seal. If the seal doesn’t hold use a little water along the edge to help. Secure the seal by pressing the prongs of a fork along the dumpling edge and making indents into the dough.

How To Cook Perogies & How Long To Boil Perogies

Once you have a few complete, boil a pot of water. Once boiled, add salt and drop in 3-4 dumplings. You will need to stir the water at first so they don’t stick together. Eventually, after 3-5 minutes the Perogies, will float to the surface of the water, when that happens, allow them to cook for an additional 30-45 seconds before taking them out of the water and setting them aside on an oiled tray or casserole dish. As you add more cooked perogies to the oiled tray or casserole dish, make sure they are covered in olive oil to avoid them sticking to one another. You can store them like this for a few days in the fridge if you don’t want to eat them right away.

I like my perogies fried so typically I will heat up some butter in a pan on medium and once hot, place a few of these finished, pre boiled perogies in the plan flipping them as they become nicely browned. When ready, remove them from the pan, add a dollop of sour cream, chives, and bacon bits and serve!

Pierogies in Air Fryer

You can also air fry pierogies in an air fryer if you have one! It usually only takes 4-5 minutes to get them crispy and golden brown but I have found that each air fryer I have tried them with is a little different so just keep an eye on them. Typically 4-5 minutes though is good!

Enjoy!


FOLLOW ME ON INSTAGRAM @ISTHATSOH


If you like this recipe for perogies with bacon or have any comments/questions about how to make homemade perogies or suggestions as to what to serve with perogies, feel free to leave them in the comment section below!


PIN THIS POST

HOMEMADE PEROGIES FROM SCRATCH.jpg Perogies - how to make perogies, homemade perogies

RECIPE REVIEW: STRAWBERRY GOAT CHEESE BRUSCHETTA RECIPE

I found this recipe online while trying to find inspiration and had to try it out. I am a huge fan of goat cheese and the mix of sweet and salty flavors, so right off the bat it caught my attention. I did make an adjustment to the original recipe which called for thyme instead of mint, and I am so happy I did. The freshness of the mint perfectly complimented the strawberries and it tasted just heavenly. If you have a sweet tooth or like sweet fruits with cheese, you got to try this strawberry bruschetta recipe! Feel free to also get creative and change up the cheese! I am sure it would also taste amazing with feta cheese and a little balsamic glaze or cream cheese if that’s all you have!

INGREDIENTS:

Serving: 3-4 People

1/2 CUP of balsamic vinegar
Bread cut into slices - I used baguette but the original recipe calls for Italian
1 TBSP of olive oil
1 LB of Fresh Strawberries (cut into small morsels)
2 TSP of Fresh Mint (chopped) - original recipe calls for thyme
1 CUP of Goat Cheese - Keep at room temperature for easy spreading
Salt and Pepper to Taste


LOOKING FOR AN INTERESTING APPETIZER? CHECK OUT THESE OTHER RECIPES!


HOW TO MAKE STRAWBERRY BRUSCHETTA:

The first thing you want to do is reduce the balsamic vinegar into a glaze so in order to do this you need to heat it in a small pot or pan over medium to low heat. Let it simmer there for 8 to 10 minutes, it should reduce by about half and thicken nicely to a glaze. Once it is done, remove from heat and allow it to cool back to room temperature.

Next, you have to toast the bread. You can either do this in bulk using a foil-lined baking sheet, drizzling them with olive oil, and placing them in the oven at 400 for 5-10 minutes. The timing here can vary depending on how thick you cut the slices and how golden/crunchy you want them so keep an eye on them so they don’t burn.

While the bread is in the oven, combine cut-up strawberries with fresh mint in a bowl and add in the room temperature vinegar glaze. Salt and pepper the mixture to your taste.

Once the bread is ready you can go ahead and spread goat cheese across each piece before spooning the strawberry bruschetta mixture over each piece. Garnish with more mint and serve!

Enjoy!

To check out the original recipe, click HERE!

If you are looking for an authentic traditional Italian bruschetta recipe with tomatoes, click HERE!


FOLLOW ME ON INSTAGRAM @ISTHATSOH

Gallery Block
This is an example. To display your Instagram posts, double-click here to add an account or select an existing connected account. Learn more

If you like this strawberry bruschetta recipe or have any comments/questions, feel free to leave them in the comment section below!


PIN THIS POST

SAVOURY FLAKY SPANAKOPITA BITES

Spanakopita-6 2.jpg

I was craving some flaky spanakopita the other day and decided to test my hand at baking it myself at home. Adam’s Baba (grandmother) makes an amazing Macedonian version called Zelnik so naturally, she was the first person I called. These little spinach pies ended up turning out amazing even though I sort of freestyled some of the measurements and combined Baba’s recipe with a couple of others I found. I mean, you can never have too much cheese, right!?

INGREDIENTS:

Serving: 24 Spanakopita Bites

-Spanakopita Filling-
Olive oil
1 Medium Sweet Onion chopped finely
6 CUPS of Fresh Spinach chopped roughly
3 Springs of Green Onions, sliced into thin pieces
2 CUPS of Italian flat parsley chopped finely
2 Cups of Goat and Sheep Feta
1 CUP of freshly Grated Halloumi Cheese
2 Eggs beaten lightly
Salt and Pepper

-Phyllo Cups-
1 (454 Grams) Packet of Phyllo Sheets*
3/4 CUPS of Melted Unsalted Butter
1 Egg beaten lightly

*Phyllo Sheets - Make sure that the phyllo dough is completely thawed.  It is super fragile so if it is not well thawed out it will break easily.  In general, be extra gentle when handling each layer of phyllo because it is so thin it will tear easily. You have to work a little fast because the dough drys out quickly. I first cut the phyllo layers into rough 4” squares using a scissor and stacked them to keep the air off them as I worked. You can also keep them under a slightly damp dishtowel. Work with one muffin pan at a time.

DIRECTIONS:

Spanakopita.jpg

Butter your muffin trays making sure to coat the bottom of each cup and the sides

In a pan add in olive oil and finely chopped onion and saute until translucent.

In a large bowl add the sauteed onion with finely chopped parsley, spinach, green onion, eggs, crumbled feta, and Halloumi. Add a pinch of salt and pepper and combine thoroughly till well mixed. Set aside.

Preheat oven to 375 degrees and pull out your muffin trays. It’s time to create your pastry cups.

Add one 4” phyllo square to each buttered muffin cup mould on your tray pressing each sheet into the moulds and allowing the corners to point up. Little tears may occur -don’t worry to much about this! Just make sure on the next layer to cover the tear with some phyllo. Using a pastry brush, brush each phyllo sheet with butter before adding another 4” phyllo square on top. Do this until you have cups that are 5-6 layers thick.

Spanakopita-2.jpg

Once complete, fill each cup with spinach mixture and fold over phyllo corners back towards the middle to create a cover. If they have died out, try brushing them with butter to help moisten them. There will be some flaking, don’t worry so much about it.

Spanakopita-3.jpg

Mix the last beaten egg with remaining butter and brush the top of each muffin mould with the mixture to help keep the phyllo sheet corners together before placing muffin tins in the oven and baking for 35 to 40 minutes or until the top is golden

Once ready, allow muffin trays to cool for 10 minutes before trying to transfer cups onto a serving plate or cooling rack.

Enjoy!


If you like this recipe or have any comments/questions, feel free to leave them in the comment section below!


PIN THIS POST

VEGAN PUMPKIN SOUP WITH @INSPIREDBYNICK!

Oh Hello There!

Welcome back to my blog!

I know it’s been a hot minute since I have posted anything on the ‘Food and Drink’ section of Soheila Online, but let me assure you that this was completely intentional. As I grow my brand I am also evolving and changing the direction of certain aspects of my blog. And although I love food (I mean, this girl loves to eat!) I wasn’t sure if recipe posts were where I wanted to concentrate my time and efforts. That doesn’t mean I won’t be sharing pretty food pictures with you anymore! It just means, instead of focusing my efforts on sharing my recipes, I want to share my food experiences with you in a different way - like through collaborations with my favourite food influencers!

So in the spirit of new beginnings I am back on the blog today to share a little festive autumn collaboration with my dear friend @Inspiredbynick! If you are guys are not familiar with Nick Joly he is a vegan food blogger based in Toronto that aims to promote healthier lifestyle habits and delicious vegan recipes. If you aren’t following him on Instagram already I definitely recommend you do!

@InspiredByNick and I at Downey’s Farm

@InspiredByNick and I at Downey’s Farm

Nick and I first met a couple months ago through our mutual friend Krystle (@dineandfash) and really hit it off. Since our first introduction over lunch at Cubano Restaurant I have been following Nick’s progress and really admire his positive attitude, health lifestyle habits, all round hustle, and drool-worthy vegan food pics! That is why a couple week ago I asked Nick if he wanted to collaborate with me on a little project I was planning for fall.

Usually not the biggest fan of letting go of summer, this year I wanted to embrace autumn by celebrating its cuteness in all its glory. For me this meant a little content creation road trip up to the pumpkin patch would need to happen, and I knew Nick would be the best partner in crime to collaborate with. So off we went to Downey’s farm in Caledon (a short 45 min drive from downtown Toronto).

Our plan for the collaboration was to go early, take a couple lifestyle photos, grab some picture perfect pumpkins, head back to Nick’s house to make a vegan recipe he had in mind, and style some Pinterest worthy photos. We were so prepared for our little road trip and for our food styling and pumpkin patch photos session that everything went off without a hitch. Nick had purchased mini pumpkins and ingredients ahead of time and I showed up with a red wagon (the perfect pumpkin patch photo prop) and a bag full of dollar store decorations for food styling. Together we took some super cute photos and created perfect autumn themed content. 

Nick of course being the master cook in this collaboration has shared the recipe to the Vegan Pumpkin Soup we (but really he - I just played with the dogs) made -> http://bit.ly/2CC1ATS on his blog while I get to share the cute pictures of us from the pumpkin patch with you here. Although I won’t be posting as many recipes anymore I really feel like there are so many talented foodies out there like Nick who’s Instagram could benefit a lot of people and instill more positive habits in everyone’s life - vegan or not. That is why I wanted to collaborate with Nick on my first post back and share his amazing platform with you as a way to find inspiration and positive reinforcement for your everyday life. Food after all is ment to be shared and Nick just does it so well!


I hope you enjoyed this recipe as much as I do. If you have any comments please leave them below and I'll be happy to answer them as soon as I can! Happy cooking!!!


PIN THIS POST