RECIPE REVIEW: SHEET-PAN CHICKEN WITH CHICKPEA, CUMIN AND TURMERIC

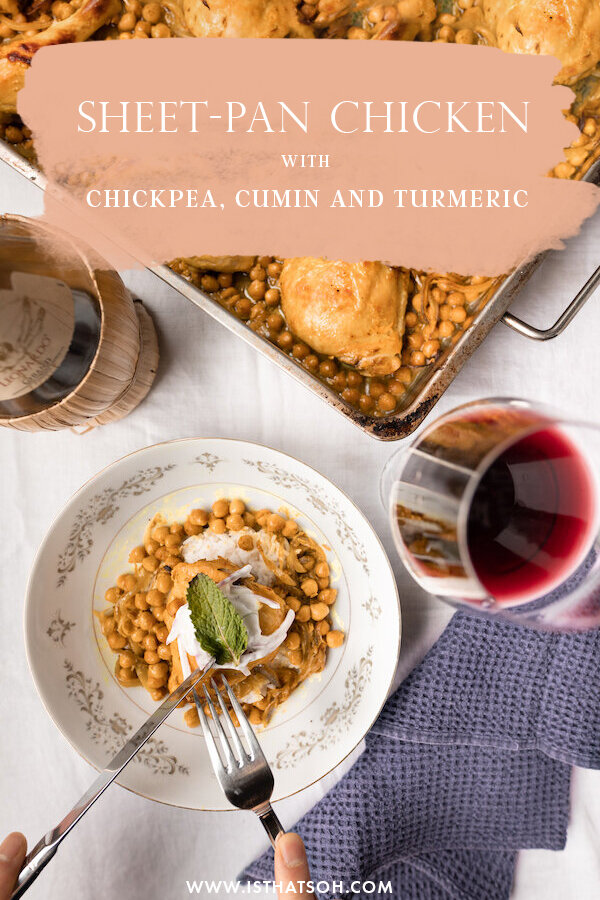
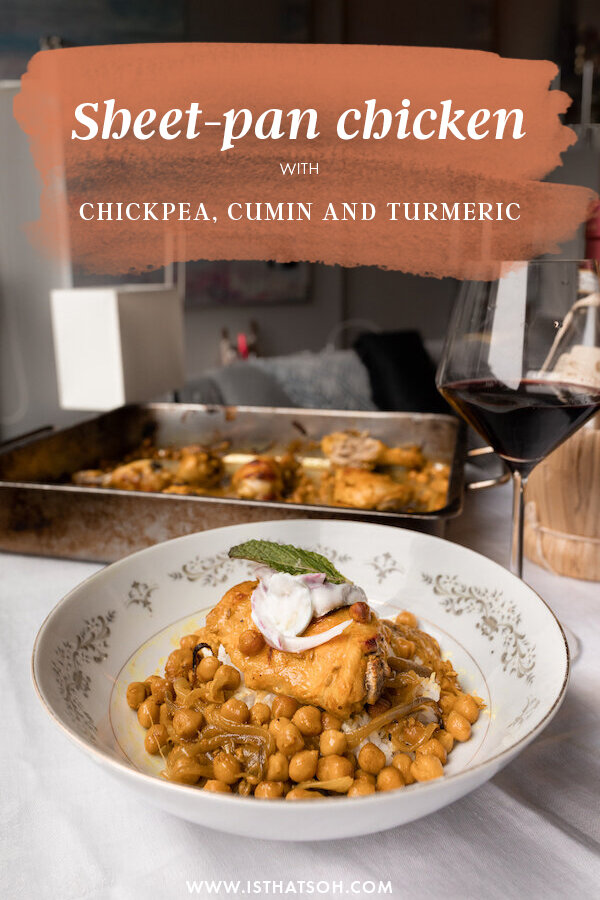
I was first introduced to this NY Times Sheet-Pan Chicken recipe during a dinner party with a girlfriend and couldn’t get enough. I ended up taking a copy of the recipe home eager to try it myself and not only was it so easy to remake, but it tasted just as good as the first time. I love the mix of flavors and spices, and how the yogurt breaks through the acidity. If you want to make it vegetarian and just leave out the meat, I’m sure it would be just as tasty! Either way, Adam told me I can definitely make it again so not only does this recipe get my approval, but it gets his too!

Score: 4.5/5

INGREDIENTS:

 Serves 4 People

-Chicken and Chickpea-
4 LBS of Chicken (I prefer to use dark meal like thighs) bone-in and skin-on.
Lemons for lemon juice - need to yield 5 TBSP total (2 for chicken, 2 to marinate slaw, and 1 for yogurt)
1.5 CUPS of full-fat Greek yogurt
2 TSP of Turmeric (1 TSP for chicken marinade, 1 TSP for seasoning later)
1 TBSP of Fennel Seed
1 TSP of Cumin (ground)
2 Cans of Chickpeas (drained and rinsed)
1 Large Red Onion - sliced thinly
1 Mini Cucumber - sliced thinly
Olive Oil
2 TBSP Water
Salt and pepper to taste

-Toppings-
Feta (optional)
Fresh Mint - torn into small pieces

DIRECTIONS:

 Season chicken using salt and pepper before creating a marinade using 3/4 CUP of yogurt, 2 TBSP of lemon juice, 1 TSP of Turmeric, and 2 TBSP of water. Add more salt and pepper if necessary, it should be slightly salty, this will reduce once cooked and combined with yogurt topping later.

Add seasoned chicken to marinade and make sure it is coated evenly - allow to sit for a minimum of 30 minutes at room temperature or overnight in the fridge.

Prior to cooking, adjust the oven rack to the top shelf and heat oven to 450!

Next combine chickpeas, fennel seed, cumin, and the remaining Turmeric in a bowl with half the red onion slices, drizzle with olive oil and season with salt and pepper before giving it a good toss to make sure it is covered evenly. Place on a rimmed baking sheet and push chickpeas to the outer edge to make room for chicken.

Scrape the excess marinade off the chicken and place it in the center of the baking sheet. Bake in the oven for about 45-50 minutes until skin is browned. You will need to toss chickpeas occasionally to make sure they become crispy and golden and don’t burn

While the chicken is cooking create a slaw by tossing the remaining onions in a bowl with the thinly sliced cucumber and add 2 TBSP of lemon juice. Season with salt and pepper and let sit in its juice.

Once the chicken is ready, remove from oven and allow to cool slightly. Add onion cucumber slaw, to remaining yogurt and top with 1 TSP of fresh lemon juice. Season with salt and pepper to your taste. Top chicken with yogurt and garnish with mint and feta.

Enjoy!

To check out the original recipe, click HERE!


If you like this recipe or have any comments/questions, feel free to leave them in the comment section below!


PIN THIS POST

SAVOURY FLAKY SPANAKOPITA BITES

Spanakopita-6 2.jpg

I was craving some flaky spanakopita the other day and decided to test my hand at baking it myself at home. Adam’s Baba (grandmother) makes an amazing Macedonian version called Zelnik so naturally, she was the first person I called. These little spinach pies ended up turning out amazing even though I sort of freestyled some of the measurements and combined Baba’s recipe with a couple of others I found. I mean, you can never have too much cheese, right!?

INGREDIENTS:

Serving: 24 Spanakopita Bites

-Spanakopita Filling-
Olive oil
1 Medium Sweet Onion chopped finely
6 CUPS of Fresh Spinach chopped roughly
3 Springs of Green Onions, sliced into thin pieces
2 CUPS of Italian flat parsley chopped finely
2 Cups of Goat and Sheep Feta
1 CUP of freshly Grated Halloumi Cheese
2 Eggs beaten lightly
Salt and Pepper

-Phyllo Cups-
1 (454 Grams) Packet of Phyllo Sheets*
3/4 CUPS of Melted Unsalted Butter
1 Egg beaten lightly

*Phyllo Sheets - Make sure that the phyllo dough is completely thawed.  It is super fragile so if it is not well thawed out it will break easily.  In general, be extra gentle when handling each layer of phyllo because it is so thin it will tear easily. You have to work a little fast because the dough drys out quickly. I first cut the phyllo layers into rough 4” squares using a scissor and stacked them to keep the air off them as I worked. You can also keep them under a slightly damp dishtowel. Work with one muffin pan at a time.

DIRECTIONS:

Spanakopita.jpg

Butter your muffin trays making sure to coat the bottom of each cup and the sides

In a pan add in olive oil and finely chopped onion and saute until translucent.

In a large bowl add the sauteed onion with finely chopped parsley, spinach, green onion, eggs, crumbled feta, and Halloumi. Add a pinch of salt and pepper and combine thoroughly till well mixed. Set aside.

Preheat oven to 375 degrees and pull out your muffin trays. It’s time to create your pastry cups.

Add one 4” phyllo square to each buttered muffin cup mould on your tray pressing each sheet into the moulds and allowing the corners to point up. Little tears may occur -don’t worry to much about this! Just make sure on the next layer to cover the tear with some phyllo. Using a pastry brush, brush each phyllo sheet with butter before adding another 4” phyllo square on top. Do this until you have cups that are 5-6 layers thick.

Spanakopita-2.jpg

Once complete, fill each cup with spinach mixture and fold over phyllo corners back towards the middle to create a cover. If they have died out, try brushing them with butter to help moisten them. There will be some flaking, don’t worry so much about it.

Spanakopita-3.jpg

Mix the last beaten egg with remaining butter and brush the top of each muffin mould with the mixture to help keep the phyllo sheet corners together before placing muffin tins in the oven and baking for 35 to 40 minutes or until the top is golden

Once ready, allow muffin trays to cool for 10 minutes before trying to transfer cups onto a serving plate or cooling rack.

Enjoy!


If you like this recipe or have any comments/questions, feel free to leave them in the comment section below!


PIN THIS POST

PEEK-A-BOO SHORTBREAD LINZER COOKIES

The Best Shortbread Linzer Cookie Recipe

It's not always easy to keep up financially with the holidays. Although I love giving people gifts and putting a smile on my friends and family members faces, my thoughtful nature can get quiet expensive if I'm buying everyone gifts. That is why during the holidays I love to bake! Putting your efforts towards spreading holiday cheer through making something can often be the perfect gift to share with loved ones. One of my go - to holiday gifts this year are these super cute peek-a-boo shortbread snowflakes. I filled mine with my favourite jam, Bonne Maman but you can use Nutella, Dulce De Leche, or whatever filling you like! Enjoy!


FOLLOW ME ON INSTAGRAM @ISTHATSOH


Peek a boo jam filled shortbread snowflakes

INGREDIENTS FOR SHORTBREAD LINZER COOKIES:

1 CUP of unsalted softened butter
3/4 Cup of Icing Sugar
1/2 TSP of Vanilla Extract
1/4 TSP of Salt
2 Cups of All Purpose Flour
1/2 Cup of your favorite jam!

*you can dust the cookies with icing sugar at the end for extra effect!

STRAWBERRY JAM

LOOKING TO DO SOME HOLIDAY BAKING? CHECK OUT THESE OTHER FUN RECIPES!


HOW TO MAKE SHORTBREAD LINZER COOKIES:

In a mixer or by hand place softened butter, sugar, vanilla, and salt in a bowl and mix until well incorporated. 

Add in your all-purpose flour bit by bit till a dough starts to form. (TIP: If it is too sticky you can always add a little bit more flour at the end)

Once the dough is formed wrap in plastic wrap and place in the fridge for 20 minutes.

Once ready, preheat oven to 325 degrees.

Roll out dough between two pieces of wax paper! Use snowflake cut out to make your desired shape and place on a baking tray lined with a cookie sheet or wax paper. Half of these will become 'Peek-A-Boo' tops to the cookie (TIP: Once on the baking tray it is easier to make the smaller inside 'Peek-A-Boo' cut-outs using a smaller snowflake and extracting the inside cut out with a toothpick!)

When ready place in the oven for 20 minutes or until cookies become golden on the edges. Rotate the trays halfway (about 10 minutes).

Let cool before sandwiching a layer of jam between the bottom full shortbread cookie and the 'peek-a-boo' cut out top shortbread cookie!

Enjoy!


If you like this Shortbread Linzer Cookie recipe or have any comments/questions, feel free to leave them in the comment section below!


PIN THIS POST

ITALIAN CROSTATA RECIPE - MEMORIES FROM ITALY

Having recently received a package of Bonne Maman jams (best surprise ever!) I decided that I would put them to good use and make some delicious Italian breakfast tarts known as Crostatas. If you ever find that you have lots of jam in your fridge and you are looking for ways to use them up this is a great idea. The recipe is really easy and forgiving, and can be a fun activity to do with kids. Although Italians typically serve this tart with breakfast it can easily transition to an after dinner dessert with the help of a scoop of ice cream. Buon appetito!!

INGREDIENTS:

2 Cups of flour
1/2 Cup of granulated sugar
1/2 Teaspoon of baking powder
1 Egg + 1 Egg yoke (throw out whites for just one egg)
1/2 Cup of butter (softened!)
3/4 Cup of jam of your choice

DIRECTIONS:

Using a large bowl add in your flour, sugar, and baking powder - whisk until fully incorporated together.

Make a well and add in your eggs and butter, and start to incorporate it all together. I like to start with my whisk and then move to using my hands as it gets more clumpy.

Kneed the clumps together until they form a dough (this may take some time but the butter will eventually spread and help form the dough).

Once dough is formed wrap in plastic wrap and place in fridge for 30 minutes.

Preheat oven to 350 degrees

Take dough out of fridge after 30 minutes and roll out using a rolling pin to about 1/8 of an inch thickness.

Spread the dough out over your pie dish and get rid of any excess dough. You can kneed the excess dough together again and roll it out again to create strips of dough which are equal in thickness to decorate the top of the crostata with a lattice later if you want.

Add in your jam and spread out evenly. You want just enough jam where you don't see the crust below.

Add your decorative stripes of dough to the top now. I like to form a lattice but some people cut out shapes instead. You can turn down the edges of the pie to hold the lattice strips in place.

Place in oven for 30 - 35 minutes or until top is golden.

Once ready remove and let cool for 10 minutes before serving. Enjoy!


If you like this recipe or have any comments/questions, feel free to leave them in the comment section below!


PIN THIS POST


STRAWBERRY PIE WITH SHORTBREAD CRUST!

Since strawberry season is upon us I thought it would be perfectly fitting to make a strawberry pie last weekend. Since I was at the cottage and there is a lovely organic strawberry picking farm close by, off I went to pick my own strawberries! The result of that adventure was of course this delicious strawberry pie recipe. What is so clutch about this recipe (and can easily be used for any pie recipe) is the shortbread cookie crust bottom! WOW it's good! The best part is that even for a non pie maker/baker like me this recipe was so easy. Not to mention that the pie got devoured in one sitting and I had to make three more - I didn't mind.

INGREDIENTS:

CRUST
1/2 Cup of Butter (Softened)
1/4 Cup of Sugar
1 Cup of All Purpose Flour

STRAWBERRY FILLING

1 Quart of Strawberries (divide into two portions)
1 Cup of White Sugar
3 TBSP of Cornstarch
3/4 Cup of Water

DIRECTIONS:

Beat the soft butter with the sugar until fluffy.

Add in flour bit my bit until crumbly cookie dough starts to form. Press dough into a 9 Inch pie pan. Refrigerate for 10 minutes to harden

Preheat Over to 400 degrees (200 Celsius). After pie crust has been in the fridge for 10 minutes let bake in the oven for 10-15 minutes until golden and firm. Set aside to cool.

Separate the strawberries into two parts - you are going to mash half to create the filling and keep the other half to place on top for decoration.

Take the mashed strawberries and place in a sauce pot and bring to a boil, add in sugar and stir often for 10 minutes.

Mix cornstarch and water in a bowl and add into the boiled strawberry mixture - reduce heat to a simmer and allow to thicken.

Once ready remove from heat and let cool.

Once your strawberry sauce is cooled pour into shortbread crust and top with remaining strawberries.

Keep in fridge until ready to serve! It is great on its own or with some ice cream!

Enjoy!

Fresh Organic Ontario Strawberries

PIN THIS POST