EPISODE 8: FINISHING TOUCHES - RENOVATING MY VICTORIAN HOME

Toronto Home renovations - victorian style home - custom staircase - spray gun painting staircase post and stair spindles

The stair balusters after being painted in a bedroom we turned into a giant spray paint booth!

RENOVATING MY TORONTO VICTORIAN HOME - EPISODE 8!

As the finishes come to a close, it’s hard not to look back on this year-long home renovation project and take stock of how far we have come. This past year, Adam and I faced a lot of ‘firsts’. First time demolishing a wall, first time doing any structural work, first time widening a staircase, framing out new bedrooms, doing insulation work - the list goes on. It’s true, ‘anything worth doing is going to be difficult’ and renovating our 125 year old Victorian home was no exception!

For those who have been following Adam and I’s home renovation journey, thank you so much for the support this past year. You have honestly made creating these videos and sharing our experience with you such a joy and I hope you feel inspired to step out of your comfort zone and challenge yourself in some way too.

For those that are just tuning in, when Adam and I purchased this property as our first home, we knew it needed some work. The house had been divided into units with a ‘new-ish’ kitchen on the second floor and a very old, very small kitchen on the main floor.

Initially, Adam and I thought we would wait before doing any renovations; settle in, learn about the house, figure out its quirks, save a little money and then start the planning process. But soon after we moved in, we realized many of our appliances were broken and needed to be replaced. This ended up being the small nudge needed to get the ball rolling and so the process of planning our Toronto home renovation begun. Seven months later (and just in time for Adam’s birthday), we received our building permit and were ready to get started!

P.s. If you are interested in seeing/revisiting what the house looked like prior to renovations, you can go check out my ‘pre-renovation house tour!

Toronto Home renovations - victorian style home - kitchen renoation - neoclassical kitchen design with slim shaker cabinets

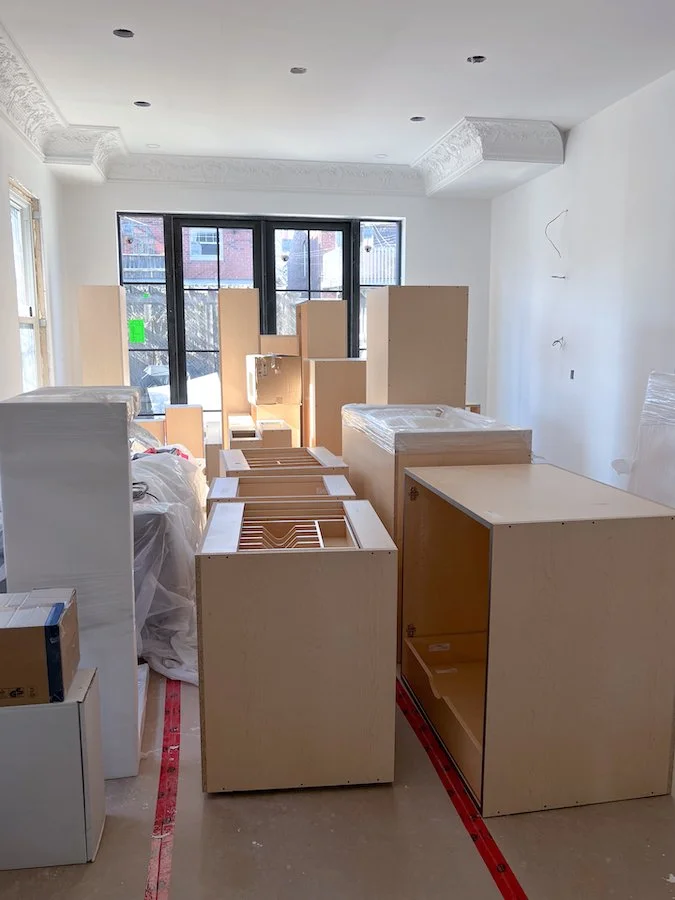
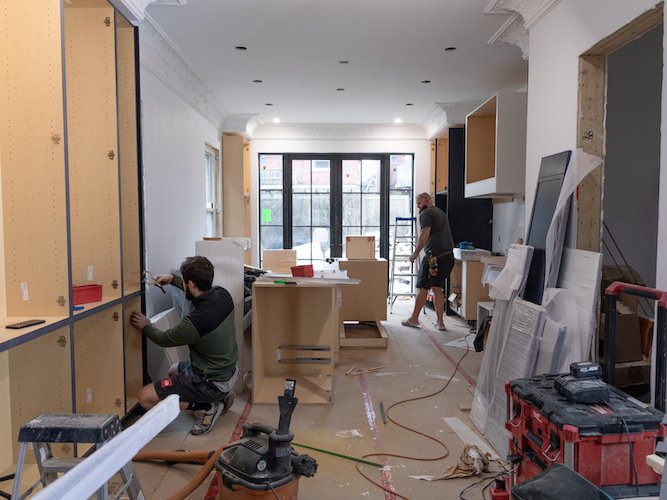
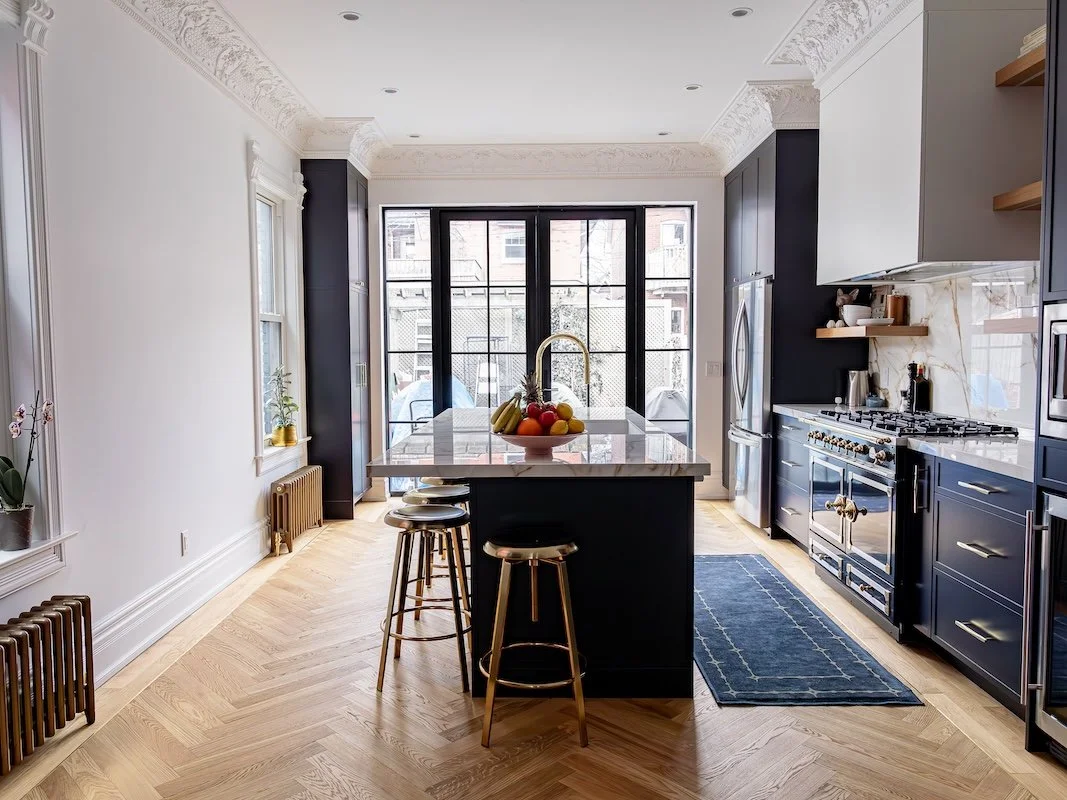
My custom, slim shaker cabinet style kitchen made by Domani Design Group

INSTALLATION OF MY CUSTOM KITCHEN CABINETS

After over a year in the making, this past month our custom kitchen was finally installed!

Adam and I love to cook so when it came to designing our dream kitchen, we wanted to make it the perfect space to entertain. Adam’s only request was to have a large island where his friends could sit around and chat with him while he cooks. I, on the other hand, needed it to be super functional for content creation and full of natural light for photos. In the end, Adam got his large kitchen island and I got the neoclassical kitchen of my dreams. Of course we didn’t do it alone! In order to ensure the flawless execution of our dream kitchen, Adam and I turned to Domani Design Group here in Toronto.

Located in the Castlefield & Caledonia Design District, Domani Design Group is a family run business with over 40 years of experience in designing and building custom kitchens. In addition to being a distributor of luxury European brands like Pedini, Domani also specializes in custom cabinetry for both kitchens and bathrooms.

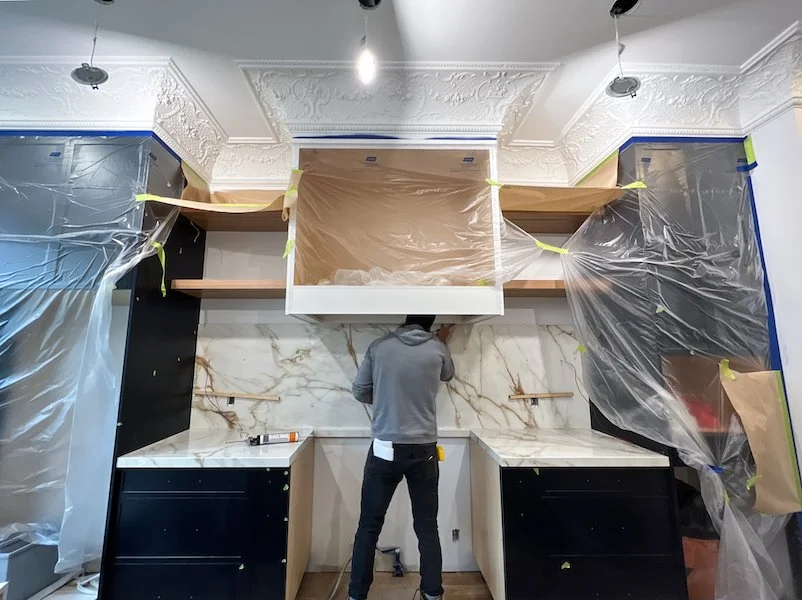
Having just splurged on a new stove, I wanted the cabinetry to compliment our dark navy blue La Cornue duel range. To achieve this I ended up going with a slim shaker cabinet profile in a matching navy blue. To me this felt both contemporary and classic, and I knew it would work well with the large ornate crown mouldings I was eyeing from Parsiena Design and the Crittall style back door Adam and I had designed for our newly enlarged back entrance. When it came to our counter tops and back splash, I choose a Calacatta Gold made of Porcelain as I knew it’s superior durability and resistance to stains would ensure it lasted a lifetime. To help bring out the caramel streaks in the veins we chose a complimenting House of Rohl faucet in a polished brass finish as well as elevated knobs and pulls.


FOLLOW ME ON INSTAGRAM @ISTHATSOH


Toronto Home renovations - victorian style home - bathroom renovations - waterproofing and tiling of checkerboard tile floors

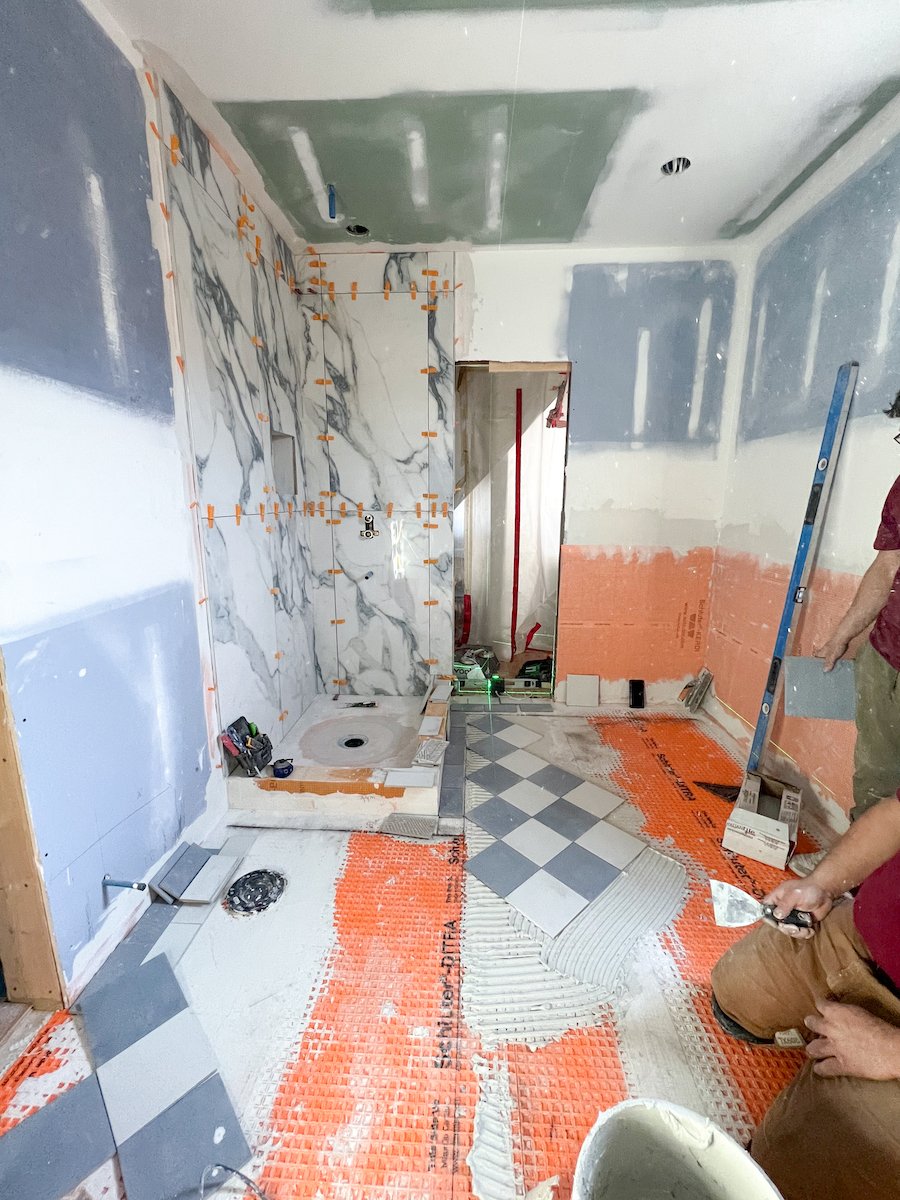
Master bathroom renovations are underway and for the tiled floors I went with a checkered tile pattern in blue and white with a border to match!

MASTER BATHROOM RENOVATION UPDATE

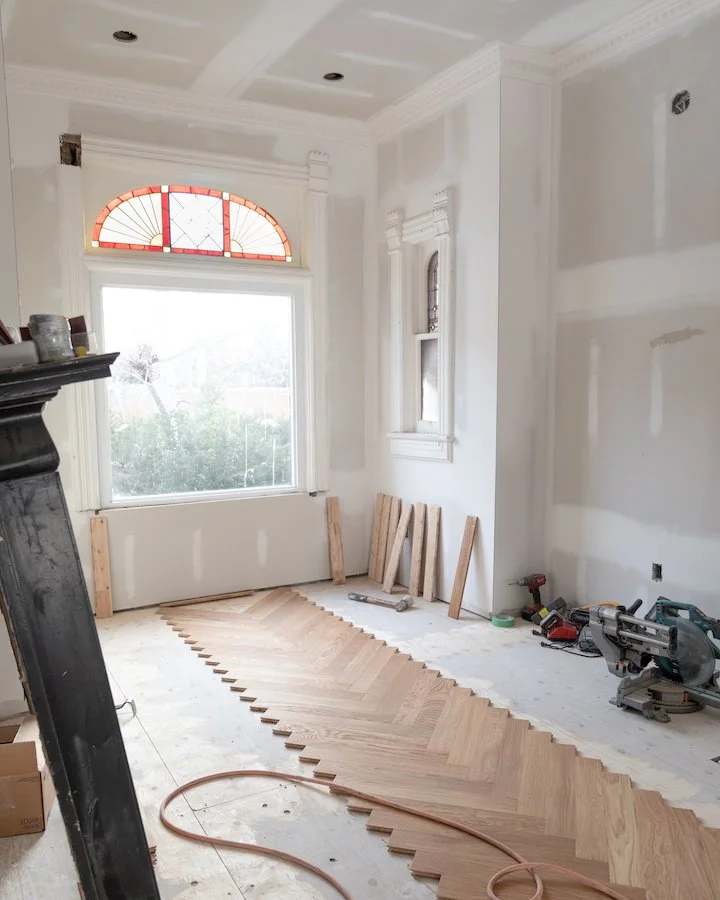
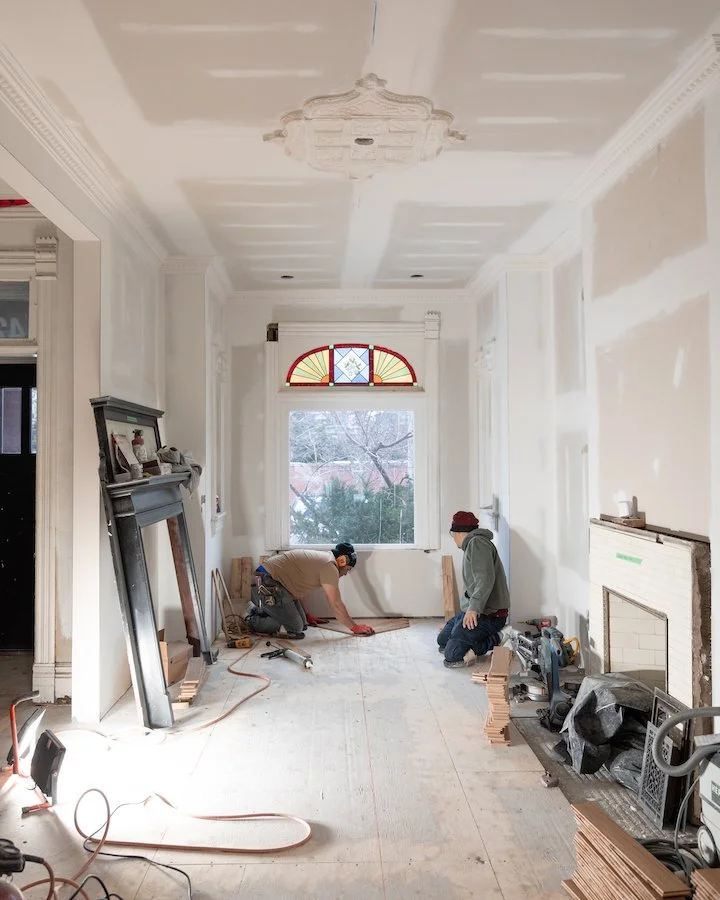
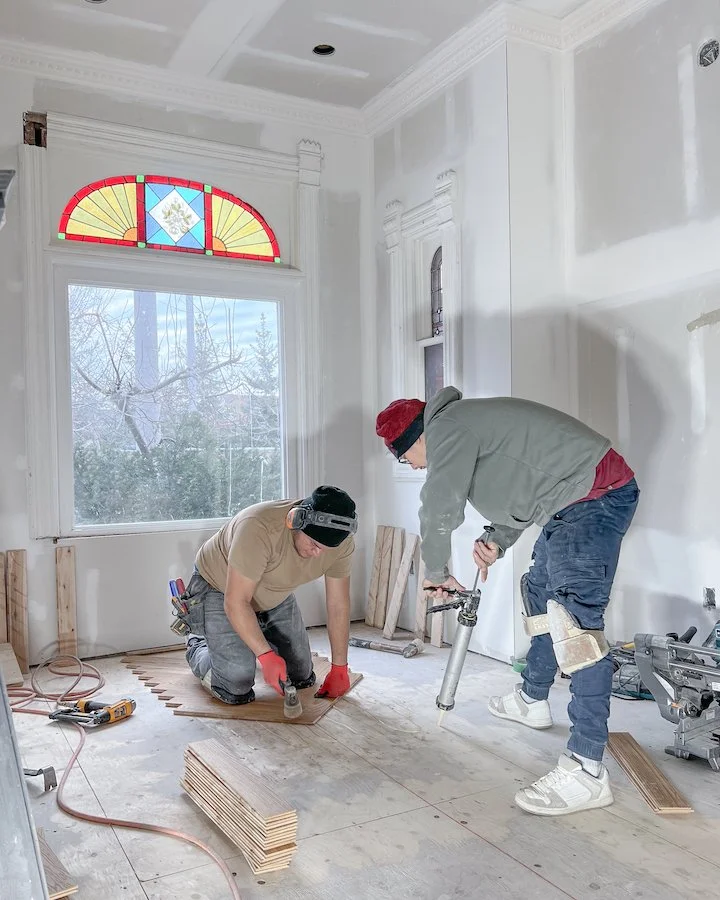
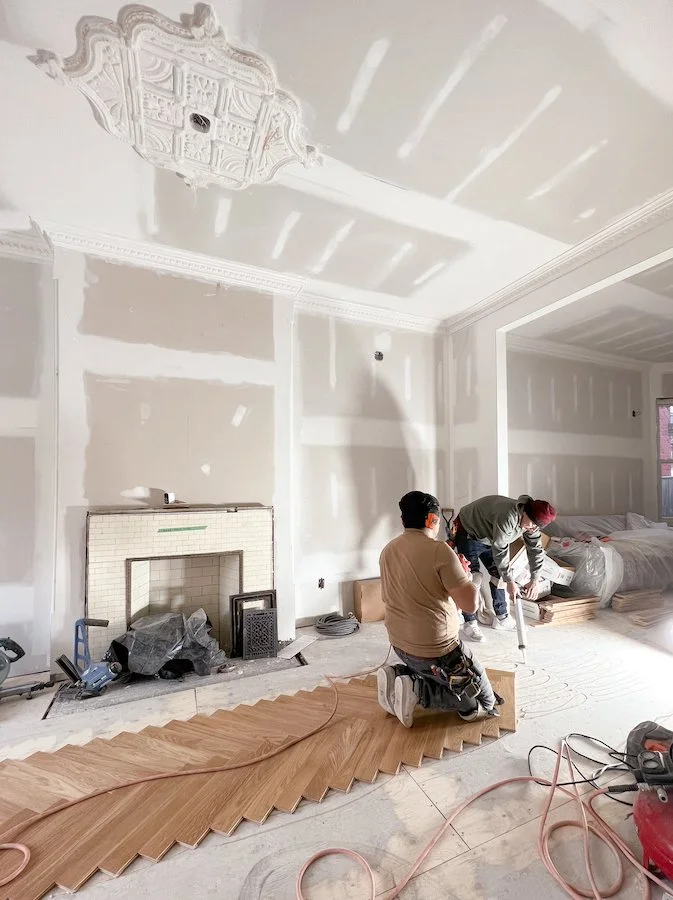
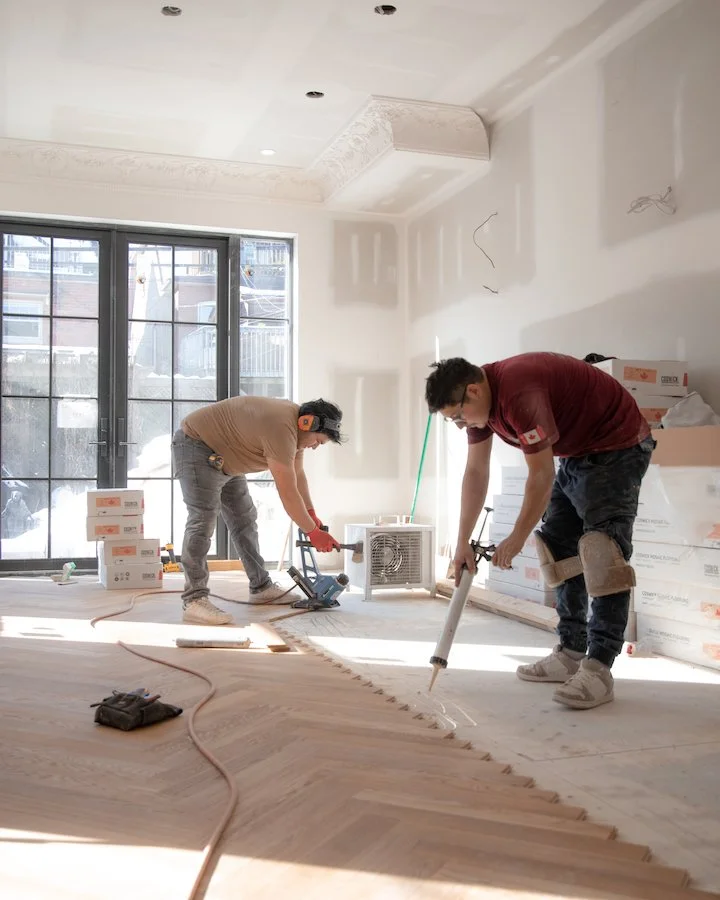
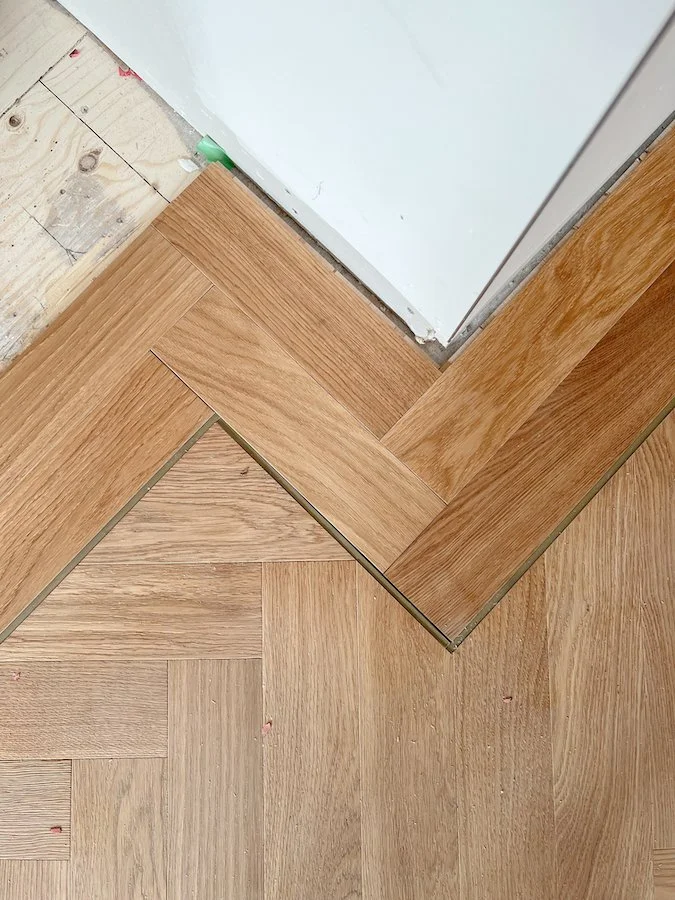
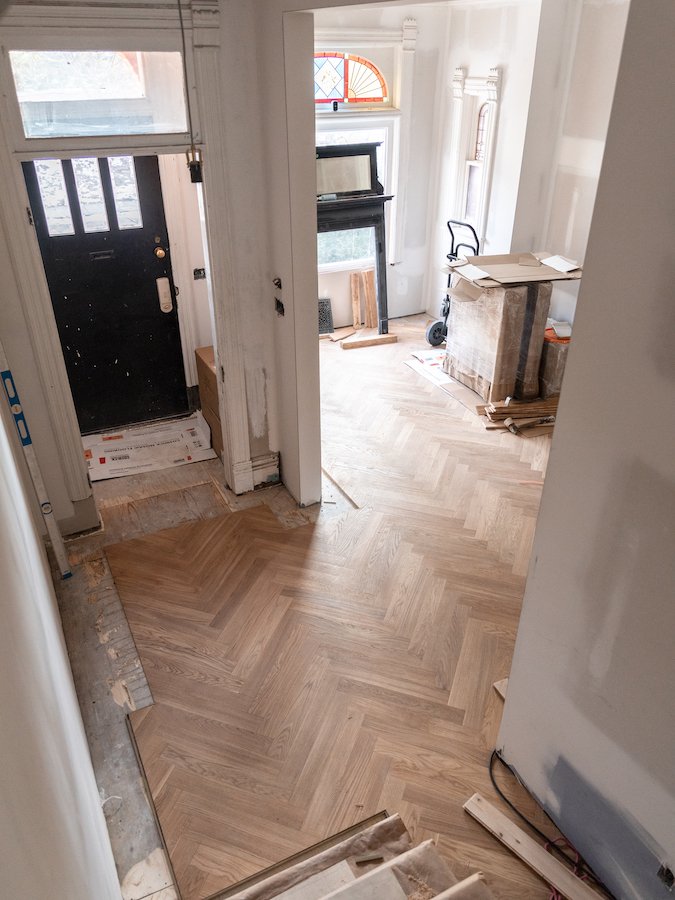
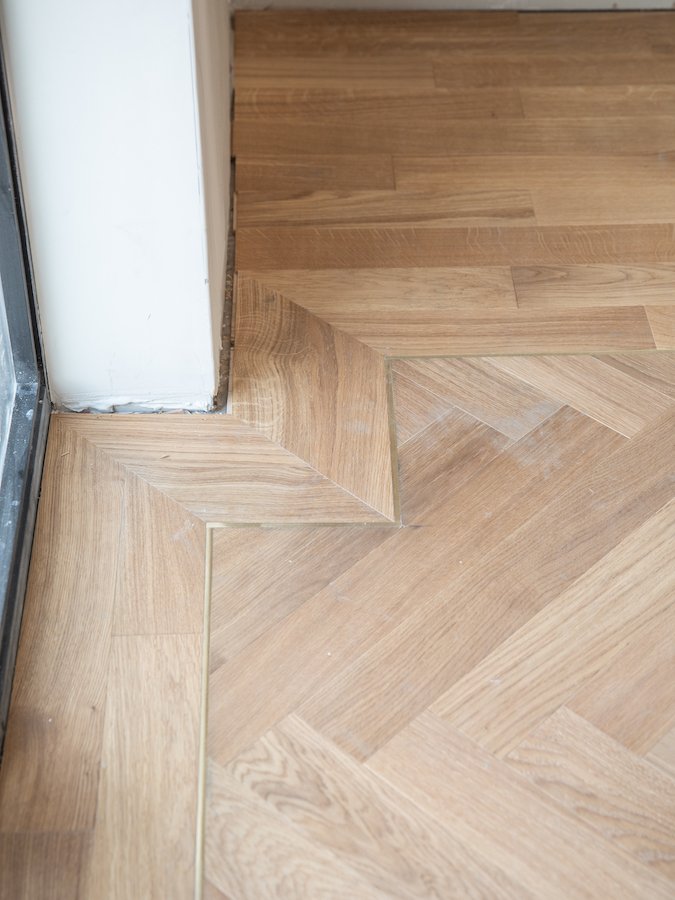
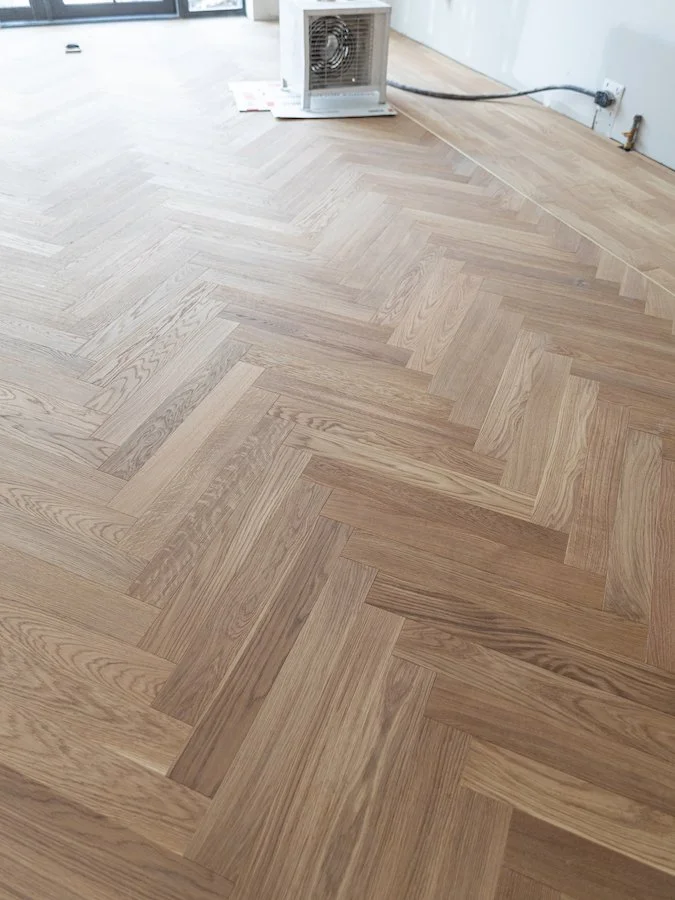
With the completion of our white oak herringbone floors from Chestnut Flooring, we began the tile work for our master bathroom. Taking inspiration from the checkered pattern seen in the hallways of Palace of Versailles and incorporating my favourite colour blue, I was able to source a suitable match locally. The trick with this space however was that it was quite small. Since the majority of it would be covered by the tub, floating vanity and shower, using the right size tile was important. If the tile was too large, the pattern would not be as apparent and feel almost like an afterthought. Conversely, if the tile were too small, it would be distracting and all that you notice. In the end I found a suitable 8x8 tile that, although was not honed marble like my inspiration, was well proportioned for the space, offered the durability associated with porcelain, and complimented the white and blue ‘marble’ porcelain slabs we chose for the shower walls. To help further pull the room together I ended up choosing a large white oak wall mount vanity, also in a slim shaker profile, with a white quartz counter top to match our shower curb. For hardware, a chrome faucets, tub filler and shower fixture finished off the rooms colour palette with a ‘polished’ detail.

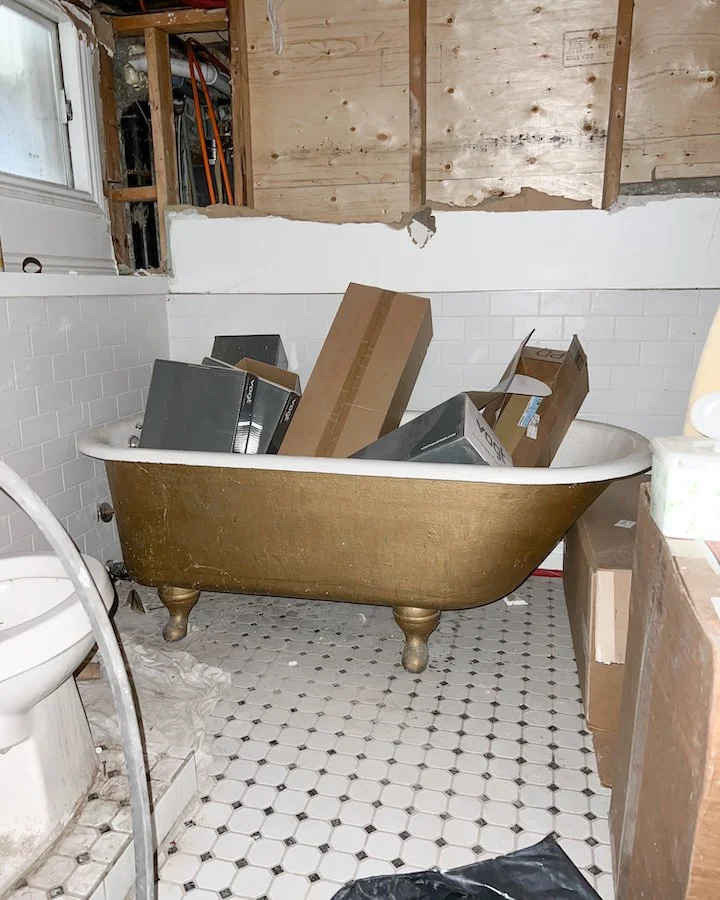
While tiling for the mater bathroom was underway, Adam and I turned our attention to the cast iron tub in the basement. When we first moved in, I would never take baths upstairs in our master bathroom. To me, there was something about the bathtub that never felt quite safe and I worried that if I filled it with water as well as my body weight, I would find myself falling through the floor. Instead I would take baths in the basement where I had a beautiful claw foot cast iron tub that would keep the water warm for what seemed like ages. It didn’t take long for the basement bathroom to become my little sanctuary and when renovations began, I had no intentions of getting rid of my beloved tub. Instead, I convince Adam that the best course of action was to move the cast iron tub upstairs! Once disconnected, Adam along with the help of his brother, began its great migration. In the process, however, we learned that only one side of the tub had been painted gold, and the other half was black! To remedy the situation, we had our painter Ariel from South Hill Property Care refinish the tub and paint the outside of it silver to match the chrome hardware. In addition to the tub, we also painted the bathroom’s small cast iron radiator in the same silver colour and I think they both turned out better than imagined. Once the paint was dry and the tiling of the master bathroom was complete, we were then able to resume moving the cast iron tub to the second floor and place it in it’s final position! I still can’t believe it!

Toronto Home renovations - victorian style home - custom staircase - spray gun painting staircase post and stair spindles

The posts of my custom staircase after they were finished being spray gun painted!

PAINTING AND TRIM WORK

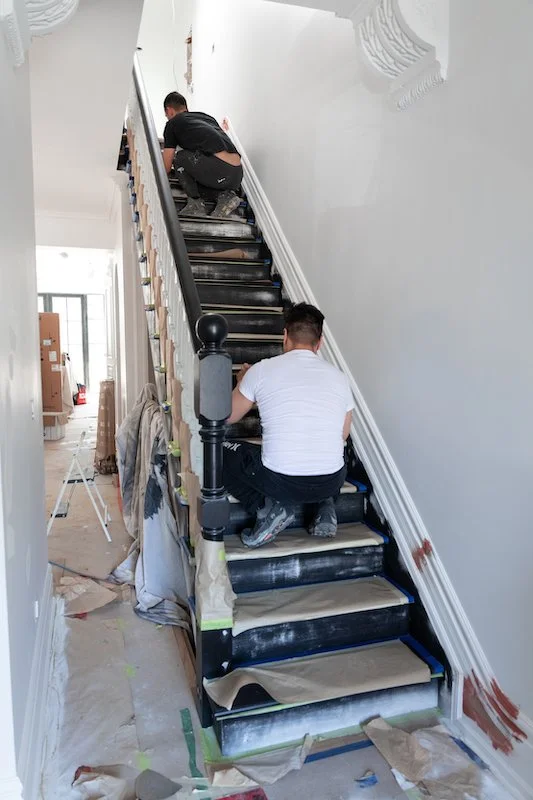
Not only did Ariel refinish my cast iron tub, but he also worked diligently on all the fine carpentry. From baseboards to installation of my new doors, over the course of a month much of the trim work was completed.

Since Ariel was also in charge of painting the house, he was able to give the new stair spindles and posts a layer of paint prior to install by turning one of the second floor bedrooms into a paint spray booth. It was so cool watching him use a spray gun and seeing how quickly he can work with his machine. Almost makes me want to buy a spray gun myself.

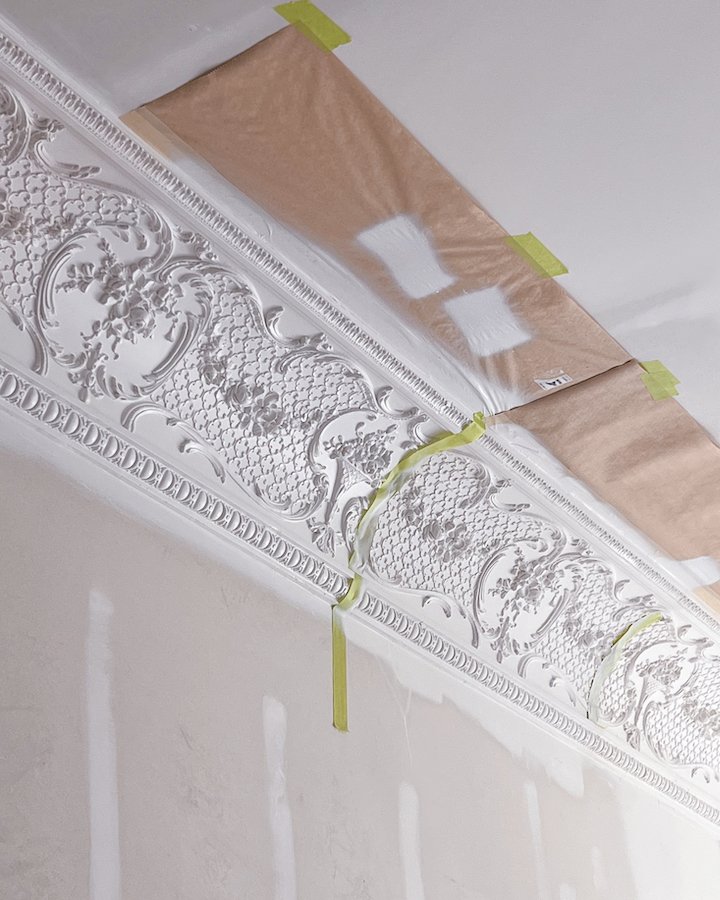
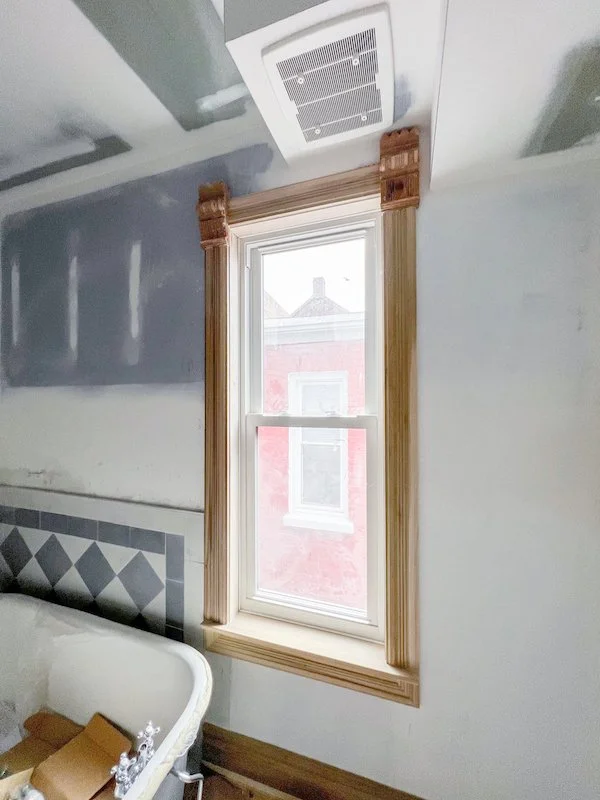
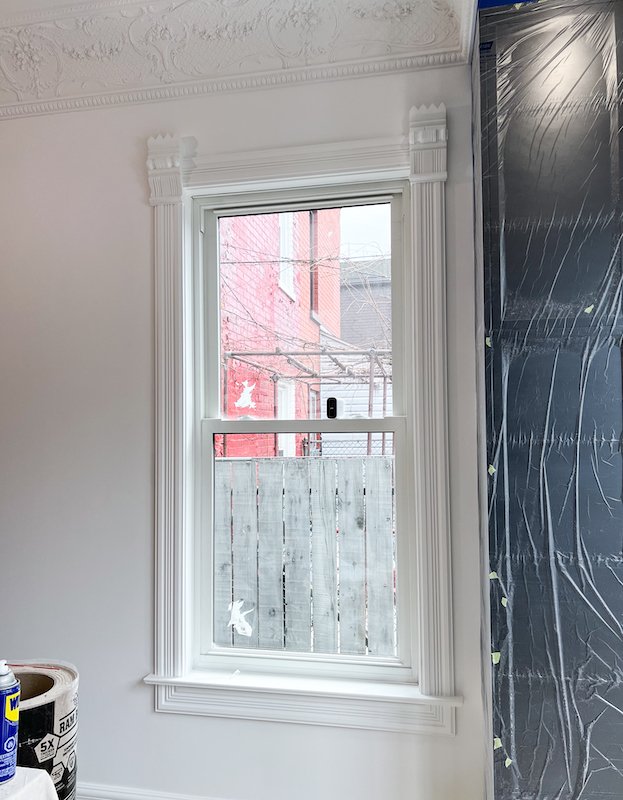
I also spent some time restoring some original trim that I had saved from the original house prior to the demo. I used a heat gun to remove layers and layer of paint and restore them to their natural wood material. Once bare I then sanded them down, used a little wood filler to cover up any dents and imperfections before handing them back to Ariel for re installation. I love the way these look in the corners of the window trim and doors and actually had Parsiena Design reproduce them for me in plaster so that I could introduce them in the upstairs windows as well. Unfortunately, due to the nature of plaster, they don’t fair well in moisture rich places like bathrooms but this is exactly where the old wood ones would be the best option.

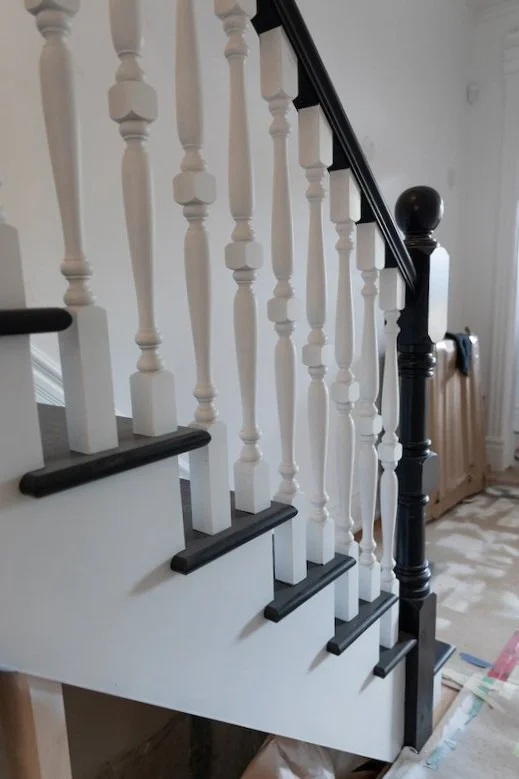
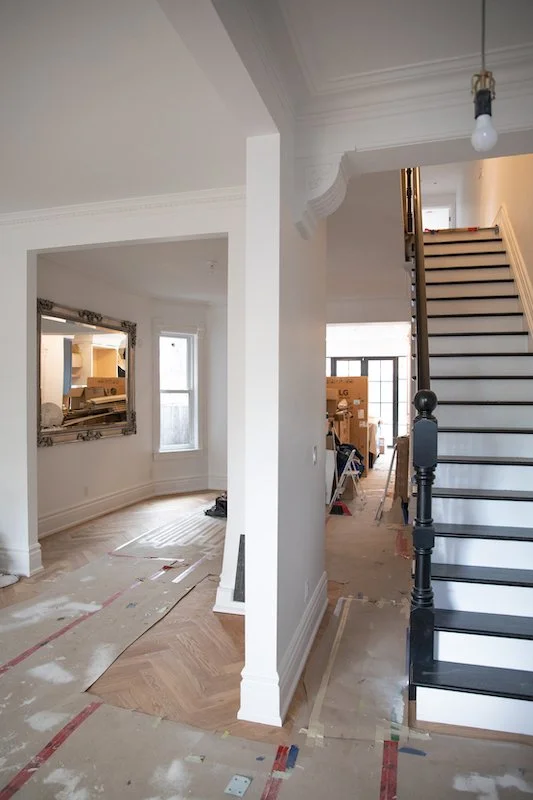
INSTALLATION OF OUR CUSTOM STAIRCASE

Once Ariel was finished painting the stair balusters and posts we were able to get our stair installer back in to wrap up the stairs. Adam and I are so happy with how our custom staircase turned out and love the Victorian detailing in the ornate design of the stair spindles.


ENJOYING THIS CONTENT? CHECK OUT SOME OF MY OTHER EPISODES AND BLOG POSTS!


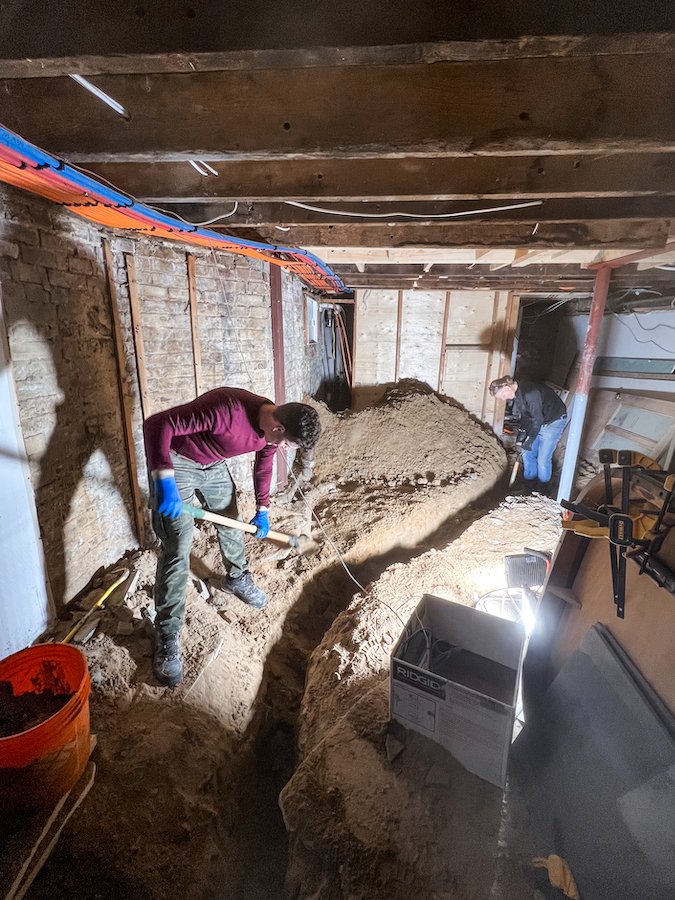
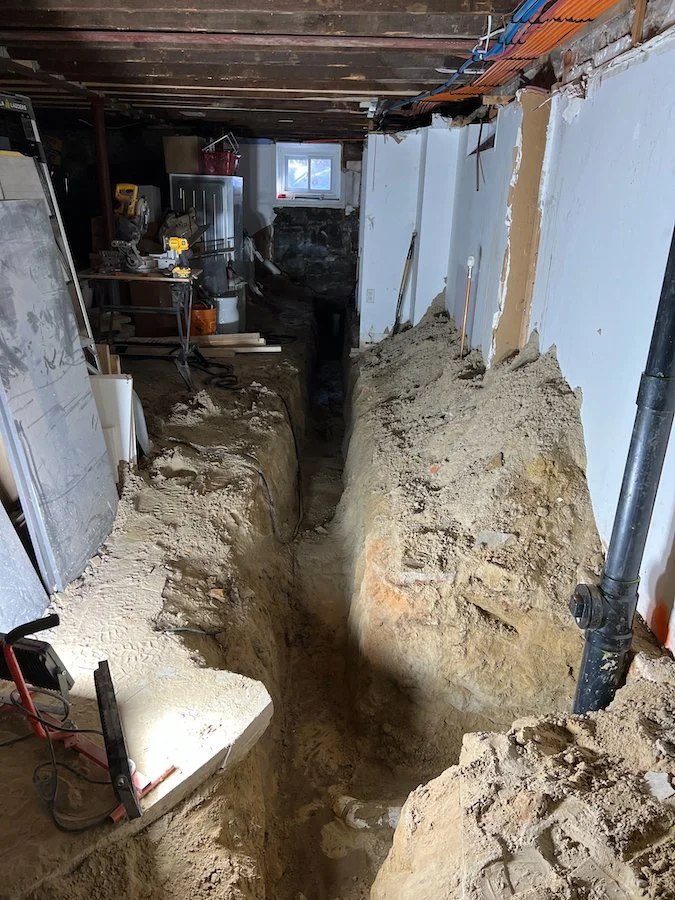
BASEMENT RENOVATION UPDATES

Since the last episode, Adam and I have also made further headway on the basement. Once the main drain was installed we could begin concentrating on removing some of the disturbed soil from the basement and clearing out space. Adam and I plan to continue working on the basement this spring and will likely be doing some underpinning to the foundation on at least one side of basement while benching the other. More on this phase of our renovation project to come in future episodes so stay tuned!

Toronto Home renovations - victorian style home - refurbished cast iron radiators from Ironworks Radiators Inc

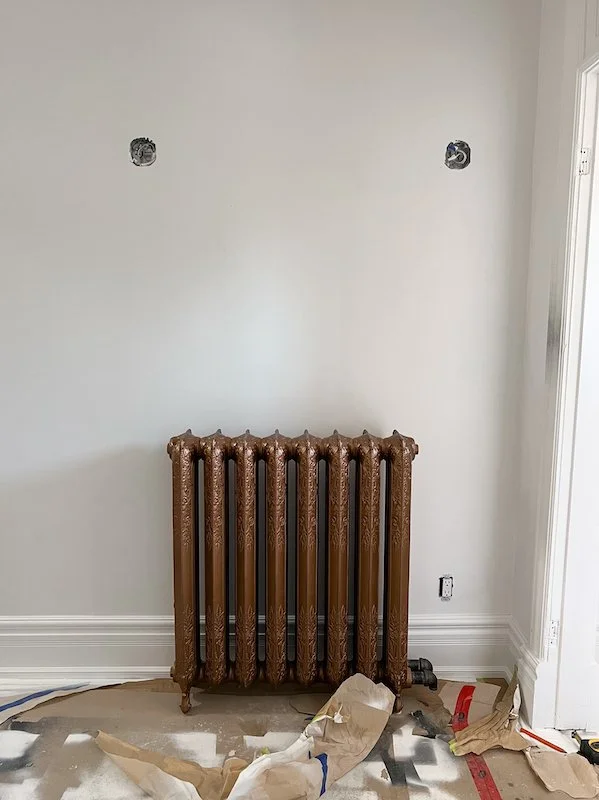
My refurbished ornate Victorian rads are finally ready for installation!

INSTALLATION OF OUR CAST IRON RADIATORS

As the weather started to warm up and spring was officially upon us, we were also able to get all our radiators from Ironworks Radiator Inc installed. I am so happy with how the refurbished vintage ornate cast iron radiators we got from them turned out and I love my chosen paint colours. Now installed, there is no denying the character and elegance they add to the main floor, and how well they play into the house’s Victorian heritage.

If you love Victorian style houses or are just looking to refurbish your rads at home, I highly recommend checking out Ironworks Radiator Inc in Etobicoke. They have an extensive stockyard of Victorian radiators located at the back of their shop and their inventory is always changing. They also work directly with Castrad Radiators in the UK to import brand new cast iron radiators in various styles including more modern sleek silhouettes.

Toronto Home renovations - victorian style home - custom staircase - spray gun painting

Painting of my custom staircase by South Hill Property Care

PAINTING THE HOUSE

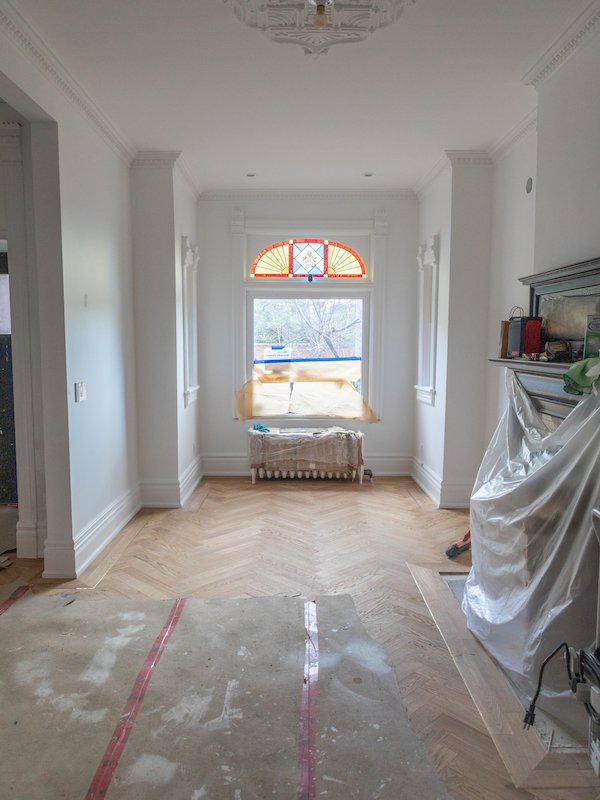
Once Ariel was finished all the fine carpentry work, he was able to turn his attention to painting the rest of the house. We ended up going with Benjamin Moore’s ‘Chantilly Lace’ which truth be told caused him somewhat of a headache because it was so white that it took several coats to conceal inconsistencies in the walls. In total Ariel said he had to use about 4-5 coats on the walls and 3 coats on the trim to achieve a finish we were all happy with. Word to the wise, if you are thinking about painting your house Chantilly Lace prepare yourself for many coats!

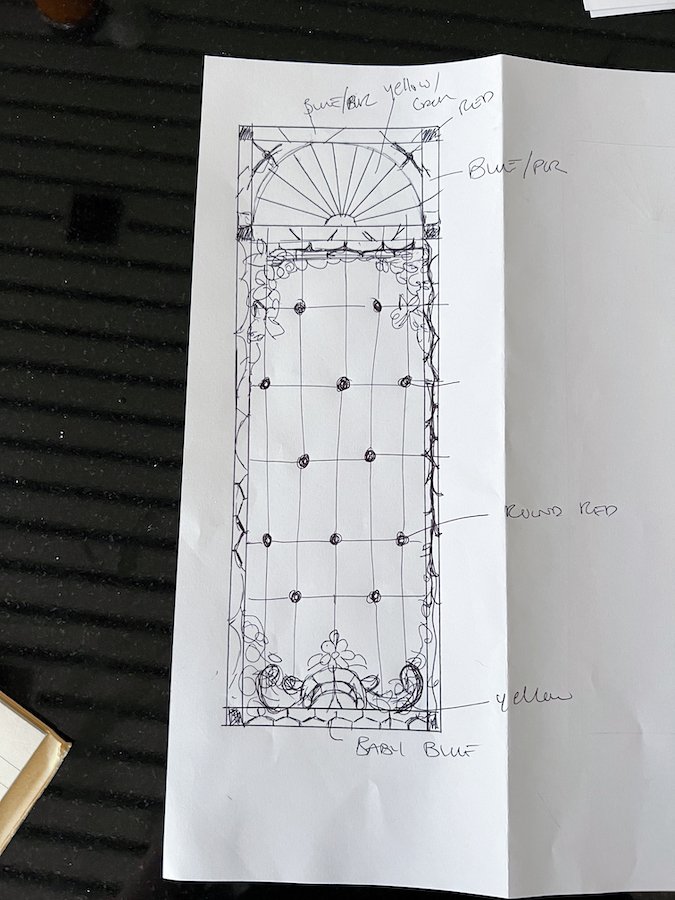
Even though this is all I have to share today, there is still so much more work to be done at the house. All our appliances still need to be installed, Adam and I will be working on underpinning the basement in the spring, and our new tiles from Winckelman Tiles in collaboration with Deco Tile will be arriving soon! All this and more to come in future episodes!

Toronto Home renovations - victorian style home

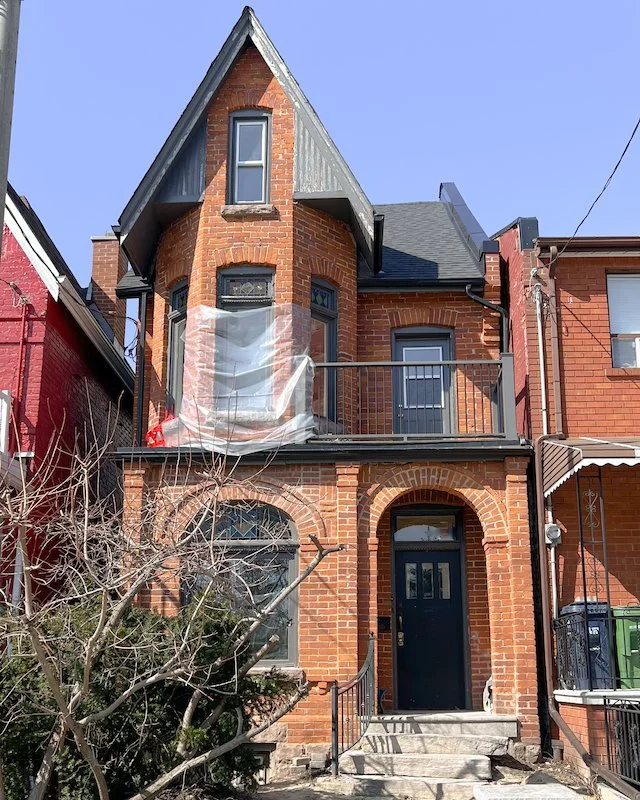
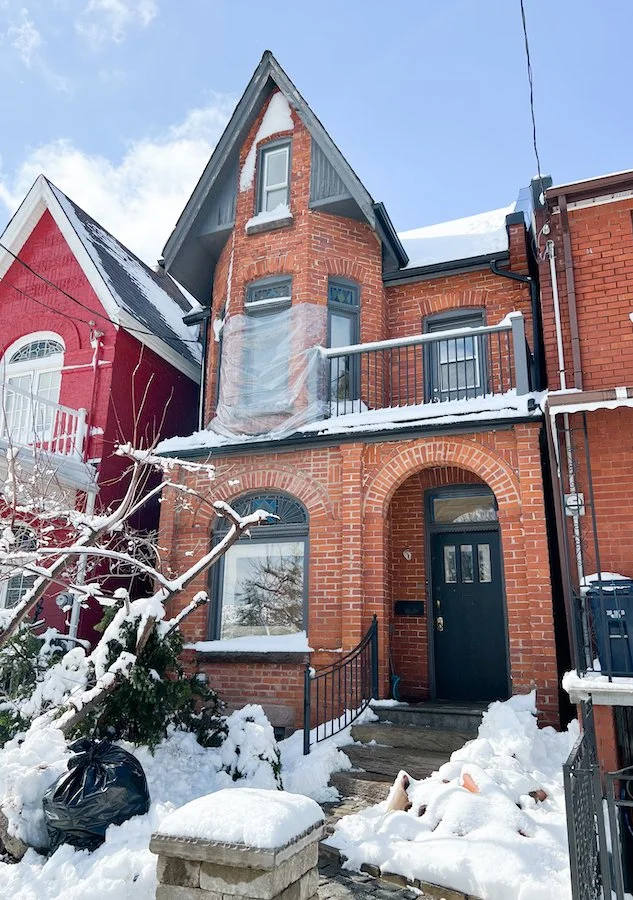
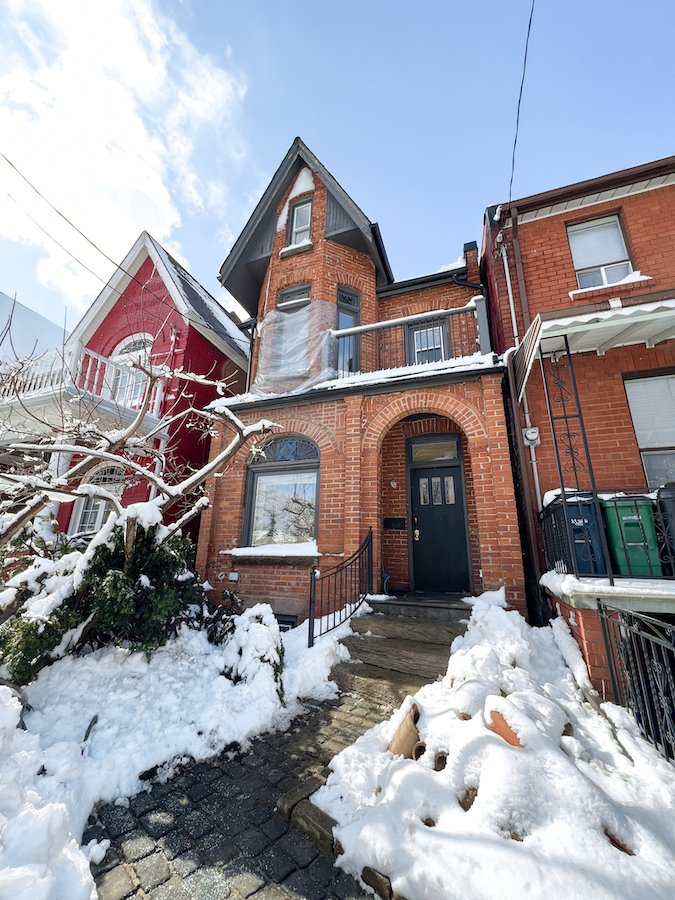
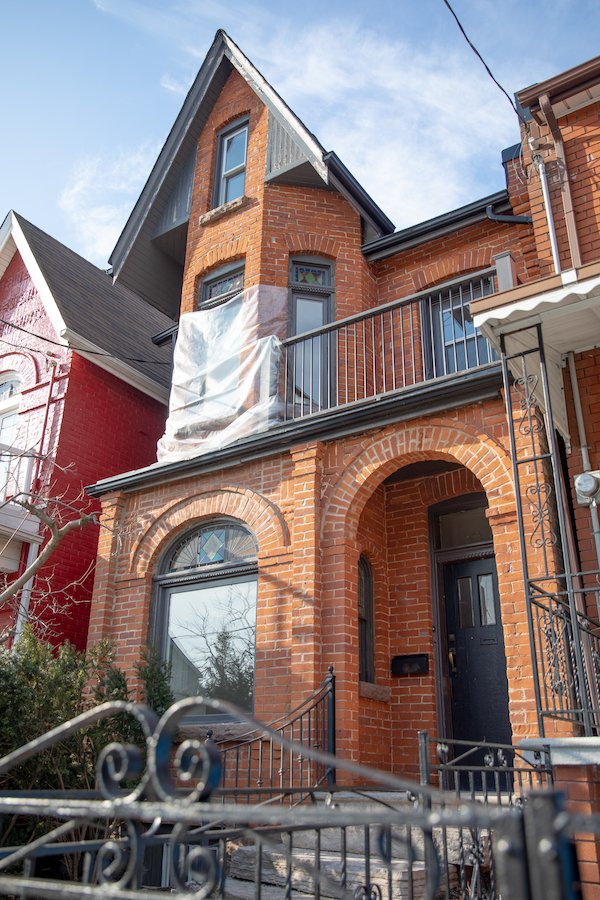
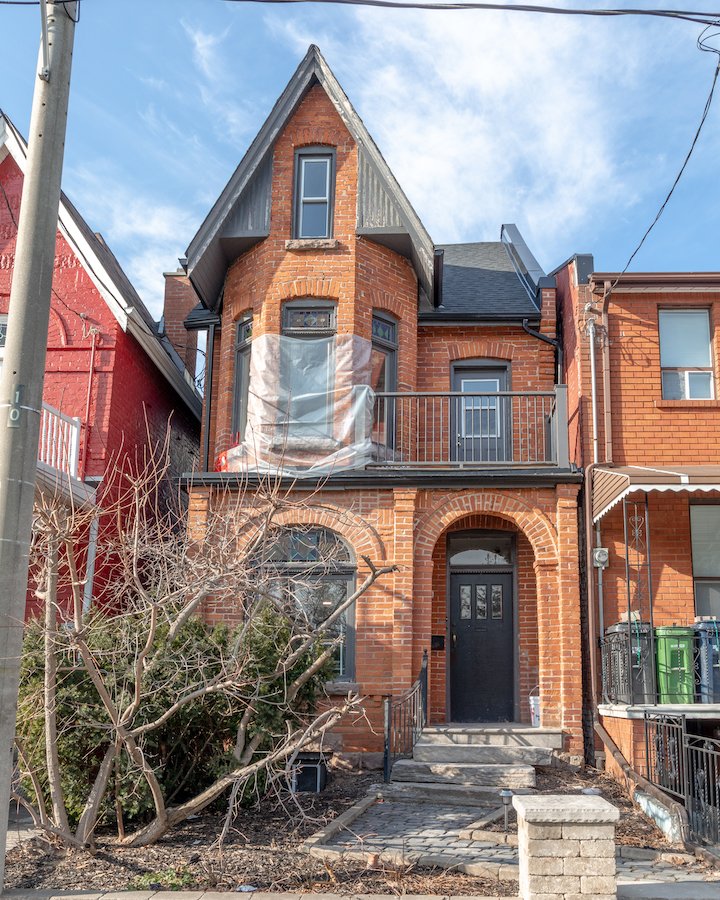
My Toronto Victorian home currently undergoing a major renovation

Thank you so much for joining me today and for checking out my new Toronto home renovation series on Youtube. I am super excited to be modernizing a Victorian home while still keeping the charm of an old Victorian house. If you have any questions about my Victorian house renovations, what it’s like to live in Little Portugal, Toronto or recommendations for Toronto contractors, hit me up in the comments below!

Before I sign off, I’d also like to say a big thank you to Domani Design Group, Chestnut Flooring, Parsiena Design and Ironworks Radiator Inc for partnering with me on this project. I’m so excited to be working with local experts on our Toronto home renovations but want to reiterate that, like always, all opinions remain my own.

Until next time,

- Soheila

MORE BTS PHOTOS FROM THIS EPISODE


PIN THIS POST

EPISODE 7: A DATE WITH DESTINY - RENOVATING MY VICTORIAN HOME

home renovations in Toronto - install herringbone flooring with brass inlay from chestnut flooring

Installation in progress! My white oak herringbone dreams are about to come true!

RENOVATING MY TORONTO VICTORIAN HOME - EPISODE 7!

It’s been yet another busy month at the house as we power through more of the finishes. Following the delivery of our refurbished cast iron radiators from Ironworks Radiator Inc and the installation of our classical mouldings from Parsiena Design, Adam and I felt ready to take on the next stage of our Toronto Victorian home renovation, the flooring.

If you have been following my home renovation series for awhile, you may remember me spilling the tea on all my juicy home renovation plans. For those who are new, it has been a dream of mine to have herringbone floors! When Adam and I purchased this property as our first home together, one of the things that I was thrilled about was how old the floors were - odd I know but here me out. Down the line, I knew we would eventually do some renovations to our Victorian home, and when that time came, redoing the subfloor and installing new flooring would be a top priority. In the meantime, I made sure to plant the seed of herringbone floors in Adam’s mind by sharing interior inspiration with him on the regular. Little did I know my dreams were going to come true sooner than I had imagined!

It wasn’t long after Adam and I moved in that we noticed a few things were not as they seemed. Many of our appliances were not working and needed to be fixed, and since they were old to begin with, we debated whether that was even worth doing. In the end, the debate around fixing the appliances escalated into buying them which again escalated into widening the staircase (because 'how would we fit the washer and dryer upstairs otherwise’). All this turned out to be just the thing we needed to get the ball rolling and start planning our Toronto home renovation.

Having big dreams of what I wanted the floors to look like presented a few challenges for me. Victorian homes in Toronto tend to be long and narrow, and I wanted the pattern to be prominent and repeat several times across the width of the house. In order to achieve this look I required a smaller, skinnier plank size. Finding this very specific thing was not easy. Most suppliers I found carried a ‘standard size’ of 4-5 inch wide herringbone planks while I was looking for something slightly smaller in the 3-3.5 inch range. At one point I got so desperate, I called a restaurant with ‘skinny’ herringbone floors that had just opened to find out where they got theirs! It took me a few weeks and visits to numerous showrooms, not to mention ordering samples online from supplier in the US, to find the perfect product - but I found it!

home renovations in Toronto - install herringbone flooring with brass inlay from chestnut flooring - fireplace and ceiling medallion with egg and dart crown mouldings

The living room in my Toronto Victorian home is beginning to shape up really nicely!

CHESTNUT FLOORING #PARTNER

It was a sunny, fall Saturday when Adam and I drove out to Vaughan to visit Chestnut Flooring’s showroom. A long time Instagram follower of mine who also happened to be a flooring installer suggested I check out their showroom after seeing my stories and learning about my herringbone aspirations. Having installed many different brands of herringbone flooring in the Toronto area himself, he remarked at the quality of their engineered herringbone floors - and he was right. Chestnut Flooring not only had the size and colour we wanted, but it turned out that when compared to the other samples I had collected, their engineered herringbone floor product had a superior top wood layer/thickness. This meant if we ever wanted to refinish the floors down the line or needed to fade out a big scratch (knock on wood that never happens), we had the ability to sand them down and do just that! Perfect, right!?

We ended up having such a great experience working with Chestnut Flooring’s co-owner and showroom manager, Sherry, the first time around that as we progressed into our renovations and realized we would have to pull the second floor (phase 2) into the initial phase of our renovation they were the only showroom we needed to visit to source additional flooring. Not only do they offer a wide selection of products from both well-known domestic and international brands, including hardwood, engineered, laminate, carpet, vinyl and tile, but Sherry was able to find a match for our second floor that we just loved! A red oak, straight plank, solid hardwood that adds both warmth and durability to the second floor.


FOLLOW ME ON INSTAGRAM @ISTHATSOH


Part of my big herringbone design dream was to incorporate a boarder with brass inlay. Luckily, a week before installation I was able to find a supplier in the Toronto area but since it was going to take a few days to arrive, we ended up starting the installation on the second floor.

The flooring installation on the second floor went quick and took maybe two days. The red oak hardwood floors from Chestnut Flooring look so warm and inviting. You can really see the natural beauty of the grain when the afternoon sun shines into the room. Adam and I ended up getting enough material for both of the back bedrooms and the 2nd floor hallway. We do have big plans to tile our new bathroom but that will have to wait for another episode!

Just as we wrapped up the second floor installation the brass inlay arrived. I was so excited that my dream was becoming real right before my eyes that I stayed and watched the process. My flooring installer did such a great job incorporating the border inlay and really took his time polishing the brass before installation. He even kindly made two examples for me of how the corners could be done so I could feel confident with my choice. After a week, my date with destiny was upon me! The white oak herringbone floors were fully installed and looking even better then I could have imagined.

CABINETRY HARDWARE AND STAINED GLASS WINDOWS

While the flooring was being installed I was also able to finalize my kitchen cabinetry hardware and begin working on a design for a stained glass window in our main floor powder room. The window in the powder room is skinny but tall and although we love the natural light it provides, it really doesn’t provide any privacy. After commissioning a stained glass artist last fall to replicate one of the small panels in the front window that I noticed was missing, I thought I would work on a larger design with her for this space as well. My plan is to incorporate the same colours you can see in the front window and some of the same motifs, while also keeping the majority of it in the centre a clear, textured glass. Can you picture it?


ENJOYING THIS CONTENT? CHECK OUT SOME OF MY OTHER EPISODES AND BLOG POSTS!


Toronto Home Renovations - Victorian Style Home - mosaic tiles at Deco Tile showroom

Deco Tiles Showroom located at 142 Tycos Drive in Toronto

VICTORIAN MOSAIC TILE COLLABORATION WITH DECO TILE & WINCKELMANS TILES! #PARTNER

So, I have been keeping a secret from you. A few weeks ago I received an email from Winckelmans Tiles, a French tile manufacturer with factories in Northern France. Having been in business for almost 130 years, they are best known for their mosaic tiles that have been used in numerous hotel, commercial spaces and homes globally.

My first encounter with Winckelmans took place two years ago while designing the finishes for my Toronto home renovation. Their catalogue featured so many beautiful mosaic patterns but what caught my eye was their collection of Victorian tiles. Not only do they have the classic ‘Octagons and Dot’ pattern I was already completely charmed by but they also offer numerous classical Victorian border patterns as well. I was smitten and had to let them know!

Sometimes amazing things happen when you take a chance and put yourself out there, and I’m happy to finally be able to share that I am going to be collaborating with Winckelmans Tiles through their local distributor in Toronto, Deco Tile. Located on Tycos Drive in Toronto, I visited Deco Tiles showroom to place my order for the powder room and front entrance. I went with a classic super white and black Victorian ‘Octagon and Dot’ pattern with a border to match, and for the powder room I decided to extend the pattern and border up one of the walls. I can just picture it now, looking at your reflection in the mirror and seeing the Winckelmans’ pattern on the wall behind you, framing your silhouette. A dream I can’t wait for!

Home Renovations Toronto - victorian homes - Main Drain Replacement

Adam and I kicked off Phase 3 ‘Basement Renovations’ by replacing the main drain and installing a back water valve!

ADAM AND I KICKED OFF PHASE 3 - THE BASEMENT!

Once flooring was complete Adam and I decided it was finally time to kick off Phase 3 of our renovation. If herringbone floors were my dream, Adam’s was having an amazing entertainment space in the basement. Given all the structural work we had to do at the beginning of our renovation, our once finished basement was no more and it was time for us to pull the trigger on replacing and lowering the main drain as well as installing a back water value outside. This required us to not only demo the basement bathroom but begin breaking the concrete floor and digging a 3 foot trench. Of course with all our stuff stored in the basement, this was a big challenge but we were able to successfully knock off those first few tasks before we begin working towards finishing the basement in the spring. Now that the main drain has been replaced and the back water valve installed we can hook up the water, begin removing all the stuff being stored in the basement, and begin the cleaning process!

REFURBISHING OUR CAST IRON TUB

When Adam and I first moved into the house I would never take baths upstairs. For some reason I never felt the supports under the bathtub on the 2nd floor were strong and I was paranoid that I would fall through the ceiling if I filled it with the weight of water in addition to me. Instead I created a little candlelight sanctuary in the basement where we had this beautiful classic claw foot cast iron tub. I loved taking baths in the basement especially since the cast iron tub would keep the water so warm for so long. I knew even before we started the renovation that the tub wasn’t going anywhere and I was determined to have it installed in our new master bathroom on the second floor. Now that we were beginning to kick off phase 3 of our renovation, the tub needed to be disconnected and moved upstairs. During its ‘great migration’ we were not really surprised to learn that only half of the tub was painted gold! The previous owners had neglected to paint the back side of the tub and it was black! I did have plans to have it repainted and refurbished but having two different paints on it didn’t make that job any easier. In addition to the cast iron tub, I also had the small bathroom radiator painted in the same silver so as to match.

toronto home renovations - cast iron tub refinishing and painting

The great migration of my cast iron clawfoot tub begins but not until we have a chance to refinish and paint it!

The week following the completion of our herringbone floors we were able to prime the main floor and paint the crown mouldings. Once that was complete the kitchen cabinetry we had custom ordered from Domani Design Group was delivered and work began on the 2nd floor master bathroom. More on all of this to come in the next episode along with installation updates on our new custom staircase, phase 3 progress and so much more.

Thank you so much for joining me today and for checking out my new Toronto home renovation series on Youtube. I am super excited to be modernizing a Victorian home while still keeping the charm of an old Victorian house. If you have any questions about my Victorian home renovations, what it’s like to live in Little Portugal, Toronto or recommendations for Toronto contractors, hit me up in the comments below!

Before I sign off, I’d also like to say a big thank you to Ironworks Radiator Inc., Parsiena Design, Chestnut Flooring, Domani Design Group, Winckelmans Tiles & Deco Tile for partnering with me on this project. I’m so excited to be working with both local and international industry experts on our Toronto home renovations but want to reiterate that, like always, all opinions remain my own.

Until next time,

- Soheila

MORE ‘BEHIND THE SCENES’ PHOTOS FROM THIS EPISODE


PIN THIS POST