ROASTED POTATO TOWERS WITH THYME AND GOAT CHEESE!

When planning for a dinner party it’s important to make sure that whatever you are serving matches or has a progression. This recipe for roasted potato towers, although not complicated in terms of flavor profile, make a really appetizing side dish and pairs well with meats, pasta, and even some seafood dishes like scallops!

INGREDIENTS:

Makes 6 Servings

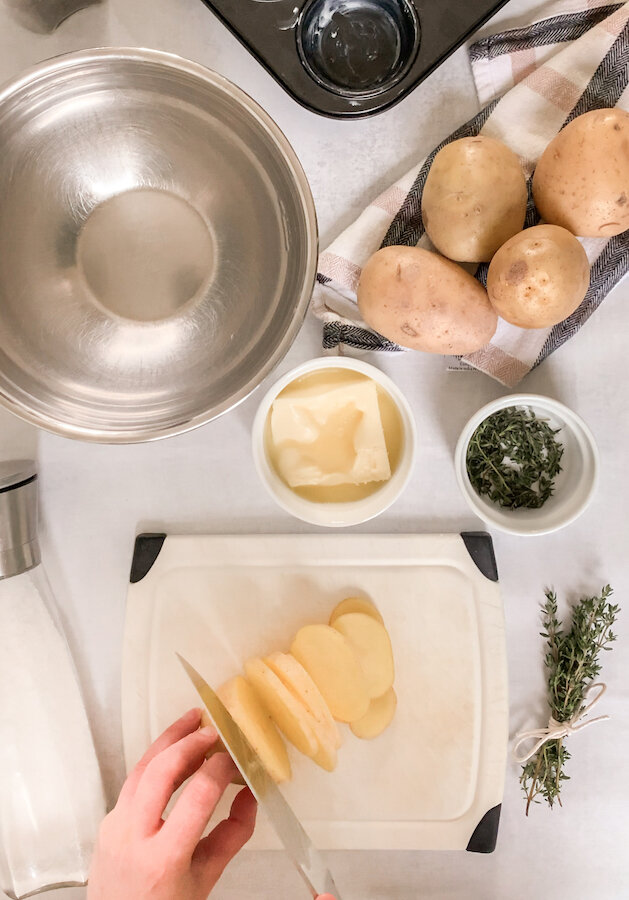
4-5 Yukon Potatoes - thinly sliced (about 1/8 inch thick)
7 TBSP Butter - melted
1 TBSP of Fresh Thyme - removed from stems
Coarse Salt and Cracked Pepper (to taste)
Goat Cheese

- Cooking Items-
Muffin Tin
Baking Tray
Aluminum Paper


CHECK OUT THESE OTHER DELICIOUS SIDE DISHES!


DIRECTIONS:

Preheat the over to 350 degrees.

Place the cut up potato slices into a large the bowl. Add the butter, thyme, salt, and pepper and mix together so the potatoes are well coated.

Take a muffin tray and butter the tray. In a circular motion start to stack the potatoes into tower form. TIP: Use the smaller pieces at the bottom of the muffin tray and the larger slices at the top.

Cover the tray with aluminum foil and bake in the oven for 30 minutes.

After 30 minutes take the cupcake tray out of the oven and turn the heat up to 450.

Next, we are going to flip the potato towers, aluminum foil and all, over onto a baking tray and remove the muffin tray. When you have successfully completed this step and fixed your towers so they stand up straight again (don’t worry it happens to all of us) place the tray back into the oven for an additional 15 minutes until they cook and become more crispy.

When they are nice and crispy take them out of the oven and add a dollop of goat cheese to the top (or if you want them to be really pretty pipe goat cheese onto them with an icing piper!), followed by a small piece of thyme for garnish.

Serve while hot!

Enjoy!


I hope you enjoyed this recipe as much as I do. If you have any comments please leave them below and I'll be happy to answer them as soon as I can! Happy cooking!!!


FOLLOW ME ON INSTAGRAM @ISTHATSOH


PIN THIS POST

Potato Towers.jpg

S'MORES COOKIES IN A JAR

Friendly reminder, you don’t need to spend a million dollars to show loved ones that you care about them this holiday season. Instead, give them a gift that is both homemade and personalized like that of some freshly baked sweets!

I for one love receiving homemade cookies or handmade gifts during the holiday season and one such gift I love to not only give but receive is ‘cookies in a jar’. This year, wow your friends with this festive s’more’s cookies recipe! No matter if you decide to bake them yourself or give a jar of cookie mix to someone as a gift, these cookies are sure to impress everyone on your list!


INGREDIENTS:


You will need 1L jars! Each jar yields approximately 9-10 cookies!

- FOR THE JAR -
1.75 CUPS of All-Purpose Flour
1 TSP of Cornstarch
1/2 TSP of Baking Soda
1/2 TSP of Salt
1/3 CUP of Brown Sugar
1/4 CUP of Granulated Sugar
1/4 CUP of Semi-Sweet Chocolate Chips
4-5 Graham Crackers
1 Cups of Mini Marshmallows
9 Hersey Pieces


- FOR BAKING -

1/2 CUP of Salted Butter
1 Egg
1/2 TSP of Vanilla


CHECK OUT THESE OTHER FESTIVE DESSERTS


DIRECTIONS:

When building the cookie mix jar, first make sure they are clean and dry inside.

Mix all-purpose flour, cornstarch, baking soda, and salt in a bowl, and then dump it into the jar using a paper funnel and packing it down.

Next dump in your Brown sugar, followed by your granulated sugar, and topped with the semi-sweet chocolate chip to create three additional layers.

Next, add a layer of cling wrap followed by your graham crackers, marshmallows, and Hershey bars. You want to do this so that they can be easily removed from the jar and separated from the mix when your recipient is ready to make the cookies.

Seal the jar and decorate as desired.

Make sure while decorating the jar to add a tag with the following instructions on how to bake the cookies:

- Preheat oven at 350
- Add 1/2 Cup of Salted Butter, 1 Eggs, and 1/2 TSP of Vanilla to a large bowl and beat until well combined.
- Open the jar and removed the top layer that is wrapped in cling wrap - set aside
- Dump the remainder of the jar in with butter and egg mixture and blend till cookie dough starts to form.
- Break graham crackers up and add 2/3 of broken crackers and 2/3 of mini marshmallows to the dough, folding it in. *You will want to save the remaining 1/3’s for garnish!
- Line a baking tray with parchment paper and create dough balls 2-3 TBSP in size and bake for 8 -10 minutes or until almost done, before removing the cookie trays from the oven, garnish with the remaining graham crackers, marshmallows, and pieces of the Hersey chocolate, and return to oven for an additional 2 minutes. (If desired, switch the oven to broil and toast the marshmallows on top. Just be sure to watch them because the small marshmallows burn quickly!)
- Cool for 2-3 minutes on a wire cooling rack before eating or storing in an airtight container.


FOLLOW ME ON INSTAGRAM @ISTHATSOH


I hope you enjoyed this recipe as much as I do. If you have any comments please leave them below and I'll be happy to answer them as soon as I can! Happy cooking!!!


PIN THIS POST

Smores.jpg

CHOCOLATE COVERED CHRISTMAS WAFER RODS

This chocolate covered Christmas wafer rod recipe is so easy to do and makes for a fun DIY you can get your nieces and nephews involved in. Plus, they are super festive and another great way to dress up the dessert table or package and added to your Christmas gifts as a personalized decoration!

Enjoy!

INGREDIENTS:


1 Can of Pirouline Wafer Rods
1 Bag of Pure White Chocolate Chips
1 Bag of Milk Chocolate Chips

- Toppings -
Sprinkles
Candy Cane - crushed
Cookie Icing

- Tools -

Wax Paper
2 Small Sauce Pans for Melting Chocolate
Piping Bag for Icing


CHECK OUT THESE OTHER FESTIVE RECIPES


DIRECTIONS:

Prepare a banking sheet by lining it with wax paper.

In a bowl, place one bag of chocolate chips and slowly melt using a double boiling method, stirring every once and a while until completely melted.

Dip wafers into chocolate or use a spoon to pour chocolate over 2/3rds of the wafer and gently shake off excess before placing on the wax paper to cool.

Immediately after, coat in sprinkles or crushed candy cane so they adhere to the chocolate-covered wafers.

If you are going to dress a few rods with cookie icing, first allow them to cool completely before adding icing and moving them to a new clean baking sheet with a new sheet of wax paper to dry.

Make sure all rods are dry before removing from the wax paper before packaging or displaying, or store in an airtight container at room temperature.


FOLLOW ME ON INSTAGRAM @ISTHATSOH


I hope you enjoyed this recipe as much as I do. If you have any comments please leave them below and I'll be happy to answer them as soon as I can! Happy cooking!!!


PIN THIS POST

HOLIDAY POMEGRANATE-CRANBERRY MOJITO

I know it’s only November but I am already so excited for the upcoming holidays! One thing that I’m really looking forward to is being reunited with close family again and although I know this COVID Christmas will probably look completely different than previous years, I’m still looking forward to celebrating all that we have to be grateful for. To help you get in the festive mood I thought I’d share a recipe for a welcome cocktail you can serve at your family gathering to help kick off the celebrations. This cocktail uses seasonal favorites like pomegranate and cranberry and can easily be made into a mocktail for kids simply by removing the rum!

Enjoy!


FOLLOW ME ON INSTAGRAM @ISTHATSOH


INGREDIENTS:

- Cranberry Sauce -
3 TBSP of Sugar
1/4 CUP of Water
1/2 CUP of Fresh Cranberries


- Cocktail -
Sugar for Rim
1 Slice of Lime
8 Mint Leaves
2 TBSP of Lime Juice
2 Oz of Pomegranate
2 Oz of White Rum
Splash of Canada Dry or Soda Water if you like it less sweet
Ice - as needed

- Garnish -
Mint Sprigs
Fresh Cranberries
Pomegranate Seeds
Lime Wheels


CHECK OUT THESE OTHER FESTIVE RECIPES


DIRECTIONS:

Add cranberries, sugar and water to a saucepan and bring it to a boil. Once it starts to boil, reduce to low heat and allow to simmer for 5 minutes until cranberries start to open and a thick sauce starts to form. Set aside to cool

Use a lime wedge to wet the rim of your glass and use the sugar to create a rim.

Add mint leaves and lime juice to the glass and muddle for a minute to release the mint flavors.

Add ice followed by a dollop of the cranberry reduction, rum, and pomegranate juice.

Add a splash of ginger ale or soda water, give it a stir, garnish with your fav garnishes and serve!


I hope you enjoyed this recipe as much as I do. If you have any comments please leave them below and I'll be happy to answer them as soon as I can! Happy cooking!!!


PIN THIS POST

3D GINGERBREAD CHRISTMAS TREE

* Please Note - Some links in this post may be affiliate links *

Level up your dessert table this year with this 3D Gingerbread Christmas Tree! It is not only so fun to make but it is also the perfect centerpiece at Christmas dinner. If you are looking for something to do that not only fill the house with the best smell (HELLO GINGERBREAD COOKIES!!) but is also a great activity the whole family can get involved in, this is it!

Happy Holidays my friends!


FOLLOW ME ON INSTAGRAM @ISTHATSOH!


INGREDIENTS:

Makes 1 Christmas Tree

- Gingerbread Cookie Recipe -
2/3 of a CUPS of Butter (unsalted) - softened
2 CUPS of Granulated Sugar
2 Large Egg - at room temperature
2/3 of a CUP of Fancy Molasses
5.5 CUPS of Flour (All Purpose)
3 TSP of Ginger
2 TSP of Cinnamon
1 TSP Baking Soda
1/2 TSP Ground Cloves
Large Pinch of Salt

- Decorations -
Cookie Icing - White, Green, Red are traditionally used
Sprinkles
Icing Sugar

- Tools -
10 PC Christmas Star Cookie Cutter - I found mine on Amazon and it arrived in 2 days! *Please note I did not use all 10 stars, I started from the smallest and worked my way larger. If you want to use all 10 stars (and have a massive tree) you will need to double your gingerbread cookie ingredients)
Wax Paper
Parchment Paper
Baking Tray
Icing Piping Bag and Decorative Tips


CHECK OUT THESE OTHER FESTIVE RECIPES

DIRECTIONS:

Blend softened butter and sugar together until fluffy. Add in your egg and fancy molasses.

In a separate bowl mix your flour, ginger, cinnamon, baking soda, ground cloves, and salt. Whisk until well mixed.

Slowly start to add your flour mixture into your butter mixture until a dough starts to form. You may want to finish it off with your hands.

Make two dough balls from the mixture and wrap them in plastic wrap before placing them in the fridge for an hour.

After an hour, remove the dough balls from the fridge and let them rest for 10 minutes before rolling them out to 1/4 inch thickness. I used my clean countertop to roll the dough out and placed wax paper on top of the dough for easy rolling.

Preheat oven to 350.

Cut out 2-3 cookies of each size (starting from smallest and working your way larger) of the Christmas Star and place them on a baking tray lined with parchment paper. Place each shape 1/2 - 1 inch apart because the cookies do spread out and puff up a little. I didn’t use all 10 of my stars (I think I stopped at 7) as I didn’t want my tree to be too big.

Bake for 11 minutes.

Remove from oven and allow to cool down before stacking them from the largest size to the smallest size. Use a little bit of icing when stacking to help hold them in place and level them out.

When you get to the final star cookie use icing to stick it to the top standing up to create a Christmas tree star!

Decorate as desired.

Allow to dry/harden in a safe place and store at room temperature.


I hope you enjoyed this recipe as much as I do. If you have any comments please leave them below and I'll be happy to answer them as soon as I can! Happy cooking!!!


PIN THIS POST