5 TIPS FOR STYLING YOUR HOLIDAY FRONT DOOR

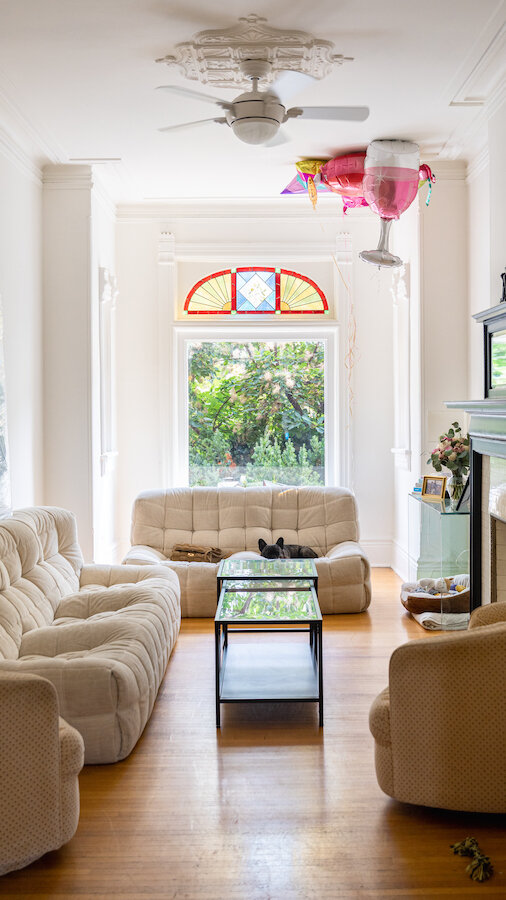
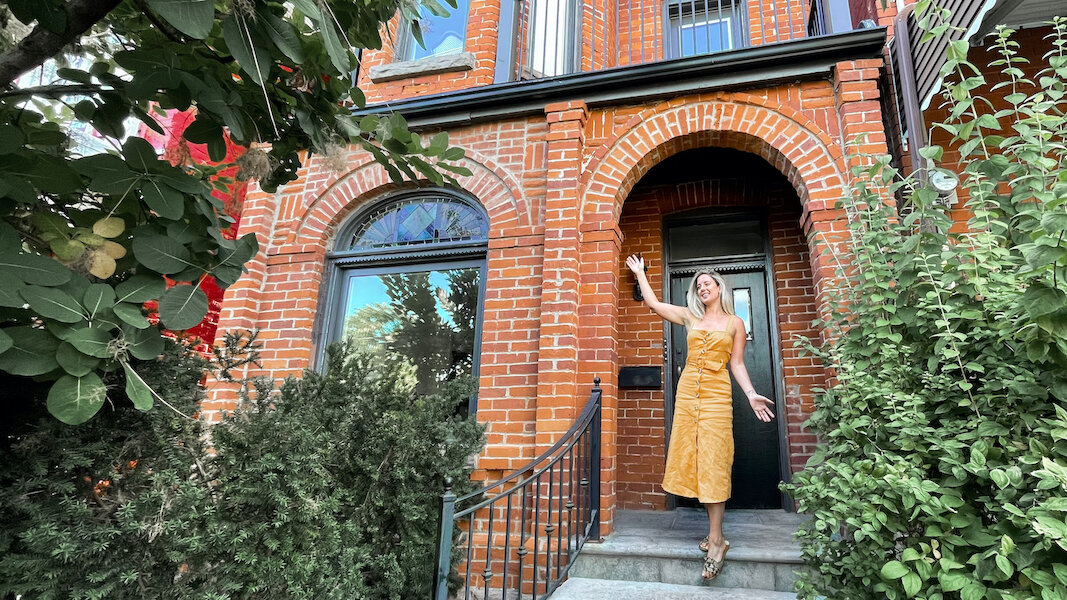
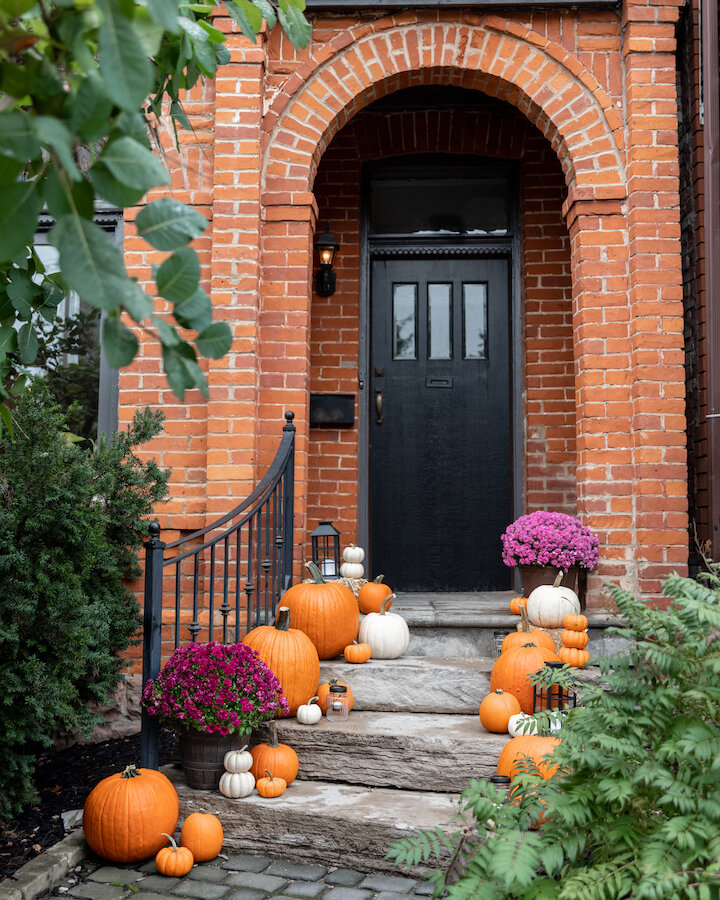
Since moving into my new Toronto Victorian home, I have been so eager to start decorating from scratch. Unfortunately, with plans to renovate the main floor starting soon, decorating my front door for fall may be the only chance I get to do something festive before the end of the year! So, upon the immediate arrival of pumpkin season, I decided to take the liberty to start decorating my fall front door right away!

In preparation for this exciting occasion, I took to my favorite social media platform - Pinterest - for some holiday and fall decor inspiration. However, It didn’t take me long to notice that many of the doors and stoops I saw didn’t really resemble mine. Thankfully, my expertise in photography and food styling kicked in and I realized that if I applied the same styling principles from taking photos of food, I should be able to create something eye catching and tailored for my space. Now having gone through the process, I also have come to realize how much easier this made procuring decor items in the proper proportions and quantity as well!

If you are starting to feel festive and have plans to decorate your front porch for the upcoming holiday season, here are some basic styling principles to take into account when creating your perfect fall front porch setup. These simple tips can easily be applied to anything you are working on and when done right, will always result in a super cute and unique holiday setup curated to your taste and style. Happy decorating!


FOLLOW ME ON INSTAGRAM @ISTHATSOH!


5 TIPS FOR STYLING YOUR HOLIDAY FRONT DOOR

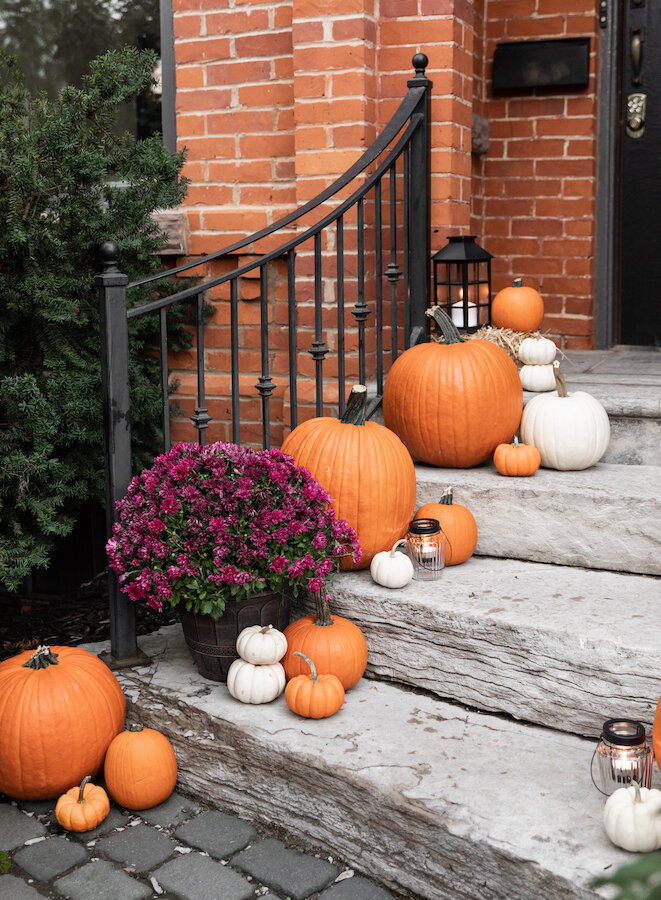
  1. Layer in the decorations - No matter what I am styling, one principle I always keep top of mind is to layer in items. In the case of my fall front door I started with the two flower pots I bought a few months back and separated them to draw the eye from ‘top right to bottom left’ in the same direction and flow of the staircase. Next I layered in my larger sized pumpkins, staggering the amount on each side to avoid too much symmetry. Following this, I added in my medium sized pumpkins and small hay bales making sure to separate the white pumpkins and use the hay bales in spots that needed elevation like behind a large pumpkin or in front of a flower pot. Next I added in the remaining small and mini pumpkins, making sure to stack a few of the mini ones on top of each other to acheive an additional element of elevation, and staggering the rest to fill in empty pockets. Lastly, I added in my lanterns/lights. In this case I had two kinds - two big lanterns and 3 small tealight lanterns - which I staggered once again in spots that either needed a pop of black or steps that felt a little bare. Layering items like this always helps me to visualize how things are looking every step of the way while also making the result look more natural and less staged.

2. Always buy decor in odd amounts - Aside from the flower pots which I already had, everything else I bought was purchased in odd numbers. 5 large pumpkins, 5 lanterns/t-lights, 5 medium pumpkins in a mix of colours, 5 small orange pumpkins and 13 mini pumpkins in a mix of colours. Doing this automatically helps me avoid to much symmetry and always yields a more natural looking setup. When it comes to photos, the rule of odds states that having an odd number of objects in a photo produces a more appealing composition than an even amount, and clearly this rule works just as well for front doors as it does for food!

3. Add in a little greenery - Greenery is an important element to any festive decor you are styling, and not only adds colour and texture to whatever you’re working on but also adds another vibrant festive element to the overall look. Usually at Christmas when creating a centerpiece I start off with a lot of greenery as a base before adding additional candles and decoration on top. In the case of my front door, the flower pots add a pop of colour and texture while also breaking up the pumpkins. Just make sure you use resilient greenery that thrives in colder weather like purple cabbages, ornamental peppers or chrysanthemums for maximum longevity!


CHECK OUT THESE OTHER HOME DECOR BLOG POSTS!


4. Add some lights for additional night appeal - You didn’t create a beautiful fall front door only for it to disappear out of sight as soon as the sun sets. Adding in some lights to your fall front porch decor will not only give it some life but it can also help visitors notice your new setup while also helping them avoid tripping on a pumpkin. In the case of my front door I used tealights lanterns, but battery operated fairy lights are another great inexpensive alternative that dazzles.

5. Stay away from kitsch… unless that’s the vibe you are going for - The number of times I had to stop myself from picking up Halloween decor while shopping for this project was hilarious. I knew I wanted to decorate my front door with pumpkins but that didn’t mean I wanted to go full on ‘Halloween’. Reminding myself to stay away from anything too kitschy like scarecrows and jack-o-lanterns helped me avoid getting to wrapped up around one festive occasion and instead made achieving a fall front door that works for the entire fall season way easier. If you are like me and want your front door to last all season long, make sure to avoid purchasing any decor that confines you to a timeline.


PIN THIS POST

10 INTERIOR DESIGN TRENDS I AM LOVING!

My ‘marshmallow couches’ and new swivel chairs in the living room of my new Toronto Vicotiran house!

My ‘marshmallow couches’ and new swivel chairs in the living room of my new Toronto Vicotiran house!

INTERIOR DESIGN TRENDS FOR 2021 AND 2022

With renovations soon to begin on my new Toronto Victorian home, I have been finding myself feeling a new sense of purpose and passion for interior design. What once was a collection of ‘wouldn’t it be nice’s’ and ‘maybe one day’s’ is now inspiration on my ‘First Floor Renovation’ Pinterest board and things just hit different. ‘Pinning’ is ‘planing’ and 2022 interior design trend reports, home decor colour trend boards and industry highlights are definitely what I have been gravitating to. For those who don’t find that stuff as sexy though, here’s a summery of what I learned and what I’m loving.

From the rise of Japandi (Scandinavian functionality meets Japanese minimalism) to the fall of grey kitchens, 2021 and 2022 interior design trends seem to show a shift in how people are moving through life and feeling about their spaces. Now that they are forced to stay home, comforts and cozy atmospheres are a must as well as a need to incorporation more sustainable elements and natural materials into the home. If we can’t go out, we want to bring the outside world in and create beautiful spaces to enjoy while doing so. An emphasis on functionality has taken centre stage as we declutter our spaces and focus on having a few statement pieces rather than an abundance of décor and furniture. When it comes to paint, neutral and grounding colours are also being favoured over vibrant jewel tones and powerful patterns, but nothing has stolen my heart more than these 10 interior design trends for 2021 & 2022:


FOLLOW ME ON INSTAGRAM @ISTHATSOH


Round and Irregular Shaped Mirrors - A useful tool when it comes to interior design, mirrors can help make a room feel larger, reflect light, or even add a splash of glamour to an otherwise stagnant space. Of course, hanging a few mirrors in a home is definitely a must, but one 2021 interior design trend that I am absolutely loving is the use of round and irregular shaped mirrors to unify a room or add a statement. One such mirror that I am currently coveting from Ferm Living is called ‘The Pond’. In some ways it reminds me of Salvador Dali’s melted clock because of it’s similar ‘melted’ characteristics. I especially love to see round and irregular mirrors used as a way to add juxtaposition to a room that otherwise would have a lot of sharp edges like a dining room or a tiled bathroom. Further, irregular or round mirrors perform the double duty of being a design element that is both functional and eye catching while still reflecting light around the room.

Crittall Doors, Windows and Partitions - Not only are they edgy and versatile, but Crittall frames are incredibly eye catching and work well with all types of aesthetics including industrial, mid-century or Scandinavian interiors. Characterized by the grid-like frames and modern lines, the use of Crittall allows both light and space to feel abundant while creating zoned areas within it. Although traditionally used for doors and windows, lately I have seen Crittal also being used to create walls around at-home office space, as doors to pantries, as shower screens and even as partition between rooms. It’s definitely something I’ve been pinning a lot and can guarantee it will be showing up in my new home.

Moody and Dark Kitchen Cabinets - A white kitchens may be timeless but nothing can do ‘sleek and striking’ better than dark kitchen cabinetry. The industry has seen a strong gravitational pull towards dark cabinet kitchens when previous overlooked as purely an 'accent' colour. Black walls, cabinetry and work surfaces are having something of a moment as dark grounding colours feel liveable, luxe and inviting. Mix in some floating shelves made of textured woods and the spaces now feels warm, rustic and inviting. Earthy tones such as terracotta and sand continue to be popular as we aim to create natural, grounding environments to help us truly disconnect from our busy lives. Same holds true for appliances. Back Stainless Steel appliances are now being offered by brands like Bosch, LG, KitchenAid, and Samsung. I myself, feel its gravitation pull and recently purchased a La Cornue stove for my new kitchen in a dramatic dark navy with brass knobs! It’s going to look SO YUM, I can’t wait!


ENJOYING THIS POST? CHECK OUT THESE OTHER HOME & HOME DECOR POSTS!

PHOTO CREDIT: @oldstockantiques

PHOTO CREDIT: @oldstockantiques

Natural Elements - Bringing nature in doesn’t have to be as literal as filling your place with a million new plant babies. Instead, switching furnishings out in favour of those that incorporate more natural fibres such as rattan, wicker, cane, and wood are a great place to start! Fabrics such as wool, linen and cotton are also being used to add texture to a room along with terracotta vases, dried flowers, marble coffee tables, and wicker baskets. These all add warmth to a room while creating an atmosphere that feels organic, relaxed, and calming. 

Accent Lighting - Lighting doesn’t just need to be functional, it needs to make a statement and much of the inspiration I have been pinning these days for the living room in my Victorian house include a beautiful chandeliers. Emphasis on luxurious lighting offers a great opportunity to draw the eye upwards accentuating high ceilings in a house like mine. If you don’t have high ceilings, no worries, you should still think of lighting as a form of jewelry. Make sure to choose something that provides some sort of opulent grandeur without overwhelming the entire look of the room.

Blush In Bedrooms and Bathrooms - Although not a new colour, earthy pinks are super popular when it comes to 2022 interior color trends and textiles. Perhaps it’s because they mix so well with earthy pigments such as terracotta and sand or natural materials like rattan and woven jute, but I have been very attracted to a rose pink palette when it comes to master bedrooms and powder rooms. There is something so subtle, sophisticated and delicate about it that it evokes feels of relaxed romance for me. I will definitely be incorporating this colour into my home after renovations are complete and am already banking a ton of inspiration for my master bedroom in this colour.

Marshmallow Couches - Definitely not an industry term but instead 100% something I just made up, marshmallow couches and/or curved and shapely furniture have been gracing the IG pages of so many of my favourite home decor accounts for the past few years. Of course striking lighting can make a statement but nothing makes a living room more welcoming than an enticing sofa. Curved couches invite your gaze to dance across a room and nubby textile like bouclé appeal to the touch drawing you further in. I have already began to embrace this 2021 living room decor trend and have procured two couches in this ultra comfy style. I also found two swivel chairs that I plan to reupholstered in bouclé to help me create the dreamiest living room setup!

Rattan, Cane & Wicker - Two things I have been swooning over for what feels like an eternity is rattan, cane and wicker! Although woven furniture styles have been gaining popularity in the last few years, they have always had a place in my heart. Growing up there was a lot of rattan and cane in my home and to me, it feels nostalgic. Natural materials like rattan and wicker add warmth and lightness to home decor while adding texture and natural elements. Both weaves are lightweight and versatile with the ability to work in every room of your home as well as outside! Think rattan garden furniture or cane dining chairs! I will definitely be incorporating a lot of this kind of furniture into my new home as I already have a few DIY’s planned and my eye on a few pieces!

Dramatic Flooring - One things Adam and I are super excited about updating in our new Victorian home are the floors. Currently we have four different kinds of flooring on just our first floor and in order to make the room feel more cohesive, we knew changing the floor was going to be a priority. I have always loved Parisian apartments and Scandinavian interiors which is why we are opting for herringbone flooring. If you’re renting or looking for a lower commitment solution, another way to jazz up your floors is to add a dramatic carpet, animal hide or animal-printed rug to your space.

Swoon-Worthy Ceilings - Accent walls have been around for a while but swoon worthy ceilings are gaining popularity especially if dramatic flooring is not in the budget. Instead of adding wallpaper to one wall, more and more people are opting in for neutrality on their wall and instead using easy stick wallpapers on their ceiling for added flair. I know when Adam and I were house hunting we came across a few Toronto Victorian homes with tin kitchen ceilings and I couldn’t help but fall head over heels in love with them. Thankfully swoon worthy ceilings are in vogue once again and I look forward to incorporating this trend into my home in some aspect.

CREDIT: Peter Salerno, Wyckoff kitchen & bath designers, NJ. Stratta tile design. Rangecraft hood. Peter Rymwid photo

CREDIT: Peter Salerno, Wyckoff kitchen & bath designers, NJ. Stratta tile design. Rangecraft hood. Peter Rymwid photo

So there you have it! Ten 2021 & 2022 interior design trends that I am currently loving. If you are curious to see how my first floor renovations turn out I invite you to follow along. I am planning to post a lot more video’s documenting the process on my Instagram and YouTube channel as well as write a lot more blog posts like this one, so feel free to subscribe! If you think this list is missing big trends or you are obsessed with anything I shared above, feel free to let me know in the comments below!

Until next time!

- Soheila


MORE FUN VIDEOS FROM OUR ‘FIRST TIME HOME BUYER’ JOURNEY IN TORONTO!


PIN THIS BLOG POST!

HOME SWEET HOME - A PRE RENO HOUSE TOUR!

Welcome To My New Victorian House!

This past August was a whirlwind of a month to say the least! My fiance and I got back from our trip to Powell River only to celebrate my birthday and take possession of our new house all in the same day! It took us a good three days to get all of our stuff into the new place (with a lot of unexpected surprises along the way), but we are finally here!

I honestly could not be more thrilled to share my new house journey with you, but if you are new and are just tuning in now, this new chapter has been almost a year in the making. I vividly remember last September when Adam (my boyfriend at the time) and I deciding to sell my condo and start looking for a house together. I had just spent the entire summer at his family cottage and loved having the extra living space to enjoy. The idea of returning to condo life in a city still under COVID restrictions felt very daunting and I knew one day soon I wanted to find a house in the city instead. Little did I know, selling my condo was going to be even more challenging than I anticipated!

If you’re in a similar life stage as me, you may have already started paying attention to the real estate market. Perhaps you are thinking it’s a great way to invest you money and want a place to call your own - which it is - but since the beginning of the pandemic, the real estate market has been going crazy in big cities like Toronto. Condo’s have seen huge fluctuations in demand and value. Further, home prices have skyrocketed thanks to low interest rates and a lack of supply. Needless to say, what I thought would be a quick transaction turned into a few months of my condo being on the market before I accepted an offer I was happy with.


FOLLOW ME ON INSTAGRAM @ISTHATSOH


The next phase of actually buying a house did not get any easier. Between skyrocketing prices, shady antics from agents, and lack of supply, it took us 4-5 months of searching, over 50 viewings, and 11 offers before we won a bid. If you’re looking to start your own house hunting journey soon, you should read my recent blog post about tips for first time home buyers on how to psychologically prepare. It was a really tough process for me - harder then I ever imagined - but I’m happy to say now it was worth the sweat, mental frustration, and tears because in the end I landed a beautiful home that is beyond anything I imagined I would end up with and I can’t wait to share it with you!

Since starting our house hunting journey a lot has also happened in my personal life including getting engaged to my boyfriend at the end of May. A few weeks later, we visited this beautiful Victorian style house in one of the most coveted neighborhoods in downtown Toronto and I instantly fell in love. The house is over 125 years old, and had so much original character, putting in an offer was a no brainier.

One of the first things that caught my eye was the beautifully arched brick entrance way! You could tell that the front of the house had been landscaped recently with a cobble stone pathway and large stone slab stairs, not to mention it was hard to miss the glorious smoke bush tree out front that provides a bit of privacy to anyone sitting in the front living room. It felt like it could be a scene from a movie - one where a young couple runs up to the front archway trying to duck out of the rain right before one of them gets the courage to lean in and steal their first kiss. Can you see it? Haha!

Perhaps it’s the romantic in me but the love affair with this house didn’t stop at the front door. The house also featured so much original molding and stain glass that I instantly became smitten.

Prior to even starting our house hunt in Toronto I had always loved old homes. Downtown Toronto is full of old homes and Victorian style houses are definitely my favorite, but unfortunately as we learned, a lot of them are not being very well taken care of, and the ones that are have lost a lot of their original charms due to updates/renovation. 90% of what we saw during our house hunting journey were that Victorian house style and I think at one point I started to drive my boyfriend nuts because I wouldn’t budge on what I wanted. But there is no denying the beauty of a Victorian home! Especially ones still full of original character! It’s rare, trust me I’ve looked! Lesson being, I am so glad I stuck to my guns!


ENJOYING THIS POST? CHECK OUT SOME OF MY OTHER LIFESTYLE POSTS!


As I walked through the house, my romantic entanglement only grew. The front living room definitely became (and still is) my favorite room in the entire house as it feature so much original Victorian house interior character and a beautiful stain glass motif! In the morning, warm light shines through the window and casts large rainbows of light on the walls inside! There is something very bright and airy about the space that always gives me really good vibes anytime I spend time in here. Since moving in, it has definitely become the room I enjoy working from the most - as a matter of fact, I am writing this very blog post from it now!

Even though we fell in love with the house after only one visit, we do have plans to do some renovations to it. Since the house is actually broken up into two units (check out the video below for the full tour) we originally planned on renting half of it out to Adam’s brother. As fate would have it (and unexpected issues with the house and our ‘new’ appliances) we decided to push up the renovations and start them this fall. Don’t worry, we are keeping as much of the original Victorian charm as we can!

Turning our house back into a single family home is going to be a lot of work but I’m really looking forward to starting renovations in a few months and putting in my dream kitchen. Before we start the renovations though, I wanted to do a quick home tour with you so you can see the canvas I am working with. In this video I will be walking you through my downtown Toronto Victorian house as well as giving you a little sneak peek on what we are planning on changing.


I hope you fell in love with the house as much as I did when I first saw it. If you have any questions or comments about this video, feel free to leave them down below!

I'm also going to be creating a lot of new content around my new home (renovations, home DIY's, and sharing about my interior decorating journey) so if you are interested in following along, feel free to subscribe to my YouTube channel or follow me on Instagram @IsThatSoh!


MORE FUN VIDEOS FROM OUR ‘FIRST TIME HOME BUYER’ JOURNEY IN TORONTO!


PIN THIS BLOG POST!

UPCYCLED DIY FAUX CERAMIC VASES


Oops I did it again! I’m back with another awesome DIY tutorial that has been trending on Tik Tok - DIY painted vases using upcycled old wine and alcohol bottles! I love the look of these DIY ceramic vases and the way they dress up a space. Doing this DIY honestly made me so excited to decorate my new place (whenever we find it) and when topped off with some dried flowers, a tapered candle or fresh flowers, they bring a whole new level of cuteness to home decor. Creating the DIY ceramic coating is so easy and only requires one ingredient other than your paint to achieve. Not to mention it adheres so well to glass so you really only need two coats to get the full effect. If you want to create a beautiful but cheap vase centerpiece for your home I highly recommend giving this little DIY of mine a go!

* Please Note - Some links in this post may be affiliate links *

MATERIALS:

Makes 1 Vase

A Up-Cycled Bottle - I used a Don Julio and Cointreau bottle
Air Dry Clay
Wax Paper
Acrylic Paint - mix to colour of choice
Baking Powder
Paint Brushes
A Mixing Utensil - I used the end of a plastic fork

Extras:
Goo Gone
A Takeout Container - to be used as base that you can easily rotate


CHECK OUT THESE OTHER FUN DIY’S


INSTRUCTIONS:

Remove labels from bottle and any additional stickers. If you have trouble I recommend using Goo Gone. Allow to air dry until completely dry.

Next, we will create the clay rings for the neck of the bottle. Roll out clay until you reach a uniform width and cut desired amount of pieces into equal lengths making sure that they are long enough to go around the neck of the bottle.

Grab one piece of clay at a time and wrap it around the neck of the bottle sealing the ends together with a little water. Continue this process the whole way up the neck. Once finished, set aside to dry for minimum 1 hour.

Once the clay has dried, place it on a pedestal (I used a takeout container). This will make it easier to rotate when painting so you dont have to touch the bottle.

On a palette (I used a paper plate), mix your acrylic paint to desired colour using a mixing utensil (I used a fork). Make sure you have enough for the entire bottle (better to have more than not enough as it will be difficult to get the same colour). Add in baking powder, 1/2 a teaspoon at a time until you reach your desired consistency. I used 2 tablespoons of paint to 1 Teaspoon of baking powder. Mix until baking powder is well incorporated.

Using a brush, paint the bottles with your paint mixture. Paint as many coats as necessary until necessary until the bottle is fully coated. Set aside to dry for 24 hours before use.

Happy Crafting!


FOLLOW ME ON INSTAGRAM @ISTHATSOH


I hope you enjoyed this DIY as much as I do. If you have any comments please leave them below and I'll be happy to answer them as soon as I can! Happy crafting!!!


PIN THIS POST

DIY MACRAME COASTERS & PLACEMATS HACK


Macrame home decor has been super trendy for some time now and I love the bohemian, natural element they bring to a space. As I look for a new home, I find myself fantasizing about how I plan to decorate it and welcoming people over once we are able to entertain again. I love the idea of incorporating nudes and natural elements into my kitchen and dining room and recently learned about this DIY Macrame hack that can be used for pretty much anything from a coffee coaster to a fruit bowl placemat to chargers on your dinner table. You don’t even need to make it round as the same steps apply to any shape you choose. If you’re really into the trend as well and are looking for a new macrame project to try, you are going to love this easy macrame DIY and my step-by-step macrame how-to tutorial below!

* Please Note - Some links in this post may be affiliate links *

MATERIALS:

Makes 1 Coaster

Heat Resistant Base
Macrame Thread
Really Sharp Scissors - if you have fabrics scissors I would use those!
Hot Glue Gun and Glue
Comb


CHECK OUT THESE OTHER FUN DIY’S


INSTRUCTIONS:

Fine the center of the heat resistant base and glue a small loop onto it using the end of the string.

Working quickly, glue down the string in a spiral direction, until the base is completely covered. Cut cord leaving a few inches at the end.

Next, take the cord and measure the circumference of the finished base, adding an extra inch or two for safe measure before cutting.

Next, you will need to cut out 5 inch pieces of cord in order to make the tassel knots. The number you will need will vary depending on the length of the cord you just measured for the circumference.

Tie each piece of 5 inch string to the circumference cord using a cow hitch knot. Repeat until the entire length of cord is covered in knots. Make sure to tie the knots tightly and as close together as possible.

Next, unravel the fibers of each tassel and or using a comb, brush the tassels so they come undone and fray nicely.

When done, glue the tassel cord to the circumference of the base so that it is flush to the base.

In order to add further stabilization, flip base over an glue in the gaps between the tassel cord and the base.

Using sharp scissors, cut the tassels so they are even in length to your desired length.

Trim off excess glue and loose fibers.


FOLLOW ME ON INSTAGRAM @ISTHATSOH


I hope you enjoyed this DIY macrame placemat and coster tutorial as much as I do. If you have any comments please leave them below and I'll be happy to answer them as soon as I can! Happy crafting!!!


PIN THIS DIY MACRAME POST