EASY KETO CAULIFLOWER GNOCCHI RECIPE

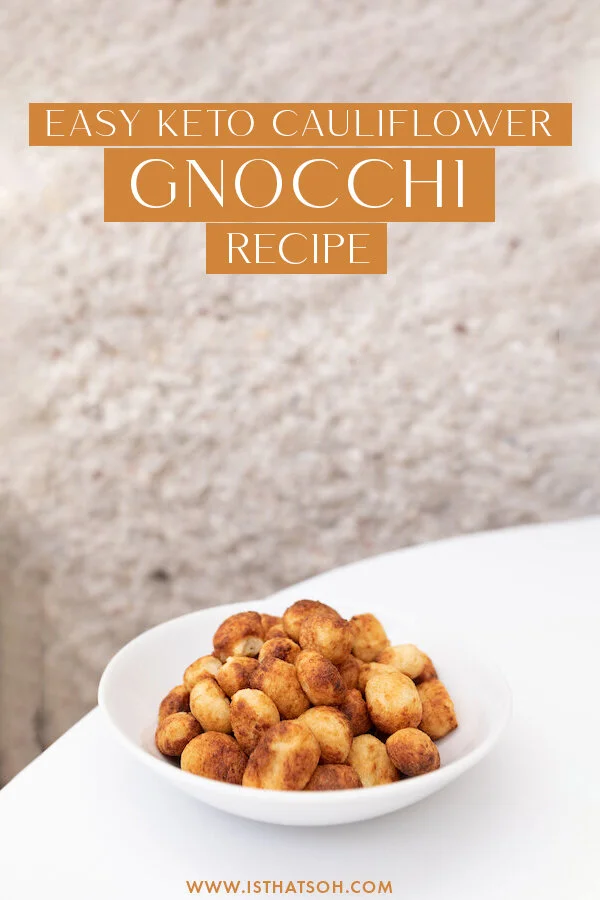
Since getting back on the Keto diet (click here to read about my Keto diet experience) I have been experimenting with new recipes to help me stay on track. One recipe that I developed using a combination of recipes I found online and experimenting with a few times, was Keto cauliflower gnocchi recipe that you can make using an air fryer or some oil in a pan if you don’t have an air fryer. Turned out that my entire family approved and actually preferred it over the regular Gnocchi I whipped up for the taste test. PLUS, it’s super easy to make! A double win! If you are looking for a healthy pasta alternative - you got to try this cauliflower gnocchi recipe!

Enjoy!


INGREDIENTS:

- Serves 4 people

1 Head of Cauliflower
1 CUP of Almond Flour
1/2 CUP of Arrowroot Flour
1 TSP of Garlic
1 TSP of Salt
1 CUP of Freshly Grated Parmesan Cheese
1 TBSP of Olive Oil if you are pan frying it


LOOKING FOR KETO RECIPES? CHECK THESE OUT TOO!


DIRECTIONS:

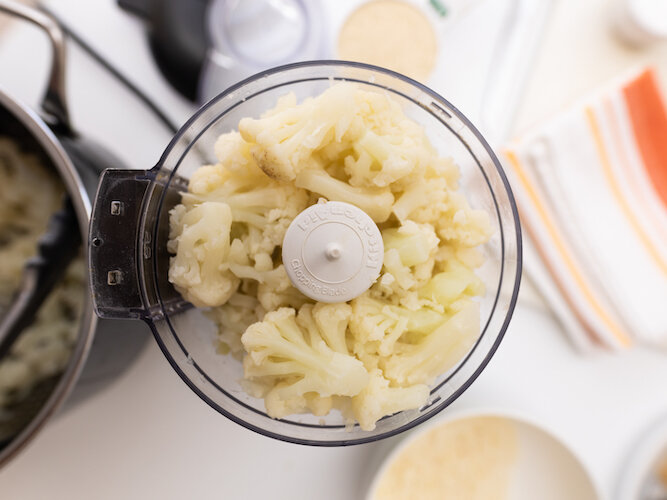
Cut the cauliflower florets off the stem in small chunks and steam until tender.

Once tender, remove the cauliflower from pot and place in a food processor. Pulse until the consistency of the cauliflower is like mash potatoes before piling it in the middle of a clean dishcloth and wringing out as much excess water as possible. Even when you think you’re done, you’re probably not so give it another wring!

Place the cauliflower in a bowl and add in the garlic, almond flour, arrowroot flour, salt, and parmesan cheese. Mix until thoroughly incorporated till it forms a soft dough. Cut dough into quarters.

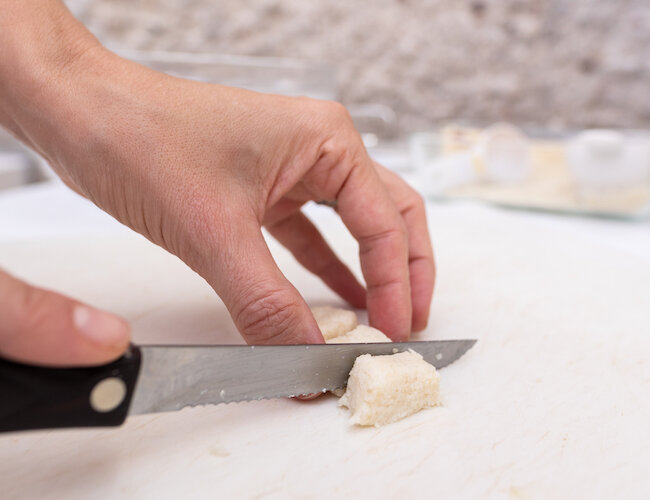
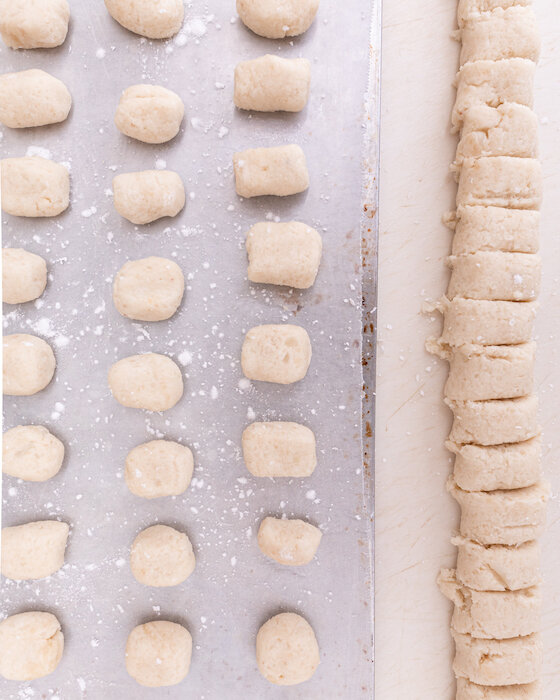
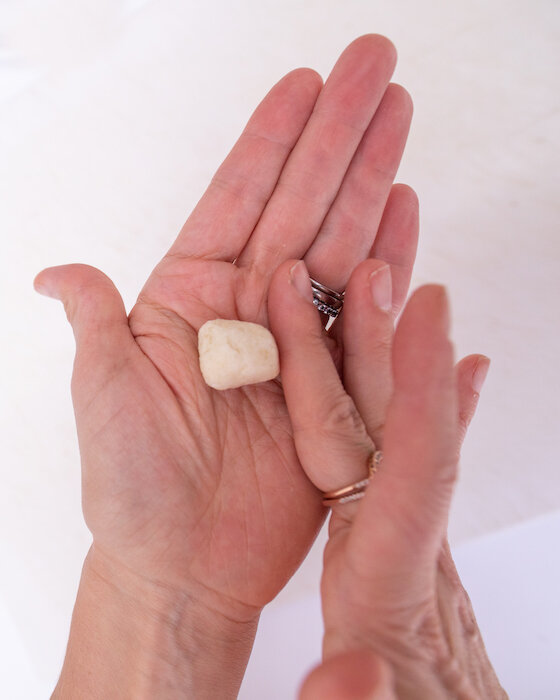
On a lightly floured surface, roll each quarter of the dough out using your hands to form a long rope about 3/4 to 1 inch in diameter. Cut the dough into 1/2 inch pieces and picking up each one, smooth the edges into small oblong balls resembling gnocchi. Once done, place on a lightly floured baking sheet lined with parchment paper.

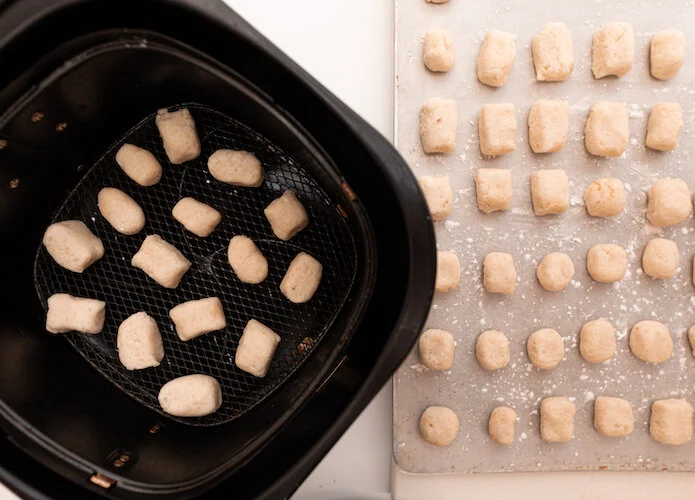
Now it is time to cook the cauliflower gnocchi. I recently used an air fryer and loved the results. If you have one you can cook them at 400 for 6 -7 minutes or fry in a tbsp of olive oil on the stove in a pan until golden brown.

When ready, serve with sauce of choice.


FOLLOW ME ON INSTAGRAM @ISTHATSOH


If you like this air fryer cauliflower gnocchi recipe or have any comments/questions, feel free to leave them in the comment section below!


PIN THIS POST

FOREVER DREAMING OF ITALY: CACIO E PEPE, A SIMPLE ITALIAN CLASSIC

We may not be able to travel during this global pandemic but that doesn’t stop me from dreaming about Italy!

A couple of years ago Adam and I ate our way through Tuscany and spent some time in Rome (click here to read my food guide to Rome) and during our time there we took a fantastic authentic Italian cooking/pasta making course. It was during that course that I first had Cacio E Pepe and feel in love with the bite of the pepper against the salty cheese. Not only did we love our time in Italy but this classic, simple dish always reminds me of our great adventures there.

Buon Appetito!

INGREDIENTS:

- Serves 2 people

120 Grams of Pasta of Your Choice
Salt
3 TBSP of Unsalted Butter
1/2 TSP of Freshly Ground Pepper
3/4 Cups of Finely Grated Parmesan
1/2 Cup of Finely Grated Pecorino

DIRECTIONS:

Boil water, add salt followed by your pasta of choice. Cook slightly before al dente.

Before draining the pasta, set aside about 1/2 a cup to 1 cup of pasta water.

Warm up butter in a skillet and add in the freshly ground pepper. Toast the pepper for 1-minute stirring continuously.

Add in 1/2 a cup of pasta water followed by the pasta - coat the pasta so it cooks a little further. The sauce should be wet so once you fold in the parmesan and allow it to cover the pasta fully if the pasta water is absorbed fully, add more before lowering the heat and adding pecorino.

Stir, serve and enjoy!


If you like this recipe or have any comments/questions, feel free to leave them in the comment section below!


PIN THIS POST

CACIO E PEPE 2.jpg
CACIO E PEPE.jpg

CLASSIC FRENCH MUSSELS MARINIERE (WHITE WINE SAUCE)

One of the best parts about being self isolate with my family is that we all like to eat!

Every Friday we get together a little bit earlier and celebrate the end of the week with some nice seafood. Each week my mom has been busting out a new recipes, each better than the last. One recipe that topped the list was her classic french mussels in a white wine sauce, an easy crowd pleaser! If you have ever wondered how to cook mussels at home or are just looking for some new recipes for mussels to try, this one is easy and so delicious!

Enjoy!

INGREDIENTS:

Serves 2 People

-Seafood-
2.5 lbs of fresh mussels – rinse, scrub and de-beard. (I usually buy extra because I know that some are going to be bad)

How to buy, store, and prep fresh mussels:

When buying fresh mussels, make sure to smell them - they SHOULD NOT have a strong odor! You also want the shells to be shut. Since mussels are alive if you bang the shells or apply pressure and close them yourself, if they are indeed alive, they should shut or remain shut. If they open once again right away it means that they are weak/not fresh, so don’t buy those. Make sure to store your mussels in the fridge, they need air to breathe so don’t use a sealed container, instead place a damp cloth over them like a napkin or paper towel to provide further moisture. Before you are ready to use them make sure to rinse the shells, remove the beards or hairy bits, and scrub away any debris off the shells.

-White Wine Sauce-
2 TBSP of Unsalted Butter
1 Shallots - chopped finely
1 TBSP of Fresh Flat Parsley, chopped finely
1 cloves of garlic - minced
1 Stock of Celery, chopped finely
1 Bay Leaf
A few twigs of Fresh Thyme
1 Cup of Dry White Wine
Salt and Pepper to Taste
1 TBSP Double Creme

-Toppings-
Fresh Flat Parsley

-Extras-
French Baguette


LOVE SEAFOOD? CHECK OUT THESE OTHER SEAFOOD RECIPES!


HOW TO COOK MUSSELS:

how to cook mussels

Place a large pot on the stove and add in your butter. Allow butter to melt on medium heat. Once ready, add shallots and cook until translucent.

Add chopped parsley, celery, garlic, bay laves and thyme to the pot and mix. Allow the heat to bring out the aroma of the herbs (maybe 2-3 minutes).

Add the fresh mussels to the mixture and stir to coat the mussels with the herbs. Add the wine and raise temperature to high. When the wine starts to bubble, stir the mussels once again so that they become coated with wine.

After you have covered the mussels in white wine, lower the heat to medium/high and cover for 5-6 minutes but no more.

After 5-6 minutes, uncover and remove mussels from the pot but keep the juice in the pot. Taste sauce and adjust with salt and pepper if needed. Add the double cream to the sauce (it should make the sauce whiter) before stirring it in until well incorporated. Add the steamed mussels back into pot, stir and serving right away while hot.

Bon Appétit!!!


FOLLOW ME ON INSTAGRAM @ISTHATSOH!


If you like this recipe for mussels, learning how to cook mussels or have any comments/questions about this mussels in white wine cream sauce recipe, feel free to leave them in the comment section below!


PIN THIS POST

how to cook mussels in white wine sauce

FALL-OFF-THE-BONE SLOW COOKED ASIAN SHORT RIBS

Ever since I have been in self-isolation due to COVID-19 I have been cooking up a storm. Yesterday, Adam and I decided to try to make some Asian style beef short ribs in the Le Creuset his parents got us for Christmas and they turned out even better than imagined! Adam said I can definitely make this again! The best part, everything goes into one pot and you just have to let it sit on low. It’s so easy!

INGREDIENTS:

 Serves 2 People

-Short Ribs-
3 LBS of Beef Short Ribs - bone-in, cut crosswise into 2” pieces
1/2 a CUP of reduced-sodium soya sauce
1/2 a CUP beef broth
1/4 CUP of brown sugar
3 Garlic cloves (minced)
1 TBSP Ginger (freshly grated)
1 TSP of Sesame Oil
1 TSP of Crushed Red Chili Pepper flakes (optional)
2 TBSP of Corn Starch
1/4 CUP of Water
Sesame Seeds for garnish
Fresh parsley (chopped finely) for garnish

-Sides-
Sticky Rice

DIRECTIONS:

short rib.jpg

In a large bowl, combine soya sauce, beef broth, brown sugar, minced garlic, freshly grated ginger, sesame oil, and chili flakes (optional) in a large bowl. Wisk until well incorporated.

Place short ribs (bone down) in Le Creuset and add in the soya sauce mixture. With Le Creuset’s you will need to give each piece of meat a little space, in other words, don’t pack them in too tight. Make sure meat is well coated with sauce - there should be a pool but not necessarily completely submerged.

short rib-2.jpg

Cover and bring to a boil on medium before lower temperature to low and allowing to cook on low heat for 5-6 hours.

30 minutes before the meat reaches the end of its cooking time, in a separate small bowl mix cornstarch with 1/4 cup of water and whisk until fully incorporated. Add the cornstarch mixture to the Le Creuset and stir well. Allow meat to cook for the remaining 30 minutes or until the sauce has thickened.

After, start to preparing/cook your sticky rice!

Once meat is finished cooking, garnish with sesame seeds and freshly chopped parsley and serve immediately over sticky rice.

Enjoy!


If you like this recipe or have any comments/questions, feel free to leave them in the comment section below!


PIN THIS POST

FALL-OFF-THE-BONE SLOW COOKED ASIAN SHORT RIBS.jpg

RECIPE REVIEW: SHEET-PAN CHICKEN WITH CHICKPEA, CUMIN AND TURMERIC

I was first introduced to this NY Times Sheet-Pan Chicken recipe during a dinner party with a girlfriend and couldn’t get enough. I ended up taking a copy of the recipe home eager to try it myself and not only was it so easy to remake, but it tasted just as good as the first time. I love the mix of flavors and spices, and how the yogurt breaks through the acidity. If you want to make it vegetarian and just leave out the meat, I’m sure it would be just as tasty! Either way, Adam told me I can definitely make it again so not only does this recipe get my approval, but it gets his too!

Score: 4.5/5

INGREDIENTS:

 Serves 4 People

-Chicken and Chickpea-
4 LBS of Chicken (I prefer to use dark meal like thighs) bone-in and skin-on.
Lemons for lemon juice - need to yield 5 TBSP total (2 for chicken, 2 to marinate slaw, and 1 for yogurt)
1.5 CUPS of full-fat Greek yogurt
2 TSP of Turmeric (1 TSP for chicken marinade, 1 TSP for seasoning later)
1 TBSP of Fennel Seed
1 TSP of Cumin (ground)
2 Cans of Chickpeas (drained and rinsed)
1 Large Red Onion - sliced thinly
1 Mini Cucumber - sliced thinly
Olive Oil
2 TBSP Water
Salt and pepper to taste

-Toppings-
Feta (optional)
Fresh Mint - torn into small pieces

DIRECTIONS:

 Season chicken using salt and pepper before creating a marinade using 3/4 CUP of yogurt, 2 TBSP of lemon juice, 1 TSP of Turmeric, and 2 TBSP of water. Add more salt and pepper if necessary, it should be slightly salty, this will reduce once cooked and combined with yogurt topping later.

Add seasoned chicken to marinade and make sure it is coated evenly - allow to sit for a minimum of 30 minutes at room temperature or overnight in the fridge.

Prior to cooking, adjust the oven rack to the top shelf and heat oven to 450!

Next combine chickpeas, fennel seed, cumin, and the remaining Turmeric in a bowl with half the red onion slices, drizzle with olive oil and season with salt and pepper before giving it a good toss to make sure it is covered evenly. Place on a rimmed baking sheet and push chickpeas to the outer edge to make room for chicken.

Scrape the excess marinade off the chicken and place it in the center of the baking sheet. Bake in the oven for about 45-50 minutes until skin is browned. You will need to toss chickpeas occasionally to make sure they become crispy and golden and don’t burn

While the chicken is cooking create a slaw by tossing the remaining onions in a bowl with the thinly sliced cucumber and add 2 TBSP of lemon juice. Season with salt and pepper and let sit in its juice.

Once the chicken is ready, remove from oven and allow to cool slightly. Add onion cucumber slaw, to remaining yogurt and top with 1 TSP of fresh lemon juice. Season with salt and pepper to your taste. Top chicken with yogurt and garnish with mint and feta.

Enjoy!

To check out the original recipe, click HERE!


If you like this recipe or have any comments/questions, feel free to leave them in the comment section below!


PIN THIS POST