BTS: THE MAKING OF MY WEDDING DRESS!

Custom wedding dress - wedding dress maker  - wedding gown and mother of the bride dress.jpg

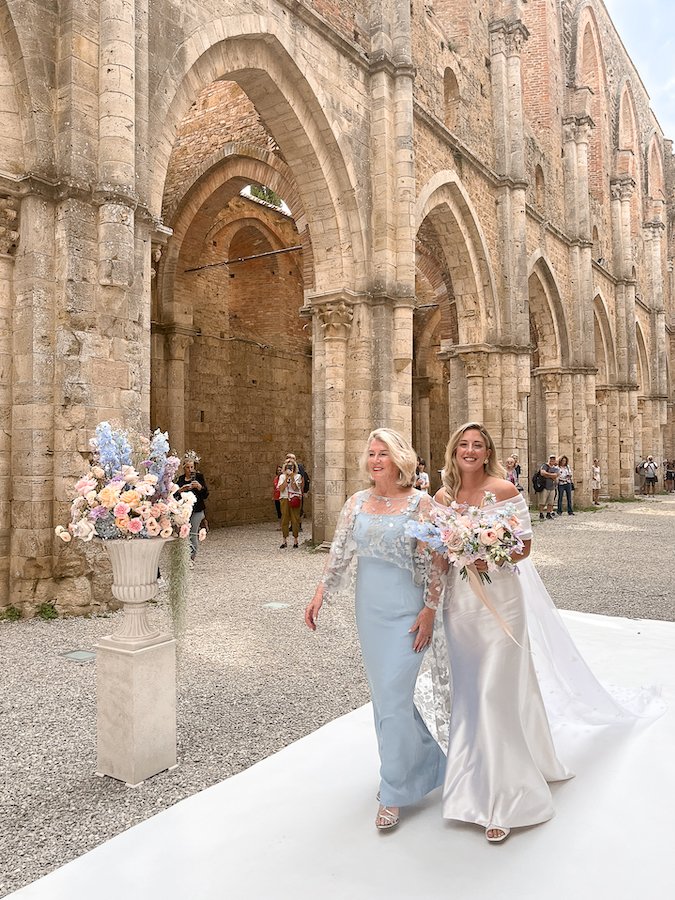
My mom honoured me by walking me down the aisle. Both of our dresses were custom made by Susan Hart

The Making of My Custom Wedding Dress

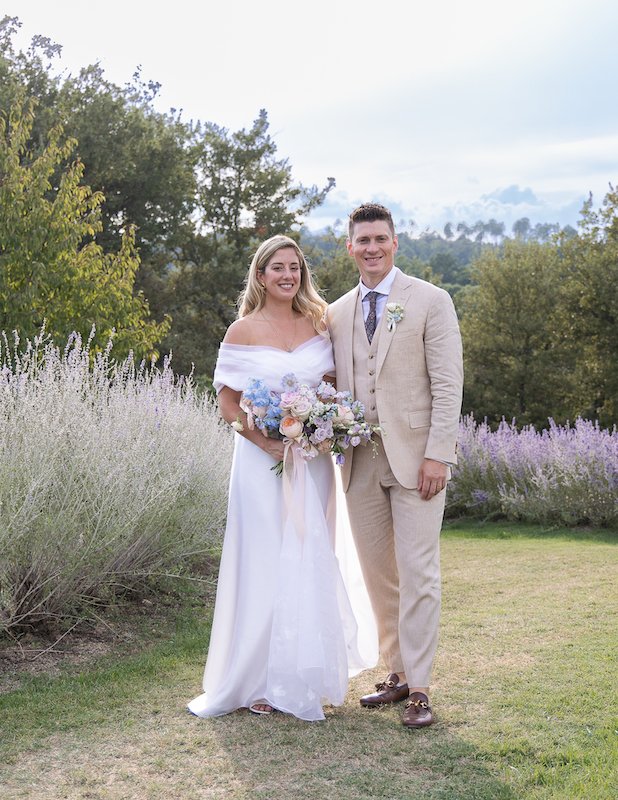
It finally happened! After 11 years together my fiancé and I finally tied the knot! And what better of a place to get married than in one of our favourite countries in the world, Italy!

This past September, Adam and I flew to Florence to spend a whirlwind weekend with friends before checking into our wedding villa just outside Siena in Tuscany. Over the course of three days we hosted a welcome pizza party dinner, tied the knot at the beautiful San Galgano Abbey, and hosted a reception, pool party and private dinner at a Michelin Star restaurant in Siena!

Even though our wedding was a dream come true, I have to admit I’m kind of relieved that it’s now over. Wedding planning is a lot of work and often stressful so having my weekends and evenings back to chill and enjoy married life has been amazing!

With that being said there are a few words of wisdom I would like to share with all brides-to-be out there. If you are stressing over finding the perfect dress, don’t! There are other options out there. I personally went the custom wedding dress route and not only ended up with a dress I loved but got it made on a way shorter timeline than required for a dress from a bridal store. The best part, I still managed to be within my budget!

If you’re curious to see what it’s like to get a custom dress made you can check out the video below where I take you behind the scenes of the making of my custom wedding dress!

Wedding Planning and Dress Shopping Timelines

When I started the wedding planning process, I had no idea what the timelines were for ordering your wedding dress. So when my friends asked me at a Christmas party if I had picked my dress yet, I shrugged it off and said ‘my wedding is still 9 months away, I have plenty of time!’ Little did I know, I certainly did not! I quickly learned that most bridal stores in Toronto advise brides-to-be to order their dress a minimum of 8 months in advance (6 months for your dress to come in and an additional 2 for fittings and alterations)! Anything less would require a ‘rush’ order and cost you further money.

Wedding Dress Shopping at Toronto Bridal Stores

With new found anxiety coursing through my veins, I scrambled to make appointments at a few bridal shops in Toronto and coordinate with my bridesmaids. Little did I know, none of it would help. After three Toronto bridal store appointments and trying on over 15 dresses, I still felt anxious. The pressure of having to place an order ASAP coupled with the fact that I didn’t really LOVE anything I tried on only intensified those feelings.

Personally, I hate making important decisions from a place of fear or anxiety. It becomes an automatic no for me. An 8 month timeline felt crazy as well as spending a substantial amount of money on a dress I didn’t love. It just wasn’t going to happen. Thankfully I had other options.

custom made wedding dress - wedding dress maker toronto - wedding dress try on with Susan Hart

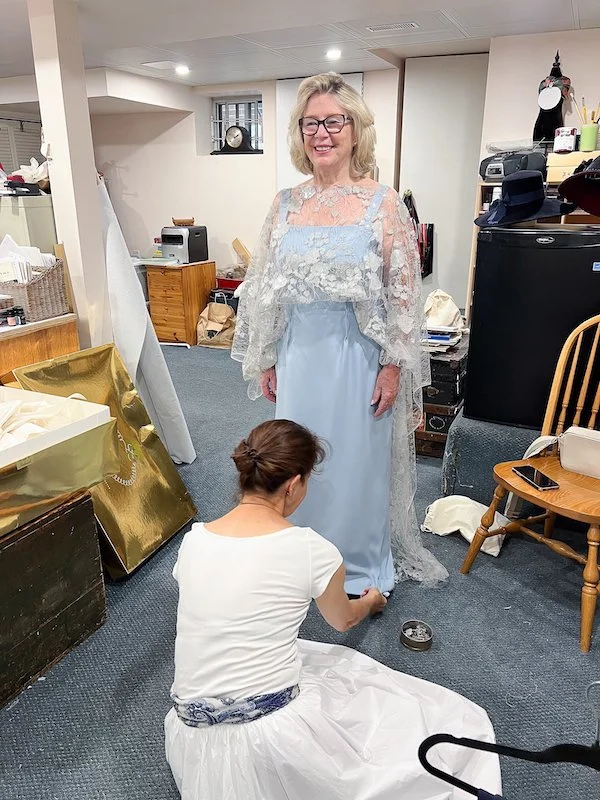
My wedding dress maker Susan Hart helping me with my wedding cape at our second fitting

My Wedding Dress Maker

Enter, Susan Hart! I have known Susan for several years and she’s actually a close family friend. Not only is Susan an incredible dress maker but she also knits, paints, and is an incredible milliner! So after a quick call to Susan, it was decided. I was going to have my wedding dress custom made.


LIKE THIS POST? LEARN MORE ABOUT MY WEDDING, BACHELORETTE & HONEYMOON!


When I told my mom about by decision to have Susan make my dress, she got so excited! Not only was she happy Susan was making my dress but she wanted Susan to help her with her ‘mother-of-the-bride’ dress as well! Having dresses made together ended up being so special and I loved how it gave us additional bonding time leading up to the wedding.

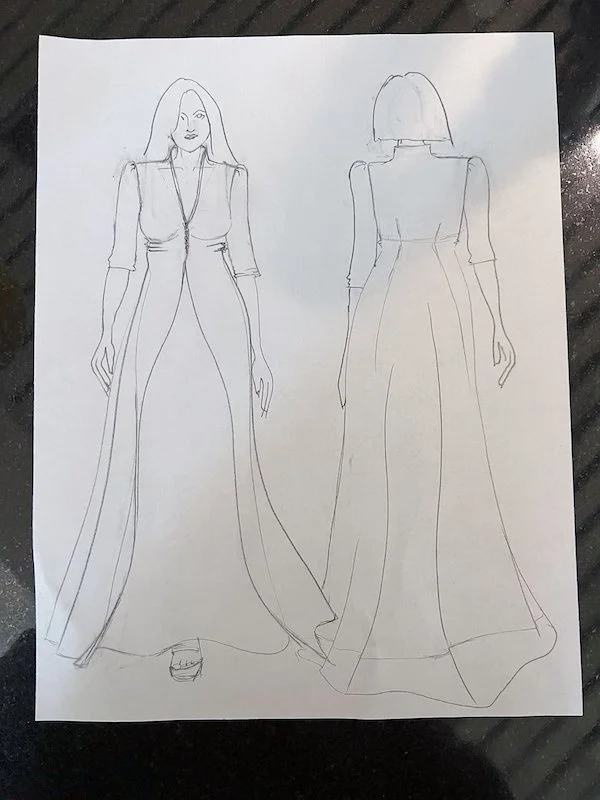
Our first fitting was spent playing with the design and getting the measurements right. The bridal cape portion of my design didn’t end up translating as imagined and I felt way more covered up in reality. We ended up spending a lot of my portion of the fitting throwing around ideas and collaborating on possible alternatives.

Fabric shopping for my mom’s mother of the bride dress we had custom made by Susan Hart an amazing wedding dress maker in Toronto

Fabric shopping for my mom’s mother of the bride dress we had custom made by Susan Hart an amazing wedding dress maker in Toronto

Fabric Shopping for My Custom Wedding Dress

A few weeks later we met up with Susan again but this time at Maryan’s fabric on Yonge Street to look through all the luxury fabrics and select the best ones for our designs. The fabric selection process can be a bit overwhelming especially since there are so many beautiful fabrics to choose from but thankfully Susan has so much experience that she was able to help me narrow down which fabric would work best for the type of stiffness and movement I was going for with my design.

After a few days with our newly purchased fabric, Susan called my us back into her studio for our second fittings. This appointment was mostly spent making further adjustments to the fit now that we had a better idea of how the fabric moved and sat against our bodies.

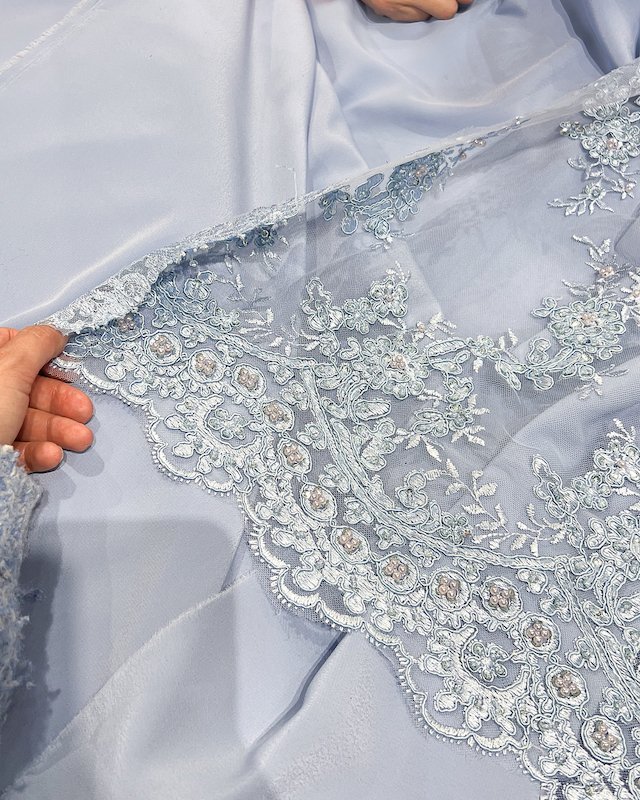
Since I was going for a pastel colour palette and all my bridesmaids were going to be in a different colour dress, my mom decided to follow the theme and opted for a periwinkle blue fabric with a beautiful sheer beading overlay that was just gorgeous!

PICTURES FROM OUR FITTINGS WITH SUSAN HART


FOLLOW ME ON SOCIAL @ISTHATSOH


custom made mother of the bride dress - bridal outfits - wedding dress maker toronto - custom mother of the groom dress.jpg

Not only did my mom have one mother of the bride dress made, she had two! I was surprised to see the new dress Susan Hart whipped up for her at one of our last fittings!

A New Custom Mother Of The Bride Dress!

PLOT TWIST: After three fittings and only three weeks remaining until the wedding, my mom and Susan surprised me with an entirely new mother-of-the-bride dress! My mom was having second thoughts about the beading overlay and was worried it was going to be way to heavy to wear under a hot Tuscan sun. Instead she opted for something a little lighter and whimsical that she could wear all night long.

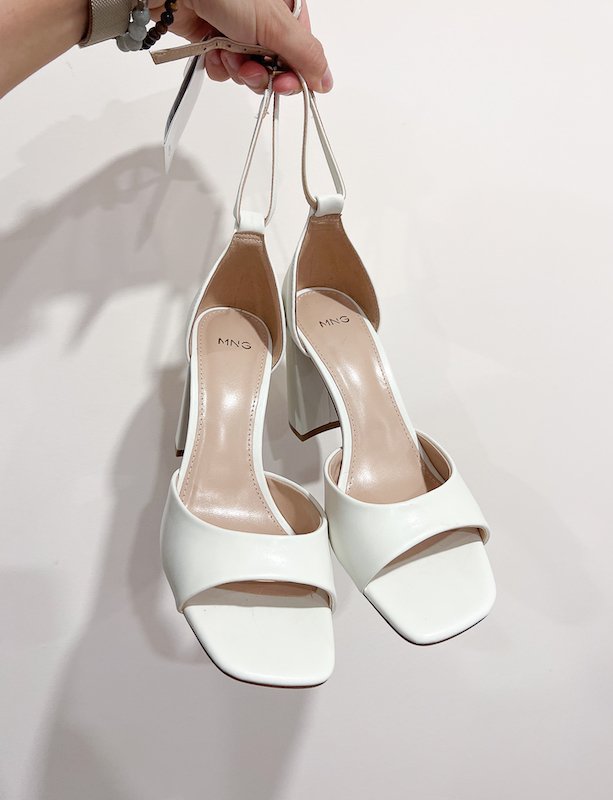
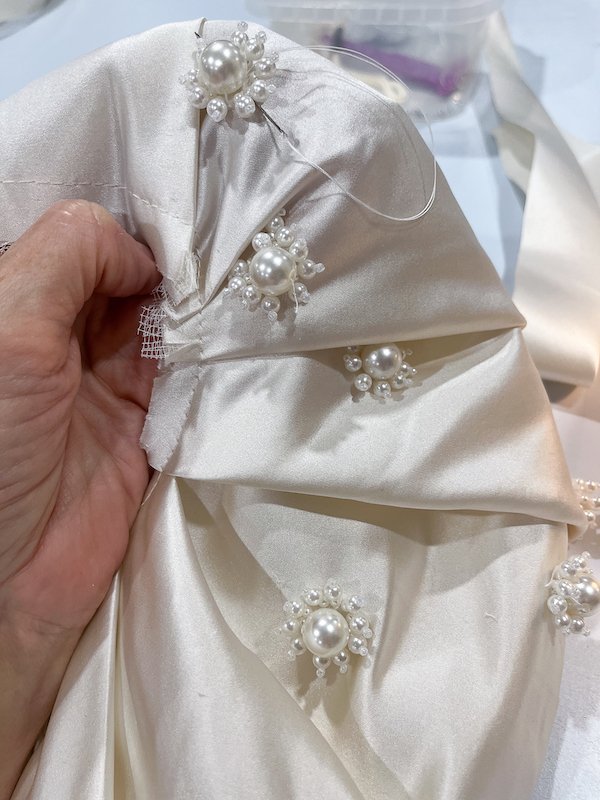
Wedding Shoes & Bridal Accessories

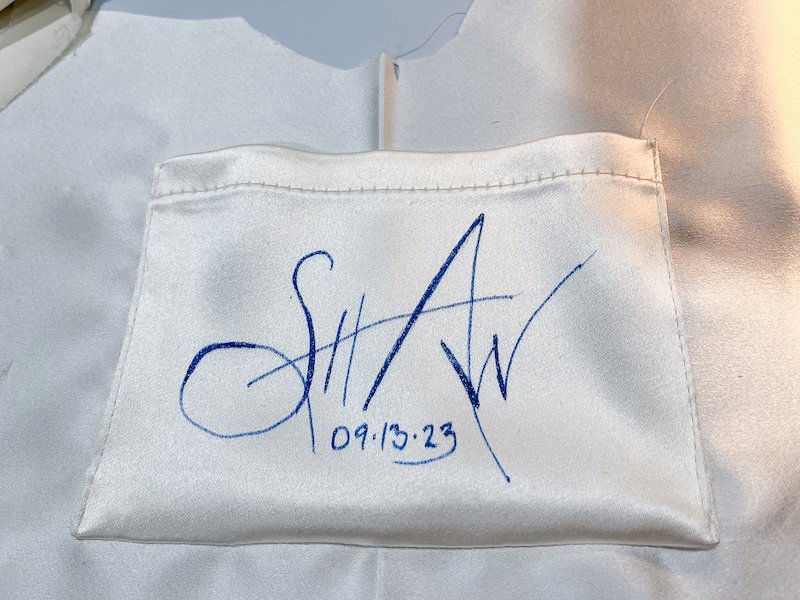
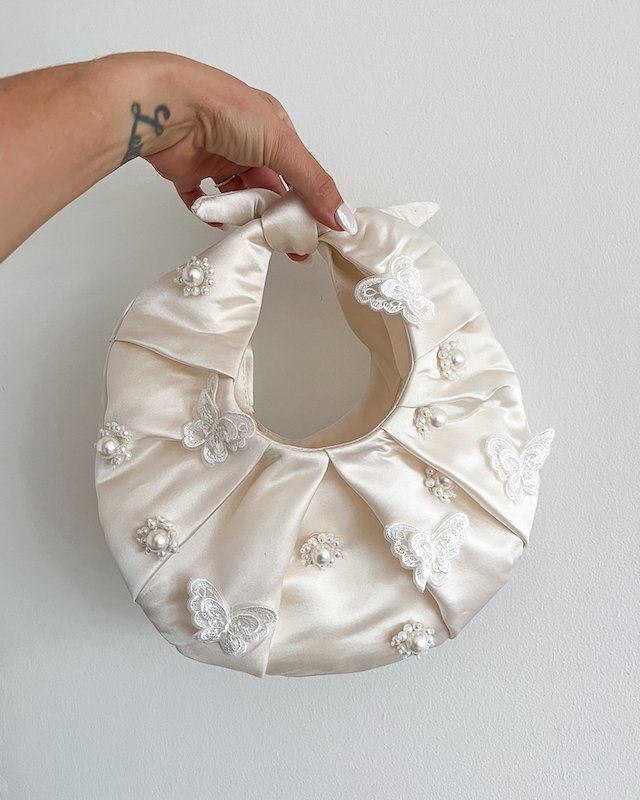
By my second final fitting I had also finally chosen my wedding shoes. Instead of going for something designer and spending a crazy amount of money on bridal shoes I knew would get ruined on the cobble stone and pebble gravel grounds of the abbey, I got Susan to work her appliqué magic on these plain blocky heels I found online at Mango. Not only did she do an incredible job DIYing the heels but she also made me this adorable croissant bridal handbag to match! She also painted Adam and I’s wedding date on the inside as a memento of our special day.

Now I felt ready for my big day!

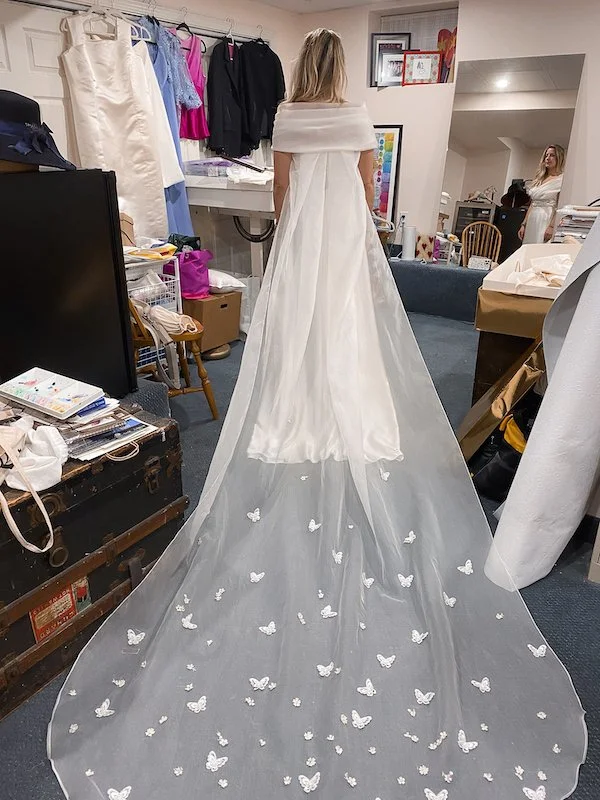
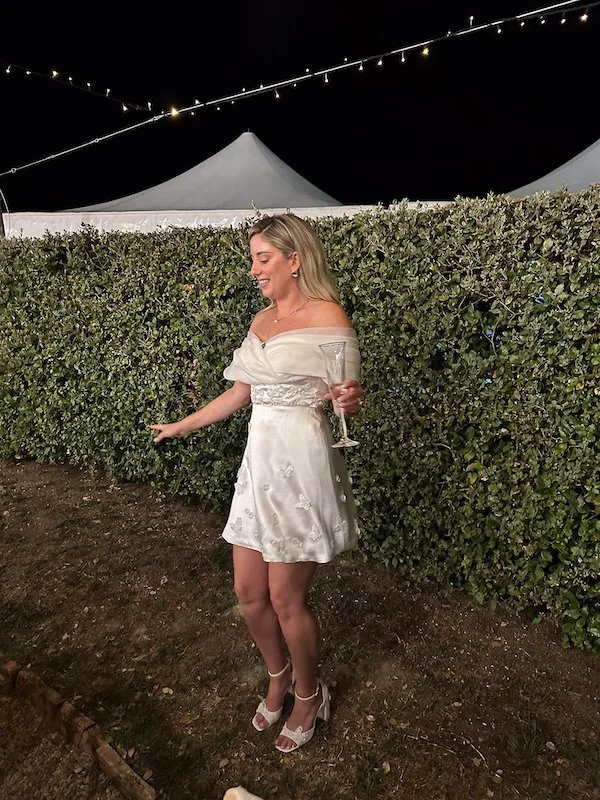
Oh, and how could I forget. Susan also made me this little party skirt with butterflies appliqued to it which made for the perfect outfit transition into an evening of dancing! She also surprised me with a bridal garter (that also had butterflies appliqued to it) which my mom passed along to me on my wedding day! Thank you Susan!

custom made wedding dress - bridal outfits - wedding dress maker toronto - custom party dress.jpg

We designed my wedding dress so that the skirts were removable. This allowed me to change into a shorter ‘party skirt’ for the dancing portion of the reception.

I hope you enjoyed this behind the scenes look of the making of my custom wedding dress! If you have any questions feel free to leave them in the comments below, otherwise don’t forget to subscribe as I’ll be back with more content soon! CIAO!

- Soheila


PIN THIS POST

THE MAKING OF MY CUSTOM WEDDING DRESS - PINTEREST TEMPLATE.jpg

LASH LIFT REVIEW: THE BEFORE AND AFTER IS AMAZING!

Lash lift review: Before and after

Lash lift results

I GOT A LASH LIFT!

Yes! The rumours are all true! I got a lash lift and to be honest the results were better than expected!

Earlier this week, I headed to Lac Beauty in Toronto’s Yorkville neighbourhood for my first ever lash lift with makeup and brow artist Jenna Want. If this is the first you are hearing about lash lifts, they are essentially a ‘perm’ for your lashes. Much like the effects of a perm for your hair, lash lifts sets a permanent curl into your lashes and the outcome is bigger, more awake looking eyes and more predominant lashes. Additionally, lash lifts are a low maintenance alternative to always using false lashes or getting lash extensions and they last way longer!


FOLLOW ME ON INSTAGRAM @ISTHATSOH


LASH LIFT BEFORE AND AFTER

All lashes have a natural shape to them and mine are long but unfortunately, pretty dead straight. As I have been getting older I have also noticed my eyelids have become more hooded. You can really notice from this ‘lash lift before and after’ picture that the curled lashes now hide the excess skin on my eyelid and make my eyes appear bigger and more awake. Further, since a lash lift curls your lashes from the base all the way to the tip, you really get to see the full length of your natural lashes which helps them appear even longer and stand out more predominantly. It’s quite amazing how such a little thing can make such a big difference.

lash lift before and after

My lash lift before and after photo

HOW LONG DOES A LASH LIFT LAST

How long does a lash lift last? The short answer is 2 months. The long answer is, it really depends on you. Like everything on our body that regenerates, our eyelashes are also on a cycle. Typically, lash cycles are about 2 months long but it really depends on a person’s genes. Either way, over the course of 2-3 months you can expect a whole new set of lashes to grow in and push the old permed lashes out.

LASH LIFT AFTERCARE

Lash lift aftercare is super simple and is one of the main reasons why I favour it over lash extensions or even false lashes. Much like a hair perm, all you need to do for the first 24-48 hours after your treatment is let the perm set. That means, do not wash your face or wear makeup for the first 24 -48 hours. If you do wash your face and water does get on your lashes, the perm wont set and the lash lift results could be badly affected. After 24 hours it is back to business as usually. You can wear makeup, mascara, wash your face with your facial cleanser, apply creams, etc. as you normally would.

See, told you lash lift aftercare was simple!

For anyone that uses lash growth serums to help lengthen, nourish, and condition your lashes, you can still use these products but you may want to use them less as they could speed up your regrowth cycle causing you to have to go back for another lash lift session sooner.

EYELASH LIFT AND TINT

When I did my lash lift I didn’t get a lash tint because I already have naturally dark lashes but it is very common for people to do an eyelash lift and tint at the same time. Ideally you would want to get the lift done before the tint to ensure you have the best curl, but that doesn’t mean you can’t get a lash lift if you’ve recently tinted your eyelashes. If you have blonde lashes or lashes that you can barely see, getting an eyelash lift and tint would be perfect and really make your eyes pop! Plus, it’s really only one extra step!

LASH LIFT VS. LASH EXTENSIONS

I have had both a lash lift and lash extensions and I would 100% say I like lash lifts more. When comparing lash lift vs. lash extensions there are a few reason why I like lash lifts more:

They are significantly cheaper! Lash lifts are around $95 whereas lash extensions start at $150 and go up depending on how dense you want them.

Lash lifts last longer - approximately 2 months! Lash extensions on the other hand last maybe two weeks depending on how quickly they start to fall out. Also, when you start to lose lash extensions your lash line looks sparse and it’s super noticeable whereas when a lash lift grows out it’s way less obvious cause you’re using your natural lashes.

You can wash your face as normal with a lash lift. When you have lash extensions you have to be careful when washing your face to avoid the eye area. I like wearing makeup but I also like having good hygiene and I was always worried with lash extensions that the glue would be a breading ground for bacteria, especially if I couldn’t wash the area. Even naturally, bacteria grow along your lash line and in your mascara tube which is why you are suppose to throw out your mascara ever three months. With lash extensions, you are more susceptible to getting an eye infection which is enough for me to choose a lash lift over a lash extension every time.

You can wear makeup as normal with lash lifts. Yes, it’s true! Load on as much of that eyeshadow, eyeliner and mascara as you want because you can wash your lashes as normal. Feel free to keep using your favourite Micellar make up remover and wipes while you’re at it! Unlike lash extensions, you can continue to do your makeup as normal unlike lash extensions where you are advised to touch the eyes as little as possible and keep them clean. Either way, because cleaning is harder with lash extensions in general, you don’t really wear makeup quite the same way.

Lash lifts look more natural than lash extensions because they use your natural lashes. In addition to using the full length of your natural lash to make them appear more prominently once permed, they also don’t look sparse once a new cycle grows in. Lash extensions on the other hand can look fake and, I find, often not done well. Unless you are going to a pro, they tend to be very dramatic, dark, overdone and need constant maintenance which can be a pain in the ass.


CHECK OUT SOME OF MY OTHER RECENT BEAUTY POSTS


LASH LIFT PROS AND CONS

Still on the fence as to whether to give a lash lift a go? Here are some lash lift pros and cons to help you get more comfortable.

Some lash lift pros are:

  • They give your lashes a natural looking curl that opens up your eyes and makes you look more awake.

  • They last for as long as your lash cycle (approximately two months).

  • They aren’t insanely expensive - Lac Beauty charges $70.

  • They can help hid hooded eyelids.

  • You can wear makeup and wash your face, use your favourite moisturizer, etc. as normal.

  • You can choose how dramatic of a curl you want! *More on this to come!

Some lash lift cons:

  • They don’t last forever.

  • It isn’t cheap. - “But, If you don’t spend your money, who will?”

  • You are putting chemicals near your eye. Another reason to make sure you go see a professional.

  • If done incorrectly, you can over process your eyelashes and damage them. Yet another reason to go to a professional for this service.

WHERE TO GO GET A LASH LIFT IN TORONTO

Well, I’m obviously going to recommend the place where I went because I loved my experience with Jenna and I’ve always had great treatments there. I actually also go to their sister hair salon Lac and Co. down the street to get my hair coloured - shout out to Kiki! She’s the best!

Lac Beauty is a conceptual lifestyle and beauty boutique spa located at 162 Davenport Rd in Yorkville, and in my opinion, one of the best spas in Toronto. In addition to lash lifts, they also offer facials, manicures and pedicures, brows, waxing, makeup services for all occasions including bridle, and spray tans. In the past I have also been to Lac Beauty for Biologique Recherche facials which I also highly recommend trying because of how they give life back to your skin and drown it in hydration to reveal a dewy ass glow!

My lash lift experience took a total of 40 minutes and included a quick consultation at the beginning so Jenna could examine my lashes and help me choose a suitable curl. I went with something natural but you can actually pick different degrees of perms depending on how dramatic of a curl you want, which I thought was pretty cool. Other than a small unpleasant smell, the procedure was quick and easy. I felt no stinging, irritation, or cause for concern during or after my procedure and left with beautifully curled lashes. As someone who does have sensitive lashes (they sometimes become super itchy depending on what mascara I use) I was relieved to see that I experienced zero irritation and would 100% go back to do it again. Maybe I’ll see you there!

I didn’t only leave Lac Beauty with a lash lift though, I also left with some funny photos and videos from my treatment which I thought were too good to hide from the world! So I quickly edited them together for you so you can see the struggle of content creation during a lash lift. OMG, I love my job but sometimes it’s a laugh and this one is on me! Enjoy!


Thank you so much for visiting the blog today and watching my lash lift review video. If you enjoyed this lash lift review feel free to let me know in the comments below. I’m also happy to answer any further questions around the topic. I’m going to be posting more videos on YouTube as well so I want to encourage you to subscribe to my 'Is That Soh YouTube channel’ if you aren’t already so you can keep up with all the great content I have planned!

Until next time,

-Soheila


PIN THIS POST

ADAM GETS AN AT-HOME COVID HAIRCUT!

So as I’m sure most people can relate, it has gotten to that point in this COVID pandemic where Adam’s hair could use a good cut. After weeks of trying to convince him to let me cut it, he finally gave in *reluctantly* and gave me the go-ahead to try my hand. What followed was pure comedy. Watch this video we made for a good laugh!

PS, if anyone is looking for tips for cutting their boyfriend’s hair, all I used was these sheers and scissors. I started with the sheers on the highest number (16mm) and worked my way down (1mm). I also made sure to pay attention to the shape of his head so that I could get the shape right. We also found a picture halfway through of what we wanted, which made it so much easier than us originally going in blind.

Haircut Inspo - Image taken from google. Please DM for photo credit.

Haircut Inspo - Image taken from google. Please DM for photo credit.

Although this video is only 2.5 minutes long the whole process took about 2 hours as I was being cautious. Further, I ended up tightening it up over the next two days with 15-minute sessions using scissors just to give it time t0 see how the hair falls, moves naturally, etc

If you have any questions or comments feel free to leave them in the comment below and I hope you get a kick out of this video!


PIN THIS POST

DIY NATURAL HAIR MASK TREATMENT

Quarantine has been a bit of an emotional roller coaster for many of us, myself included!

At first, I struggled to adapt to self-isolation and as a result, a lot of things I used to do beauty-wise, fell to the waist side. Now that time has gone by and I have had the time to properly adjust to the situation, I am trying to build a new and improved routine, one that involves a few extra self-love beauty practices like doing a DIY hair mask at home using natural ingredients.

Hair mask are great for a variety of reasons. For 1) they promote scalp health and can help balance the PH levels of your scalp making it either less oily or less flaky, 2) it can help strengthen the hair and reduce breakage, 3) it can add moisture back into your hair so that it feels softer and is shiny, and 4) it can actually help stimulate growth and thickness.

For me personally, I wanted to have something that added moisture back into my scalp and strengthen my hair so I used coconut oil, honey, banana, and egg in mine.

During the research and development phase of this blog post though what I quickly figured out about hair masks was that when it comes to ingredients any combination from the below list goes, it just depends on what kind of results you are after!

So next, I encourage you to take a look at the list of ingredients below and review their benefits before creating a hair mask that fits your personal hair needs.

HAPPY MASKING!


- STRENGTHENING PROTEIN -
Used to protect and strengthen hair, reduce breakage, make hair shiny, and cleanse the scalp.

  • Honey

  • Egg

- HYDRATION -
Used to add moisture back into the scalp and hair for less breakage, frizz, and more healthy feeling/ looking hair.

  • Coconut Oil

  • Avocado or Avocado Oil

  • Banana

  • Olive Oil

  • Yogurt

  • Mayonaise

- PROMOTE SCALP HEALTH -
Used to balance scalp PH levels, exfoliate your scalp and get rid of dandruff.

  • Apple Cider Vinegar - good for oily hair

  • Peppermint Oil - stimulates follicles

  • Cinnamon - exfoliates

  • baking soda - exfoliates

  • Lemon Juice - clarifies

  • Sugar - exfoliates

  • Baking Soda - clarifies and exfoliates


- HAIR GROWTH -
Used to nourish follicles for better/fast hair growth.

  • Castor Oil

To see a demonstration of me doing a DIY hair mask at home, check out the video below. Also, don’t forget to follow me on Instagram!

View this post on Instagram

At first, I struggled to adapt to self-isolation and as a result, a lot of things I used to do beauty-wise, fell to the waist side. Now that time has gone by and I have had the time to properly adjust to the situation, I am trying to build a new and improved routine, one that involves a few extra self-love beauty practices like doing a DIY hair mask at home using natural ingredients. Hair mask are great for a variety of reasons. For 1) they promote scalp health and can help balance the PH levels of your scalp making it either less oily or less flaky, 2) it can help strengthen the hair and reduce breakage, 3) it can add moisture back into your hair so that it feels softer and is shiny, and 4) it can actually help stimulate growth and thickness. For me personally, I wanted to have something that added moisture back into my scalp and strengthen my hair so I used coconut oil, honey, banana, and egg in mine. During the research and development phase of this video, I quickly figured out that when it comes to hair masks ingredients, any combination from a list of natural household incredients go, it just depends on what kind of results you are after! So next, I encourage you to take a look at the list of ingredients that I have posted on my blog and review their benefits before creating a hair mask that fits your personal hair needs. HAPPY MASKING! ::::: 📍 @seetorontonow. 📸 @apple Iphone XS Max #isthatsoh . . . . . #canadiangirl #prettylittleiiinspo #hairgrowth #hairtreatment #diyhairtreatment #healthyhair #scalphealth #torontoblogger #inspiremyinstagram #blondehair #softhair #hydration #toronto #torontohair #diyhair #hairsalon #torontolife #hairinspo #beautytutorial #torontoigers #hairtransformation #torontoliving #torontogirl #hairtutorial #selfcare #selfisolation

A post shared by SOHEILA HAKIMI | LIFE + TRAVEL (@isthatsoh) on


If you have any questions or comments about this blog post feel free to leave them in the comment section below.

EASY AT HOME GLOSS TREATMENT TO REVIVE BLONDE HAIR

Not sure about you but I have gotten to the point in self-isolation where my hair could use a little more love. It's been looking a little brassy lately and has been feeling dry so I decided to order an at-home gloss treatment kit from Lac and Co, and boy am I happy with the results.

The gloss treatment is perfect for anyone looking to revive their color and add some shine back into their hair. It also comes with a Virtue Labs Restorative Treatment Hair Mask so you can also take advantage of some extra hydration after you finish the treatment.

Not only does my hair smell amazing, but my colour is looking beautiful once more! On top of that, it also feels super soft, hydrated, and looking very shiny.

If you are looking for something to do at home that will give your locks a boost I definitely recommend checking this treatment out!

View this post on Instagram

A post shared by SOHEILA HAKIMI | LIFE + TRAVEL (@isthatsoh) on